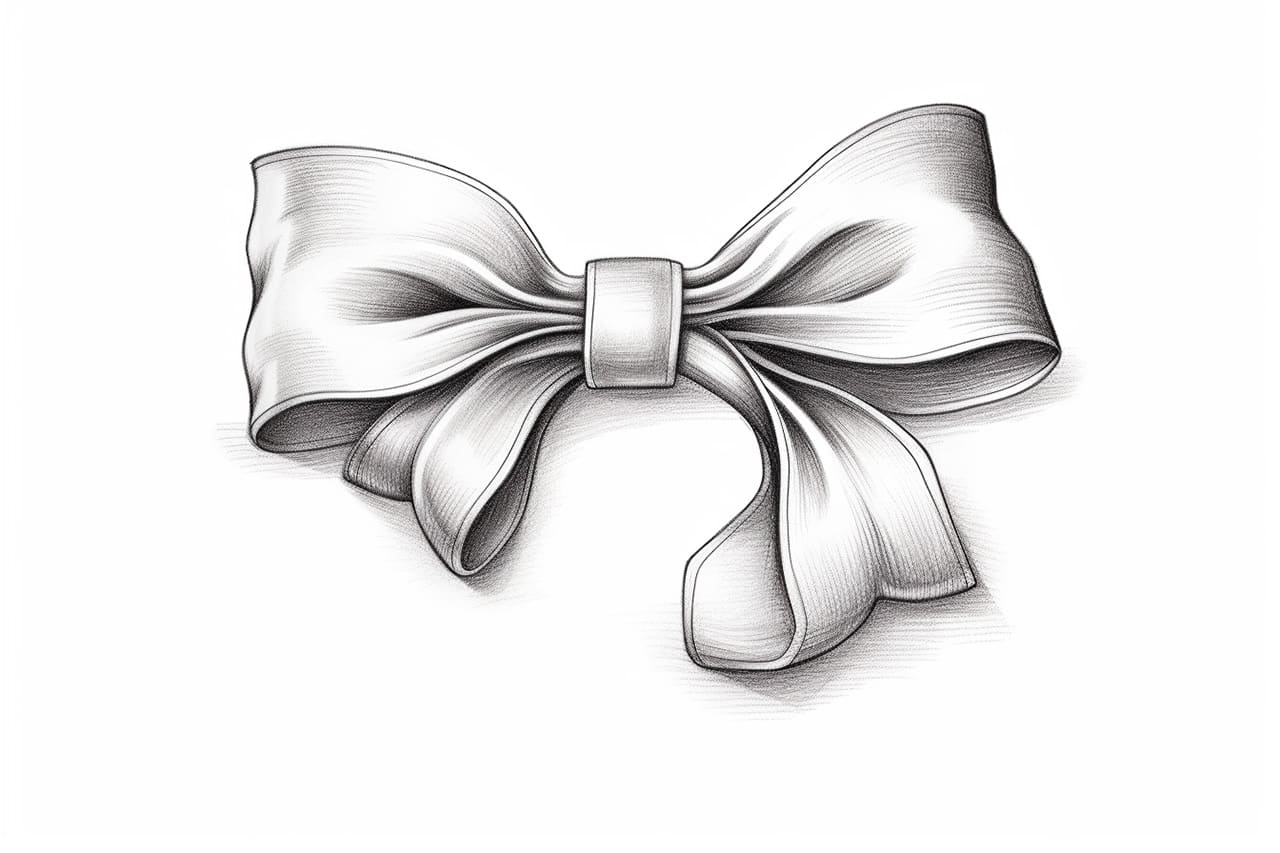
Ribbons are beautiful decorative elements that can add elegance and charm to any artwork or design. Whether you want to incorporate a ribbon into a greeting card, a logo, or a piece of artwork, learning how to draw one can come in handy. In this tutorial, I will guide you step-by-step on how to draw a ribbon.
Materials Required
Before we begin, gather the following materials:
- A pencil
- A piece of paper
- An eraser
- Colored pencils or markers (optional)
Now that you have all the necessary materials, let’s dive into the steps of drawing a ribbon.
Step 1: Sketch the Ribbon’s Outline
Start by lightly sketching the outline of the ribbon using your pencil. Determine the shape and size you want your ribbon to be. Ribbons can be simple and straight or more intricate with loops and folds.
Step 2: Draw the Ribbon’s Tail
Next, draw the ribbon’s tail by extending two curved lines from one end of the ribbon’s outline. The tail can be short or long, depending on your preference. Ensure the lines flow smoothly and follow the direction of the ribbon.
Step 3: Create the First Loop
Now, draw the first loop of the ribbon. This loop will add dimension and movement to the design. Start by drawing a curved line that overlaps the ribbon’s outline near the center. Then, connect the ends of the curved line to the ribbon’s outline with two short straight lines.
Step 4: Repeat the Loop
Continue by creating additional loops. The number of loops depends on the size and style of ribbon you desire. To draw the next loop, create another curved line that overlaps the ribbon’s outline and connects to the previous loop. Repeat this process until you’ve achieved the desired number of loops.
Step 5: Add Folds and Curves
To make the ribbon look more realistic, add folds and curves along its length. These folds can be created by drawing short curved lines that bend away from the center of the ribbon. Vary the lengths and shapes of the folds to add depth and interest to your drawing.
Step 6: Clean up the Sketch
Use an eraser to carefully remove any unnecessary guidelines and lines from your sketch. Clean up the outline of the ribbon to make it more defined and polished.
Step 7: Add Details
To make your ribbon drawing even more visually appealing, you can add some details. For example, you can draw the edges of the ribbon slightly wavy or serrated to give it a decorative look. You can also add patterns or designs to the ribbon using colored pencils or markers if you’d like.
Step 8: Shade and Color (Optional)
If you want to take your ribbon drawing to the next level, add shading and color. Determine the light source in your drawing and shade the ribbon accordingly. Use a darker pencil or marker to add shadows and depth to the folds and curves. Then, carefully color the ribbon using your preferred colors. Experiment with different shades and color combinations to achieve the desired effect.
Conclusion
Drawing a ribbon may seem daunting at first, but by following these step-by-step instructions, you can easily create a beautiful ribbon design. Remember to start with a light sketch, add loops and folds to create dimension, and clean up your drawing before adding details. With practice and patience, you’ll be able to create stunning ribbons to enhance any artwork or design.