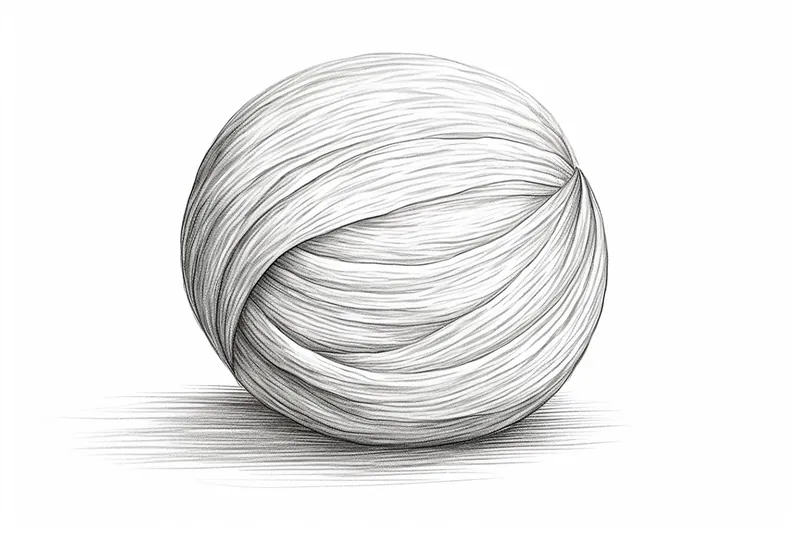
How to Draw a Yarn Ball
Learn how to draw a yarn ball step by step in this easy-to-follow tutorial. Discover the techniques to create a realistic representation of this everyday object.
Materials You'll Need
- Pencil
- Paper
- Eraser
Yarn balls are not only a staple in the world of knitting and crafts, but they also make for charming and visually interesting drawing subjects. Their round shape, interwoven strands, and soft texture offer plenty of opportunities to practice observing and rendering detail, making them a favorite for both beginner and experienced artists. Learning how to draw a yarn ball helps you hone your ability to capture complex patterns and subtle shading, all while working with a familiar and accessible object. Plus, yarn balls can evoke a sense of coziness and creativity, making them a delightful addition to sketchbooks, greeting cards, or larger illustrations.
People are often drawn to sketching yarn balls because they present a manageable challenge: simple in overall form, yet intricate in surface detail. This subject is great for practicing your observation skills, understanding how light wraps around textured objects, and exploring layering techniques to convey depth and realism. Whether you're a beginner looking to build confidence or an intermediate artist eager to experiment with crosshatching and shading, learning how to draw a yarn ball is a rewarding exercise. Throughout this step-by-step tutorial, you'll discover helpful tips for constructing the basic shape, mapping out the winding strands, and adding shadows for a lifelike effect.
Don't worry if you're new to drawing or if this is your first time attempting textured objects—this tutorial is designed for all skill levels and will guide you through each stage with clear instructions. Remember, every artist improves with practice, and each yarn ball you draw will help you develop your skills further. Grab your drawing materials and let's explore the creative process together—by the end, you'll be amazed at how easily you can capture the cozy charm of a yarn ball on paper!
Materials Required
To draw a yarn ball, you will need the following materials:
Now that you have all your materials ready, let's dive into the step-by-step instructions!
Step 1: Outline the Basic Shape
Start by lightly sketching a rough circle or oval shape on your drawing paper. This will serve as the base for your yarn ball. Remember, it doesn't have to be perfect at this stage, so focus on getting the proportions right.
Step 2: Divide the Shape into Sections
Next, divide the base shape into several sections to create the illusion of yarn strands. These sections can be irregular and vary in size and shape. You can draw curved or straight lines to separate the areas, but make sure they intersect at different angles to add depth and dimension.
Step 3: Add Depth with Shadows
To give your yarn ball a three-dimensional appearance, add some shading to the sections. Start by identifying a light source in your drawing, which will determine the direction of the shadows. Use your pencil to lightly shade one side of each section, gradually darkening it as you move away from the light source. This will create the illusion of the yarn strands overlapping each other.
Step 4: Refine the Shape
Once you are satisfied with the overall shape and shading, it's time to refine the details. Using your pencil, go over the outline of the yarn ball, making it smoother and more defined. Pay attention to the curves of the sections and make sure they flow naturally. Don't press too hard on the pencil to avoid smudging the drawing.
Step 5: Add Texture and Detail
To make your yarn ball look more realistic, add some texture and detail to the individual strands. Start by drawing small, curved lines within each section to represent the fibers of the yarn. Vary the length, direction, and thickness of these lines to create a sense of randomness. Take your time with this step, as it can greatly enhance the overall look of your drawing.
Step 6: Darken the Shadows
To further enhance the three-dimensional effect, darken the shadows in your drawing. Using a soft pencil or shading tool, carefully darken the shaded areas in each section of the yarn ball. This will add depth and make the lighter areas appear more prominent.
Step 7: Clean Up Your Drawing
At this point, take a step back and assess your drawing. Use your eraser to remove any unwanted lines or smudges. Pay attention to the edges of the yarn ball and make sure they are clean and well-defined. If you prefer, you can also go over your drawing with a fine-tipped pen or marker to make the lines more bold and defined.
Step 8: Add Highlights
To make your yarn ball appear more realistic and shiny, add some highlights. Identify the areas that would catch the most light, such as the tops of the strands or the curves of the sections. Using a white pencil or a fine-tipped pen, carefully draw small dots or lines to represent these highlights. Be subtle with your highlights to avoid making them look too artificial.
Step 9: Final Touches
Lastly, take a moment to evaluate your drawing as a whole. Make any necessary adjustments or refinements to ensure that all the elements are cohesive and well-balanced. Pay attention to the overall composition and the relationship between the different sections of the yarn ball. Once you are satisfied, your yarn ball drawing is complete!
Tip: To effectively capture the intricate details of a yarn ball, start by lightly sketching the basic round shape with a pencil and then use a series of curved lines to indicate the winding strands of yarn. Pay close attention to how these strands overlap, as this will help you understand the depth and texture of the ball. When you begin shading, use a blending stump or your finger to create soft transitions, mimicking the natural softness of the yarn. Experiment with varied pencil pressures to achieve different tonal values, and don't hesitate to layer your shading for added richness. Finally, remember to observe a real yarn ball if you can; this will provide you with a reference for the nuances of light and shadow that you want to replicate in your drawing!
Conclusion
Drawing a yarn ball can be a delightful exercise that allows you to explore shape, texture, and shading. By following these step-by-step instructions, you can create a realistic representation of a yarn ball or use it as a starting point to develop your own unique style. So grab your materials and let your creativity unfold as you bring this simple yet beautiful object to life on paper.
Fun Facts About Yarn Ball
- The World's Largest Ball of Sisal Twine is located in Cawker City, Kansas and weighs over 27,000 pounds.
- Yarn balls are often used by cats for play, a behavior rooted in their natural hunting instincts.
- Winding yarn into a ball helps prevent tangling and makes knitting or crocheting easier, as explained by Lion Brand Yarn.
- Yarn balls can be made by hand or with a tool called a yarn winder.
- Some artists use yarn balls as inspiration for still life paintings and drawings.
- Yarn balls are a symbol of coziness and creativity in many cultures.
- There are different types of yarn balls, including center-pull balls and traditional round balls.
- Yarn and knitting are often featured in pop culture.
- Some knitters prefer to use a nostepinne, a traditional Scandinavian tool, to wind yarn balls by hand.
Suggestions for Scenes and Settings for Yarn Ball Drawings
- A playful kitten tangled in a colorful ball of yarn, with strands trailing across the floor.
- An overflowing basket filled with different-sized yarn balls in a cozy knitting corner, complete with needles and a half-finished sweater or scarf.
- A close-up of a single yarn ball resting on an open sketchbook, surrounded by scattered pencils and erasers.
- A whimsical scene where yarn balls are floating like balloons, each tied with a string in a child's hand.
- An outdoor picnic setting with a yarn ball as part of a crafting project under a shady tree.
- A stack of yarn balls forming a snowman shape, decorated with buttons and a tiny hat.
- A curious puppy peeking over a table at a rolling yarn ball that's about to fall off the edge.
- A magical still life featuring glowing yarn balls illuminating a dark room, casting interesting shadows.
- An arrangement of yarn balls spelling out a word or message, with each letter made from different colors and textures.
- A vintage shop window display with yarn balls piled high among antique sewing notions and lace fabrics.