Creating a treasure map is not just a fun activity but also an opportunity to explore your creative side. Whether you are planning a scavenger hunt for a party or simply indulging in some artistic expression, drawing a treasure map can be a rewarding experience. In this article, I will guide you through the process step-by-step, providing clear instructions along the way. So grab your pens and parchment, and let’s get started on crafting your very own treasure map!
Materials Required:
Before we dive into the drawing process, let’s make sure you have all the necessary materials at hand. Here’s what you’ll need:
- A sheet of paper or parchment
- Pencils or pens in various colors
- A ruler
- An eraser
- Optional: markers or colored pencils for added vibrancy
Now that we are equipped, let’s embark on our artistic adventure!
Step 1: Plan the Layout
To begin, think about the overall shape and composition of your treasure map. Consider the size of the paper you are working with and the level of detail you want to include. Will it be a simple map guiding the way to a hidden treasure, or will it feature intricate landmarks and winding paths? Sketch out a rough draft to get an idea of the layout before committing to the final drawing.
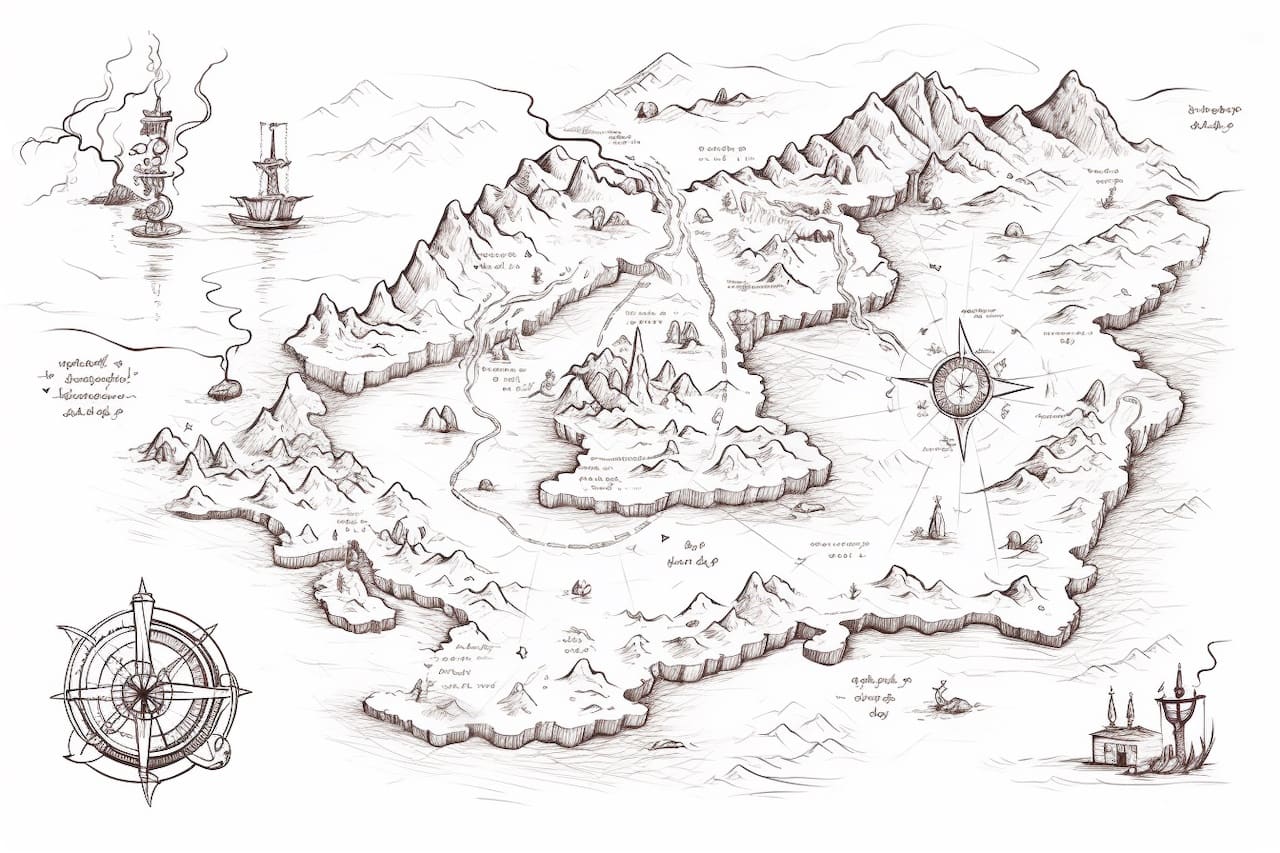
Step 2: Start with the Landmass
Using a pencil, lightly draw the outline of the landmass on your paper. This will serve as the foundation for your treasure map. Consider the shape of the land, whether it’s an island, a peninsula, or a combination of various terrains. Don’t worry about being too precise at this stage; we can refine the details later.
Step 3: Add Landmarks and Features
Now that you have the landmass in place, it’s time to add some interesting features to your treasure map. Draw mountains, forests, rivers, and any other natural or man-made landmarks that you envision on your map. Remember, this is your imagination at work, so feel free to get creative!
Step 4: Sketch the Paths
Next, sketch the pathways that will lead adventurers to the hidden treasure. Consider the twists, turns, and forks in the road. You can make them straight and direct, or add some swerves and loops to make the journey more exciting. Connect the landmarks and features you drew in the previous step using these pathways.
Step 5: Add Compass Rose and Scale
To give your treasure map some authenticity, include a compass rose and a scale. The compass rose indicates the orientation of the map (north, south, east, west), while the scale helps establish the distance between different locations on the map. Position these elements in a suitable location, ensuring they don’t interfere with the map’s readability.
Step 6: Outline the Map
Now that the basic structure of your treasure map is complete, it’s time to refine the lines and details. Go over the pencil sketches with a pen or a darker pencil, outlining the landmass, landmarks, paths, and compass rose. This will make them more prominent and visually appealing. Take your time and be patient as you go through this step.
Step 7: Add Decorative Elements
To make your treasure map more visually appealing, consider adding decorative elements such as flourishes, drawings of sea creatures, or even a pirate ship sailing in the distance. These details will add character and whimsy to your map. Be mindful not to overcrowd the map with too many decorations; balance is key.
Step 8: Color Your Treasure Map
Now comes the fun part – coloring! Using various pens, pencils, markers, or colored pencils, add color to your treasure map. Color the landmass, landmarks, and pathways using suitable shades. You can also add texture and depth by cross-hatching or blending colors. Don’t be afraid to experiment and bring your map to life with vibrant hues!
Conclusion:
Congratulations! You’ve successfully created your very own treasure map. Following these step-by-step instructions, you’ve learned how to plan the layout, sketch the landmass, add landmarks and paths, incorporate a compass rose and scale, outline the map, and add decorative elements. Remember, the joy of creating a treasure map doesn’t end here. You can continue to refine and personalize your map, making it a unique piece of art.
So gather your fellow adventurers, share your treasure map, and let the exciting journey begin! Happy drawing!