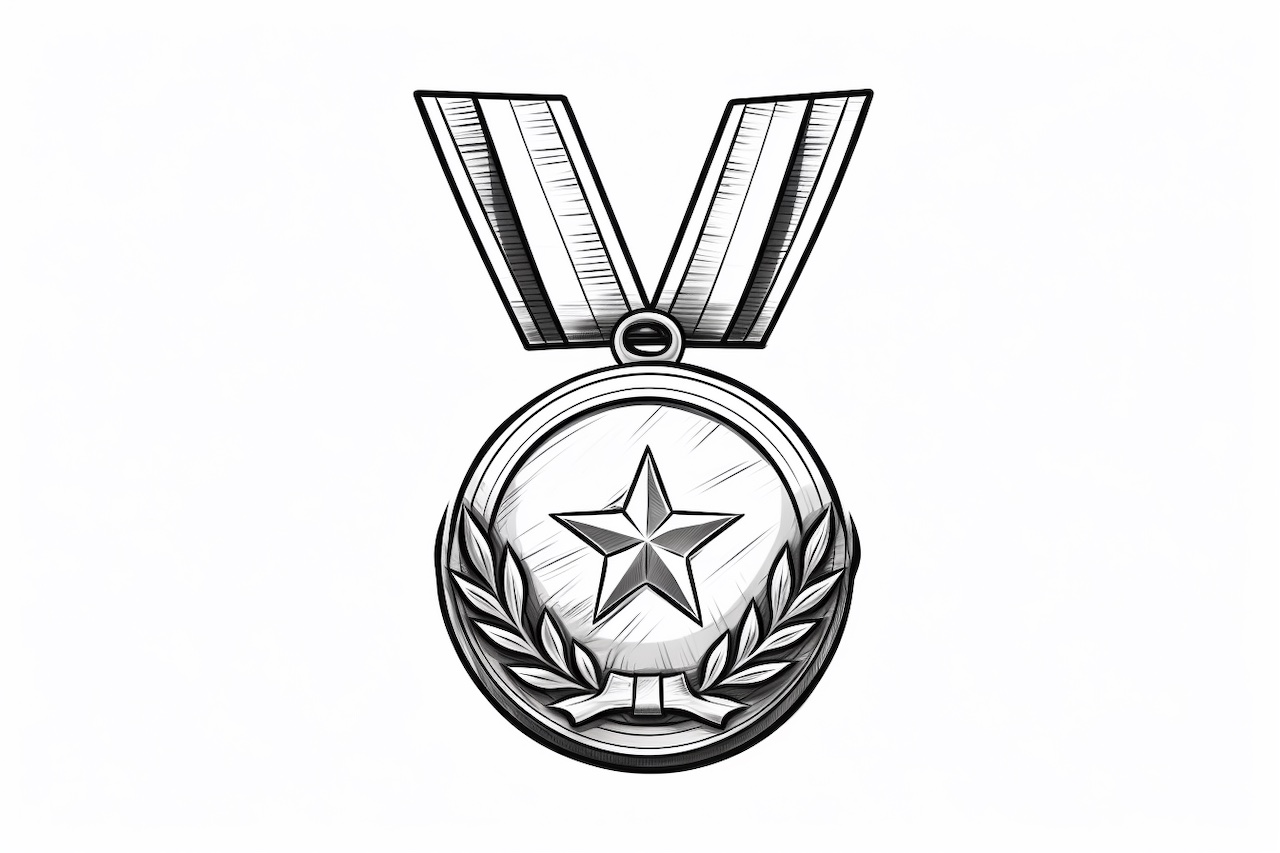
Drawing a medal may seem like a daunting task, but with the right guidance, anyone can create a beautiful and realistic depiction. In this step-by-step guide, we will walk you through the process of how to draw a medal, from the basic shape to intricate details. So grab your drawing materials and let’s get started!
Materials Required:
- Pencil
- Eraser
- Drawing paper
- Ruler
- Compass
- Protractor
- Colored pencils or markers (optional)
Now that we have our materials ready, let’s dive into the step-by-step instructions for drawing a medal.
Step 1: Sketch the Outer Shape
Start by drawing a circle in the center of your paper. This circle will serve as the base shape of your medal. Use a compass to ensure a perfect round shape, or if you don’t have a compass, you can trace around a circular object such as a coin or bottle cap.
Step 2: Add the Ribbon
Now, let’s add a ribbon to our medal. Draw two curved lines extending from the bottom of the circle, forming an upside-down “U” shape. Make sure the ends of the ribbon overlap slightly at the bottom center of the circle. This will give the illusion that the ribbon is wrapped around the medal.
Step 3: Create the Ribbon Ends
At the bottom center of the circle, draw two small triangles. These triangles will serve as the ends of the ribbon. To make them more realistic, you can round off the tips of the triangles slightly.
Step 4: Outline the Medal
Next, we will outline the main shape of the medal. Use a ruler to draw a straight line from the top left edge of the circle to the top right edge, passing through the ribbon. Then, draw another line from the top right edge to the bottom right point of the ribbon end. Continue the line along the bottom edge of the ribbon, and finally, draw a line from the bottom left point of the ribbon end to the top left edge of the circle.
Step 5: Add a Border
To make our medal stand out, let’s add a border around the main shape. Use a ruler to draw a line parallel to the outline of the medal, about 0.1 inches away. Make sure the border is evenly spaced from the edges all around.
Step 6: Design the Front of the Medal
Now it’s time to add some details to the front of the medal. This is where you can get creative and personalize your design. You can draw a symbol, an emblem, or even a portrait. Take your time to sketch your desired design lightly with a pencil until you are satisfied with the outcome.
Step 7: Add Intricate Details
To make your medal look more realistic, add some intricate details to your design. This can include patterns, textures, or small engravings. Use a fine-tip pencil or pen to carefully draw these details. Take your time and pay attention to the small intricacies that will make your medal truly stand out.
Step 8: Shade and Color
Now that our drawing is complete, let’s add some shading and color to make the medal come to life. Use a pencil or colored pencils to shade the different areas of your design, creating depth and dimension. Pay attention to light sources and add shading accordingly to create a realistic effect. If desired, you can also use markers or colored pencils to add vibrant colors to your medal.
Conclusion
Congratulations! You have successfully learned how to draw a medal. By following these step-by-step instructions and using your creativity, you can create stunning medal illustrations. Whether you’re drawing for fun or for a particular purpose, this skill will surely come in handy. So don’t hesitate to grab your drawing materials and start creating magnificent medals today!