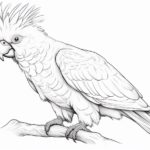
Welcome to this step-by-step guide on how to draw a cockatiel. Whether you are a seasoned artist or just starting out, this tutorial is designed to help you create a detailed and realistic drawing of this beautiful bird. By following these simple instructions, you will be able to capture the unique features and personality of a cockatiel in your artwork. So, let’s get started!
Materials Required
Before we begin, gather the following materials:
- Pencil
- Eraser
- Drawing paper or sketchbook
- Fine-tip black marker or pen
- Colored pencils or markers (optional)
Now that you have everything you need, let’s dive into the process of drawing a cockatiel.
Step 1: Basic Shapes
Start by drawing the basic shapes that form the body of the cockatiel. Begin with an oval shape for the head, followed by a larger oval for the body. Add a small circle for the eye and a curved line for the beak. Position these shapes according to the desired posture of your cockatiel.
Step 2: Outline the Body
Using the basic shapes as a guide, start outlining the body of the cockatiel. Begin with the head, following the contour of the oval shape and adding details such as the crest on top. Move on to the body, carefully drawing the contours and curves.
Step 3: Add Tail Feathers
Cockatiels have long and elegant tail feathers. Sketch the tail feathers using long and thin lines that fan out from the body. Pay attention to the length and proportion of the feathers, as this will greatly contribute to the overall appearance of the cockatiel.
Step 4: Define the Beak
Next, focus on the beak of the cockatiel. Refine the shape by adding more details, such as the upper and lower portions and the nostril. Pay attention to the angle of the beak and the way it connects to the head.
Step 5: Draw the Eye
The eyes of a cockatiel are expressive and lively. Add detail to the eye by drawing the iris and pupil, as well as the surrounding area. Remember to leave a small highlight to make the eye look more realistic.
Step 6: Sketch the Wings
Cockatiels have distinct wing patterns, and capturing these details will bring your drawing to life. Start by sketching the general shape of the wings, and then add feathery texture by drawing small curved lines to represent the individual feathers.
Step 7: Refine the Details
Go over your drawing and refine the details of the cockatiel. Pay attention to the texture of the feathers, adding more depth and definition. Take your time to capture the unique patterns and markings that make the cockatiel so recognizable.
Step 8: Add Shadows and Highlights
To give your drawing a three-dimensional look, add shadows and highlights. Observe the light source and imagine where the shadows would fall on the cockatiel’s body. Use hatching or cross-hatching techniques to create depth, and add highlights to make certain areas stand out.
Step 9: Ink the Drawing (optional)
If you prefer a more defined and bold look, you can ink your drawing using a fine-tip black marker or pen. Wait for the ink to dry before erasing any pencil marks underneath.
Step 10: Color (optional)
If you wish to add color to your drawing, now is the time to do so. Cockatiels come in a variety of vibrant hues, so choose your colors accordingly. Use colored pencils or markers to carefully fill in the feathers, blending shades as necessary to achieve a realistic result.
Conclusion
Congratulations! You have successfully learned how to draw a cockatiel. By following these step-by-step instructions, you have created a detailed and lifelike representation of this charming bird. Remember to practice regularly and experiment with different techniques to further enhance your artistic skills. Happy drawing!