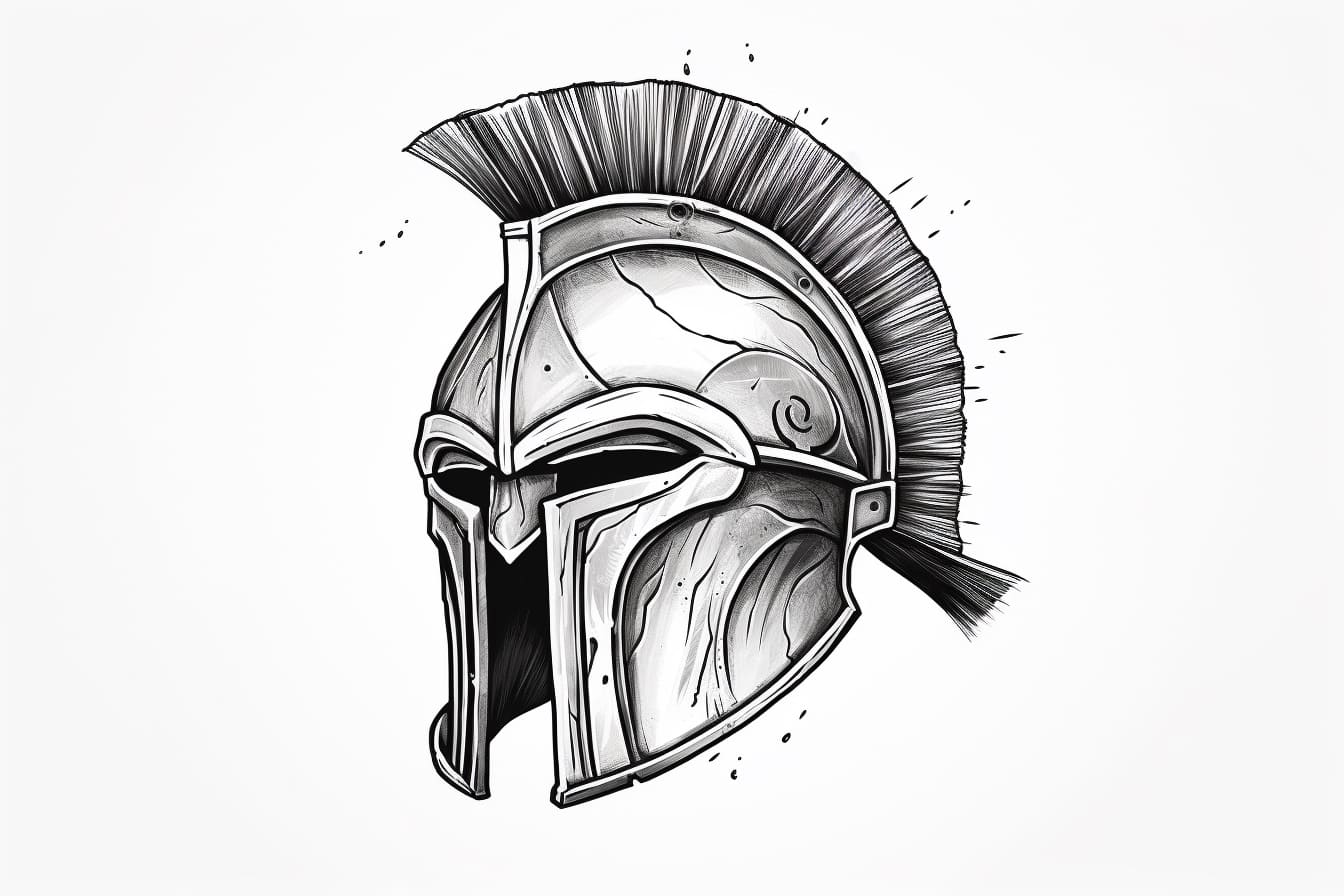
Welcome to this step-by-step guide on how to draw a Spartan helmet. Whether you’re an aspiring artist or just looking for a fun drawing project, this tutorial will take you through the process of creating a detailed and impressive Spartan helmet drawing. With clear instructions and easy-to-follow steps, you’ll soon have a stunning piece of artwork that showcases your artistic skills. So, let’s get started!
Materials Required
Before we dive into the drawing process, let’s make sure you have all the necessary materials at hand. Here’s a list of what you’ll need:
- Drawing paper or sketchbook
- Pencils (HB, 2B, 4B, and 6B)
- Eraser
- Ruler
- Compass
- Fine-tipped black marker or pen
Once you have these materials ready, we can begin with the first step.
Step 1: Sketching the Basic Shape
Start by sketching the basic shape of the Spartan helmet. Draw a horizontal line across the middle of your paper to serve as a guide. Then, using your ruler, draw a vertical line that intersects the horizontal line slightly to the left of the center. This will form the central axis of the helmet.
Step 2: Adding the Hull
Now, let’s add the main hull of the helmet. Using the axis as a reference, draw a curved line starting from the top left side of the central axis, curving around the top of the helmet, and ending at the top right side of the axis. Make sure the curve is smooth and symmetrical. This will be the upper part of the helmet.
Next, draw another curved line starting from the bottom left side of the axis, mirroring the upper curve but slightly wider, and ending at the bottom right side of the axis. This will be the lower part of the helmet. Connect the upper and lower parts with two vertical lines on each side, creating the sides of the helmet.
Step 3: Adding the Cheek Guards
To give the helmet its characteristic look, we’ll add the cheek guards next. Starting from the top left corner of the lower part of the helmet, draw a diagonal line that slopes downward and to the right. Stop the line near the bottom right corner of the helmet.
Repeat the same step on the opposite side, starting from the top right corner of the lower part of the helmet and drawing a diagonal line that slopes downward and to the left. The two lines should meet near the bottom left corner of the helmet, forming a V shape. This creates the cheek guards.
Step 4: Sketching the Top Crest
Now, let’s draw the top crest of the Spartan helmet. Starting from the top center of the upper part of the helmet, draw a slightly curved line that slopes upward to the left. Continue the curve until it reaches the left side of the helmet, creating a decorative crest.
Repeat the same step on the opposite side, starting from the top center of the upper part of the helmet and drawing a slightly curved line that slopes upward to the right. Again, continue the curve until it reaches the right side of the helmet.
Step 5: Adding Details
With the basic shape of the Spartan helmet in place, let’s move on to adding some intricate details. Start by sketching a vertical line down the central axis of the helmet, extending from the top to the bottom. This line will help guide the placement of the helmet’s features.
At the top of the helmet, draw a small circle on each side of the crests we drew earlier. These circles represent the top of the helmet’s plume holders. Then, draw a series of horizontal lines across the lower part of the helmet, just above the cheek guards. These lines represent the metal plates of the helmet.
Step 6: Refining the Shape
Now that we have the basic structure and details in place, it’s time to refine the shape of the helmet. Using darker pencils like 4B or 6B, go over the outline of the helmet to make it bolder and more defined. Add shading to the various parts of the helmet, indicating depth and dimension.
To create a sense of texture, use short, overlapping strokes to shade certain areas, such as the cheek guards and the lower part of the helmet. Pay attention to light and shadow, adding darker shading to areas that would be more recessed and lighter shading to areas that would catch more light.
Step 7: Finalizing the Drawing
To complete your Spartan helmet drawing, trace over the refined lines with a fine-tipped black marker or pen. Erase any remaining pencil marks, and your drawing is ready to be showcased!
Remember, drawing takes practice, so don’t be discouraged if your first attempt doesn’t turn out exactly as you envisioned. Keep trying and experimenting with different techniques to improve your skills.
Conclusion
Congratulations on completing your Spartan helmet drawing! By following these step-by-step instructions, you’ve learned how to capture the essence of a Spartan helmet on paper. Remember to have fun and let your creativity shine through as you explore the world of art. Whether you’re a beginner or an experienced artist, this guide has provided you with the tools and techniques to create an impressive Spartan helmet drawing.
So grab your materials and start sketching your own Spartan helmet today! Happy drawing!