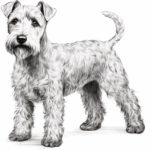
Welcome to this step-by-step guide on how to draw a Scottish Terrier. Scottish Terriers, also known as Scotties, are beloved for their distinctive appearance and playful personalities. By following the instructions in this article, you’ll be able to capture the essence of these adorable dogs on paper. So, let’s grab our drawing materials and get started!
Materials Required
To draw a Scottish Terrier, you’ll need the following materials:
- Pencil: A good quality graphite pencil with a range of hardness, such as 2B, 4B, and 6B.
- Paper: Choose a smooth-surfaced paper that can handle graphite shading techniques. Sketch paper or drawing paper will work well.
- Eraser: A kneaded eraser or a soft plastic eraser is ideal for correcting mistakes and refining details.
- Blending stump or tortillon: This tool is useful for blending graphite and creating smooth shading.
Now that we have our materials ready, let’s move on to the step-by-step instructions.
Step 1: Basic Shape
Begin by lightly sketching a circular shape that will serve as the head of the Scottish Terrier. This shape should be slightly elongated horizontally to represent the dog’s muzzle. Place this shape towards the upper part of your paper, leaving enough space for the body and legs.
Step 2: Eyes and Nose
Within the head shape, draw two small circles for the eyes. Leave a highlight in the top-left corner of each eye to add a touch of realism. Place the eyes towards the center of the head shape, slightly below the horizontal midpoint.
Between the eyes, draw a small triangle shape for the nose. Add two small dots at the bottom of the triangle to indicate the nostrils.
Step 3: Ears
Scottish Terriers have small, triangular-shaped ears that point upward. Draw two triangles on either side of the head shape, with their bases attached to the upper part of the head. Make sure the inner corners of the ears are slightly rounded.
Step 4: Mouth and Beard
Beneath the nose, draw a slightly curved line to represent the mouth. Add a small, curved line at each end of the mouth to create a smile-like appearance. Extend these lines slightly outwards to create the lower part of the muzzle.
To depict the characteristic Scottie beard, draw a series of short, curved lines that flow downwards from the bottom of the mouth. These lines should form a V-shaped pattern.
Step 5: Neck and Body
Draw a curved line that connects the head to the body. This line represents the neck. From the end of this line, draw another curved line that curves outward slightly to create the back. At the bottom of the back line, draw a horizontal line to represent the belly.
Step 6: Legs and Feet
Starting from the bottom of the belly line, sketch four straight lines for the legs. These lines should be properly spaced to maintain a balanced posture. Then, add small oval shapes at the bottom of each leg for the paws. The front legs should be slightly shorter than the hind legs.
Step 7: Tail
At the back of the body, draw a curved line that represents the tail. The tail should curve upwards and then loop back towards the body, ending slightly above the back.
Step 8: Fur Texture and Details
Now that we have the basic structure, it’s time to add some details and give our drawing a realistic touch. Start by refining the shape of the head and body, paying attention to the curves and proportions.
Add short, curved lines throughout the body to represent the Scottie’s wiry fur. Focus on the head, neck, and body, as these areas exhibit the most prominent fur texture.
Step 9: Shading and Contrast
To create depth and three-dimensionality, we’ll use shading techniques. Observe the reference image or visualize the light source, and shade the areas that would naturally be darker, such as the underside of the body and head, and the spaces between the legs.
Use your blending stump or tortillon to blend the shading, creating a smooth transition between light and dark areas.
Step 10: Final Touches
Evaluate your drawing and make any necessary adjustments. Erase any stray lines or smudges, and refine details like the eyes, nose, and mouth. Add highlights to the eyes with a fine-tipped eraser, making them appear shiny and lifelike.
Congratulations! You have successfully drawn a Scottish Terrier. Remember, the key to improving your skills is practice. Don’t be discouraged if your first attempt doesn’t turn out perfectly. With time and practice, you’ll continue to refine your technique and create stunning works of art.
Conclusion
In this article, we have explored the step-by-step process of drawing a Scottish Terrier. By following these instructions and incorporating your personal touch, you can create a beautiful representation of this adorable breed. Remember to have fun and enjoy the process of capturing the unique characteristics of the Scottish Terrier on paper.
We hope this guide has been helpful and inspiring. Happy drawing!