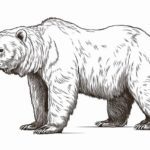
Welcome to this step-by-step guide on how to draw a polar bear! Whether you’re an experienced artist or just starting out, this tutorial will walk you through the process of creating a realistic and captivating depiction of this magnificent creature. With a few simple materials and some patience, you’ll be able to create your very own polar bear drawing in no time. So, let’s get started!
Materials Required
Before we begin, make sure you have the following materials handy:
- Pencils: It’s best to use a range of pencils, such as HB, 2B, and 4B, to achieve different levels of darkness in your drawing.
- Eraser: A good quality eraser is essential for correcting and refining your work as you go along.
- Paper: Use a smooth, heavyweight paper suitable for drawing. A4 or A3 size will work well.
- Blending stump or cotton swabs: These can be used to blend and smudge graphite for a smoother transition of tones.
Now that we have the materials ready, let’s dive into the step-by-step process of drawing a polar bear!
Step 1: Sketch the Basic Shapes
Start by lightly sketching the basic shapes that make up the polar bear’s body. Begin with an oval shape for the head, followed by a large oval for the body. Add smaller ovals for the limbs and a long oval for the muzzle. Don’t worry about details just yet – this step is all about establishing proportions and positioning.
Step 2: Refine the Outline
Using the basic shapes as a guide, begin refining the outline of the polar bear. Use lighter lines to connect the shapes, ensuring smooth and flowing curves for a more natural look. Pay close attention to the curves of the body, legs, and head. Take your time during this step to get the proportions right.
Step 3: Add Facial Features
Now it’s time to add some character to our polar bear by focusing on the facial features. Sketch the eyes using two small circles, placing them evenly on the head. Add a slightly curved line for the nose and a small circle for the nostril. Complete the face with a gentle curve for the mouth. Take care to position the features correctly as they play a crucial role in capturing the essence of the polar bear.
Step 4: Define the Fur
One of the defining characteristics of a polar bear is its thick fur. Begin by lightly shading the entire body using your HB pencil. Use short, light strokes in the direction of the fur to create a base layer. Gradually build up the shading, using darker pencils like 2B and 4B to add more depth. Remember to leave the fur around the white areas lighter, as this will give the bear a more realistic appearance.
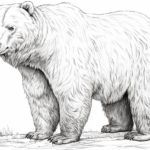
Step 5: Refine the Details
Now that the overall shape and shading are in place, it’s time to focus on the details. Use a sharper pencil, like 2B, to define the facial features and add texture to the fur. Pay attention to the contours of the face, the shading around the eyes, and the subtle lines that give the impression of individual hair strands. Take your time during this step, as it will greatly contribute to the realism of your drawing.
Step 6: Create Highlights and Shadows
To make your polar bear drawing really pop, it’s important to add highlights and shadows. Use an eraser to carefully lift off some graphite and create bright spots where the light hits the fur. This will give your drawing dimension and make the fur appear more realistic. On the other hand, use darker pencils to add shadows, especially in areas where the body overlaps or casts shadows on itself.
Step 7: Blend and Smooth
To achieve a softer and more polished look, use a blending stump or a cotton swab to gently blend the shading and soften any harsh lines. This will create a smoother transition between tones and give your drawing a more professional finish. Be careful not to overblend, as you still want to retain some texture and definition in the fur.
Step 8: Final Touches
Take a step back and assess your drawing. Look for any areas that may need further refinement or adjustment. Use your eraser to correct any mistakes or lighten specific areas. Pay attention to the overall balance of lights and darks, and make any necessary adjustments to ensure a harmonious composition.
Conclusion
Congratulations! You have successfully learned how to draw a polar bear from start to finish. Remember, drawing takes practice, so don’t be discouraged if your first attempt doesn’t turn out exactly as you envisioned. Keep practicing, experimenting, and refining your skills – that’s how artists grow. We hope you enjoyed this tutorial and found it helpful. Now, go grab your materials and let your creativity soar as you create stunning polar bear drawings of your own!