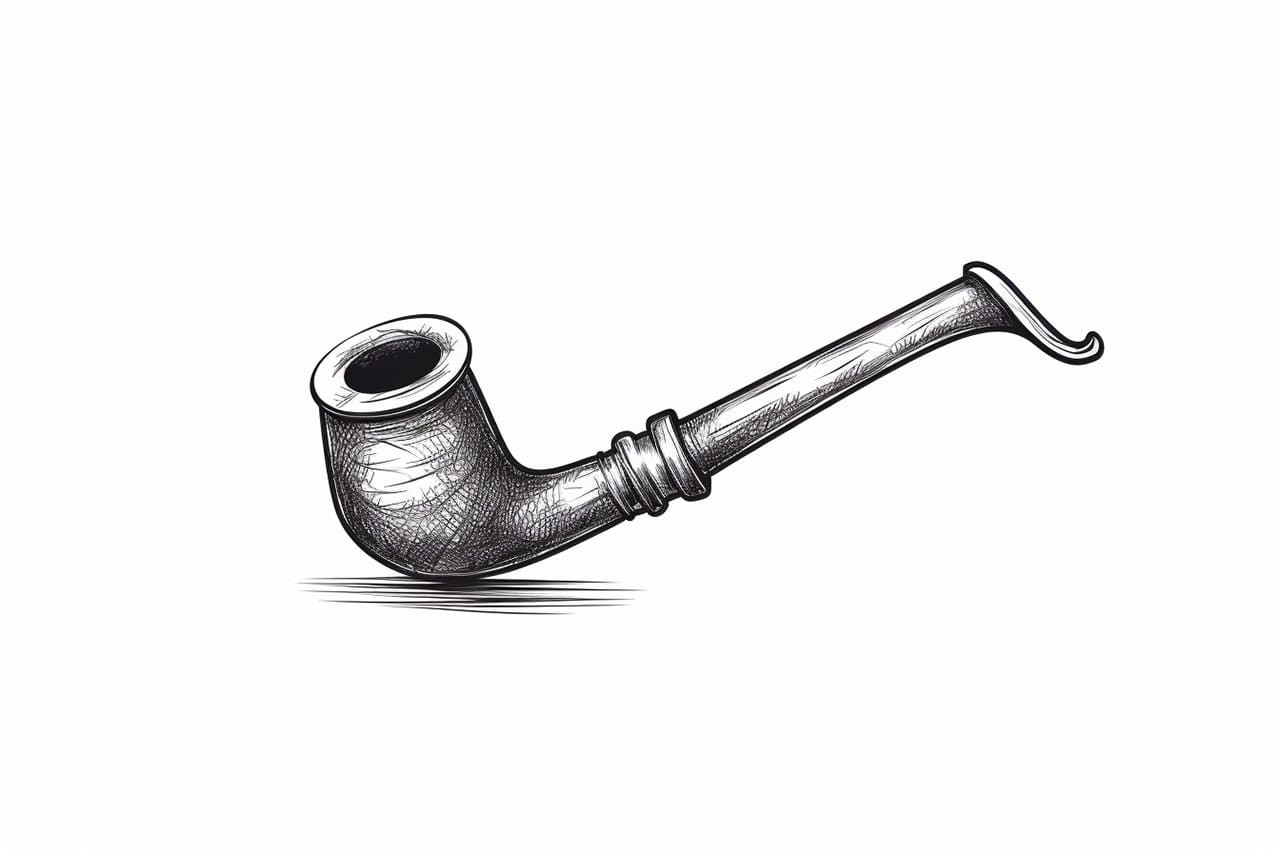
Welcome to this tutorial on how to draw a pipe. Whether you are an aspiring artist or simply looking to improve your drawing skills, this step-by-step guide will help you create a detailed and realistic representation of a pipe. With some basic drawing tools and a little patience, you’ll be able to master this subject in no time.
Materials Required
Before we get started, make sure you have the following materials:
- Drawing paper
- Pencils of varying hardness (HB, 2B, 4B, etc.)
- Eraser
- Blending stump or Q-tip
- Ruler
- Reference image of a pipe (optional)
Now that we have everything we need, let’s begin the process of drawing a pipe.
Step 1: Outline the Basic Shape
Start by drawing an oval shape slightly tilted to one side. This will be the main body of the pipe. Use a light pencil to make the initial outline as we will be refining it later on.
Step 2: Add the Bowl
Next, draw a smaller oval shape connected to the bottom part of the main shape. This will represent the bowl of the pipe. Ensure that it aligns with the overall shape of the pipe.
Step 3: Define the Stem
Draw a straight line extending from the bowl to create the stem of the pipe. You can make it as long or as short as you prefer. Keep in mind that a longer stem adds elegance to the overall design.
Step 4: Refine the Shape
Now it’s time to refine the shape of the pipe and add more details. Use a softer pencil to darken the outline and add depth to the overall form. Pay attention to the curves and contours of the pipe, making sure they are accurate and realistic.
Step 5: Add Texture and Details
To make the pipe look more realistic, add some texture and details. Use short, curved lines to create the impression of wood grain on the bowl of the pipe. For the stem, you can draw small lines to represent the grain of the material.
Step 6: Shade the Pipe
Next, let’s add shading to give the pipe a sense of volume and three-dimensionality. Start by determining the light source in your drawing, and then shade accordingly. Use a darker pencil to shade the areas that are farther from the light source, and leave the areas closer to the light source lighter.
Step 7: Add Highlights and Shadows
To enhance the realism of your drawing, add highlights and shadows to the pipe. Use an eraser to carefully remove some of the graphite in areas that would catch the light, such as the top of the bowl and the stem. This will create a bright highlight. Then, use a pencil to darken the shadow areas, such as the underside of the bowl and the area where the stem connects to the pipe.
Step 8: Refine the Drawing
Take a step back and evaluate your drawing so far. Look for any areas that need refinement or adjustment. Pay attention to the overall proportions, curves, and details of the pipe. Make any necessary corrections to ensure a polished and accurate drawing.
Step 9: Finalize the Drawing
Once you are satisfied with the overall look of your drawing, you can finalize it by deepening the shading and adding any additional details you may want. Take your time to make sure every aspect of the pipe is well-defined and visually appealing.
Conclusion
Congratulations on completing your drawing of a pipe! By following these step-by-step instructions, you have learned how to create a realistic representation of this unique object. Remember, practice is key, so keep refining your skills and exploring different drawing subjects. With time and dedication, you will continue to improve your artistic abilities.