Welcome to this step-by-step guide on how to draw a pencil. Whether you’re a beginner or an experienced artist looking to improve your drawing skills, this tutorial will provide you with clear and concise instructions to help you create a realistic pencil illustration. So grab your drawing supplies, and let’s get started!
Materials Required
Before we begin, make sure you have the following materials on hand:
- Drawing paper or sketchbook
- Pencils of various hardness (HB, 2B, 4B)
- Eraser
- Sharpener
- Ruler (optional)
- Blending stump or cotton swabs (optional)
Now that you have all your materials ready, let’s begin the process of drawing a pencil.
Step 1: Sketching Basic Shapes
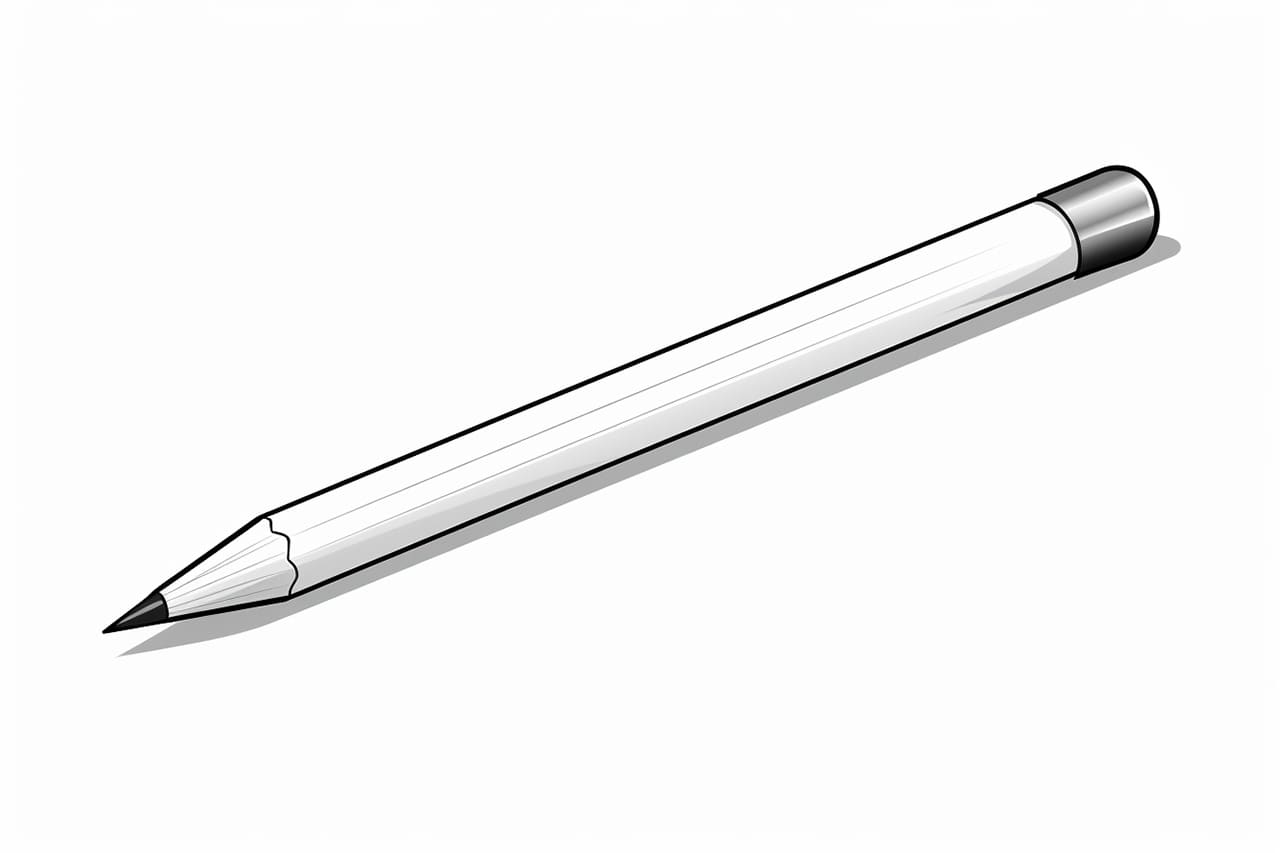
Start by lightly sketching the basic shapes that make up the pencil. Begin by drawing a long, thin rectangle standing upright. This will serve as the main body of the pencil. Next, draw a smaller rectangle at the top of the first one, forming the eraser. Finally, add a diagonal line at the bottom of the pencil to create the pencil tip.
Step 2: Adding Details
Once you’re satisfied with the basic shapes, it’s time to add some details to make your pencil look more realistic. Begin by drawing a straight line parallel to the top and bottom edges of the main body. This will create the wooden texture of the pencil.
Next, draw a small circle at the top of the eraser to give it a three-dimensional appearance. Use short curved lines to indicate the metal band that holds the eraser in place. You can also add a small shadow beneath the eraser to create depth.
Step 3: Shading and Blending
To add dimension and depth to your pencil drawing, it’s important to shade and blend the different areas. Start by shading the pencil body using a soft pencil like 4B. Apply light pressure and use long, smooth strokes to create a consistent tone. Make the shading darker towards the edges and lighter towards the center to create a cylindrical shape.
Next, shade the eraser using a lighter pencil like 2B. Use shorter strokes to mimic the texture of the eraser. Pay attention to the highlights and shadows to make it look three-dimensional.
Once you’re done shading, use a blending stump or a cotton swab to gently blend the pencil strokes. This will create a smooth and seamless shading effect.
Step 4: Adding Highlights and Shadows
To make your pencil drawing even more realistic, it’s important to add highlights and shadows. Start by identifying the light source in your drawing. Imagine where the light is coming from and use that as a guide to determine where the highlights and shadows should be placed.
Using an eraser, carefully remove some graphite to create the highlights. Focus on the areas where the light hits the pencil, such as the top of the pencil body and the metal band around the eraser.
To create shadows, use a softer pencil like 4B and add darker shading to the areas opposite the light source. Pay attention to the cast shadow beneath the pencil and the subtle shadows between the wooden texture lines.
Step 5: Refining and Detailing
In this final step, take a step back and evaluate your drawing. Look for any areas that need refinement or additional details. Use a sharp pencil to add fine lines and textures to enhance the wooden texture of the pencil. You can also use a ruler to guide you in drawing straight lines.
Pay attention to small details such as the metal band around the eraser and the reflection on the pencil body. Take your time and make any necessary adjustments until you’re satisfied with the final result.
And there you have it! You’ve successfully drawn a realistic pencil. With practice and patience, you’ll continue to improve your drawing skills and create more intricate artworks.
Conclusion
In this step-by-step tutorial, we’ve learned how to draw a pencil. By following the clear and concise instructions, you’ve created a realistic pencil illustration using simple shapes, shading techniques, and attention to detail. Remember to practice regularly and experiment with different pencils and shading techniques to enhance your drawing skills.
Now, grab your drawing supplies and start creating amazing pencil drawings of your own. Happy drawing!