Welcome to this step-by-step tutorial on how to draw a minion! Minions have become a beloved character from the “Despicable Me” franchise, known for their adorable appearance and mischievous personalities. Whether you’re a beginner or an aspiring artist, this guide will teach you how to bring these cheerful creatures to life on paper. So grab your drawing materials and let’s get started!
Materials Required
Before we begin, make sure you have the following materials at hand:
- Drawing paper: Choose a smooth and sturdy paper that is suitable for sketching and shading.
- Pencils: Have a range of pencils with different lead grades, such as HB, 2B, and 4B.
- Eraser: A soft eraser will be helpful for fixing any mistakes along the way.
- Fine-tip black pen: This will be used for adding details and outlines.
- Colored pencils or markers (optional): If you want to add color to your minion drawing, have some colored pencils or markers ready.
Now that you have your materials ready, let’s start creating our minion!
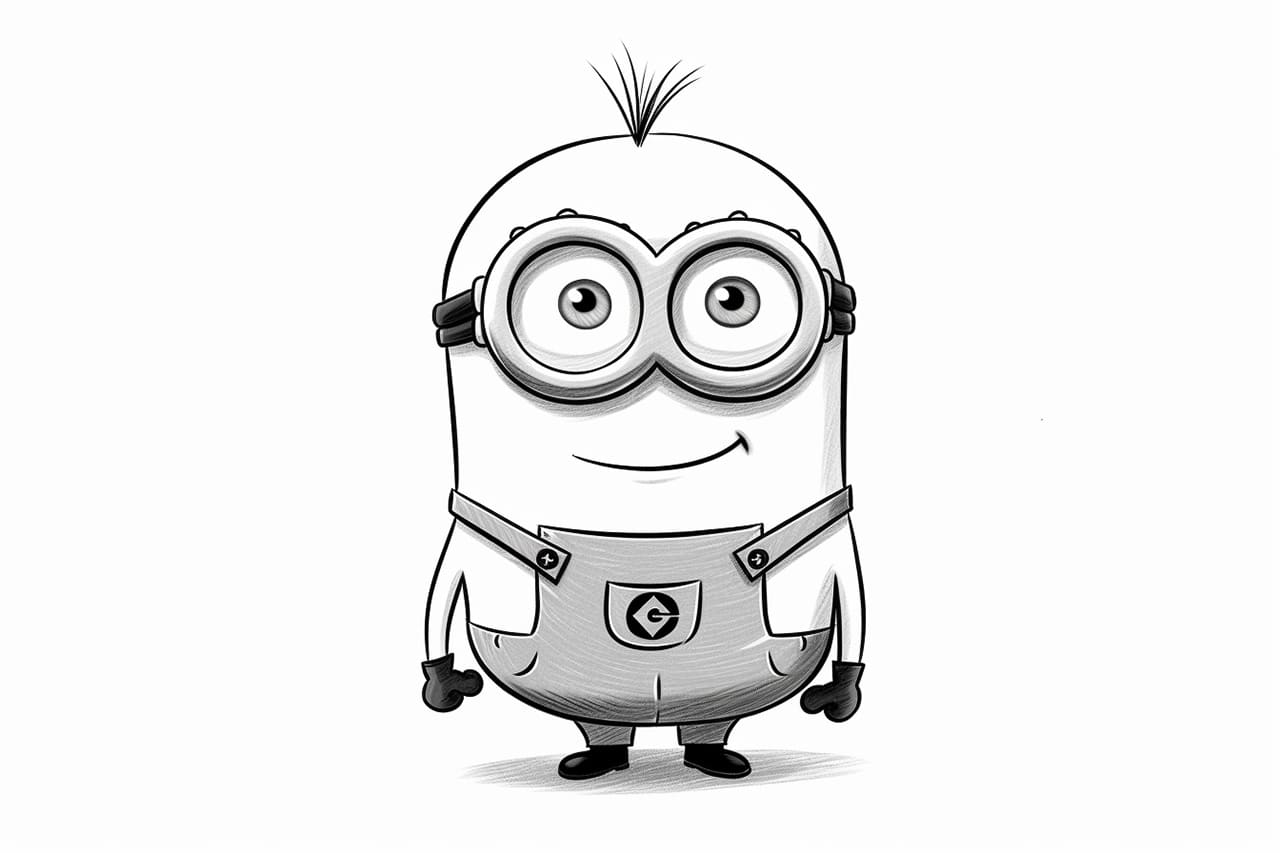
Step 1: Draw a Basic Shape
Begin by drawing a large oval shape in the center of your paper. This will be the body of the minion. Try to make it slightly taller than it is wide, as minions have a distinctive shape.
Step 2: Add Goggles
On the upper part of the oval shape, draw a slightly curved horizontal line. This will serve as the band for the minion’s goggles. Next, draw two circles within the oval shape, one on each side of the head, to represent the eye sockets.
Step 3: Draw Eyes
Inside each eye socket, draw two smaller circles, leaving a small gap between them. These will be the minion’s eyes. Add a small dot in the middle of each circle to represent the pupils.
Step 4: Define the Mouth
Just below the eyes, draw a curved line to form the minion’s mouth. This line should curve upward at each end, creating a smiley face expression.
Step 5: Draw the Straps
Extend two straight lines from the goggles’ band on each side of the head. These lines will form the straps that hold the goggles in place.
Step 6: Create the Overall Shape
Below the body, draw a rectangular shape. This will be the overall that the minion wears. Make sure it extends slightly beyond the sides of the body and reaches down to the feet.
Step 7: Add the Arms and Hands
Begin by drawing two long, slightly curved lines extending from the shoulders to the sides of the body. These will serve as the minion’s arms. At the end of each arm, draw a circle shape to represent the hands.
Step 8: Draw the Feet
At the bottom of the overall shape, draw two small rectangular shapes slightly angled outward. These will be the minion’s feet.
Step 9: Add the Minion’s Hair
On top of the head, draw small curved lines in various directions to create the minion’s unique hairstyle. Minions often have short, messy hair that adds to their playful appearance.
Step 10: Refine the Outline
Go over your pencil lines with a fine-tip black pen to add more definition to your drawing. Trace over the main features, such as the body, goggles, eyes, mouth, straps, overall, arms, feet, and hair. Use short, confident strokes to achieve a clean and crisp outline.
Step 11: Erase Guidelines
Carefully erase any remaining pencil guidelines and stray marks on your drawing. Take your time and use a gentle touch to avoid smudging the pen lines.
Step 12: Optional – Add Color
If you want to add color to your minion, grab your colored pencils or markers and have fun! Minions are typically yellow, so start by coloring the body in a sunny shade. Add blue to the straps and goggles, and mix in some gray for the overall. You can also experiment with different colors for the hair and eye color.
Conclusion
Congratulations! You have successfully learned how to draw a minion. By following these step-by-step instructions, you can create your very own adorable minion character. Remember to have fun, be patient, and keep practicing. Soon, you’ll be able to draw minions with ease and even add your own creative twist to them. Enjoy your newfound drawing skills and keep exploring the wonderful world of art!