Welcome to this step-by-step guide on how to draw a giraffe easily. Whether you are a beginner or an experienced artist, this tutorial will provide you with clear instructions to create a realistic giraffe drawing. By following along and using simple techniques, you will be amazed at what you can achieve. So, let’s get started!
Materials Required
Before we dive into the steps, let’s gather the materials you will need to create your giraffe drawing:
- Drawing paper or sketchbook
- Pencil (preferably 2B or HB)
- Eraser
- Fine-tip black pen or marker (optional)
- Colored pencils or markers (optional)
Now that we have everything ready, let’s begin!
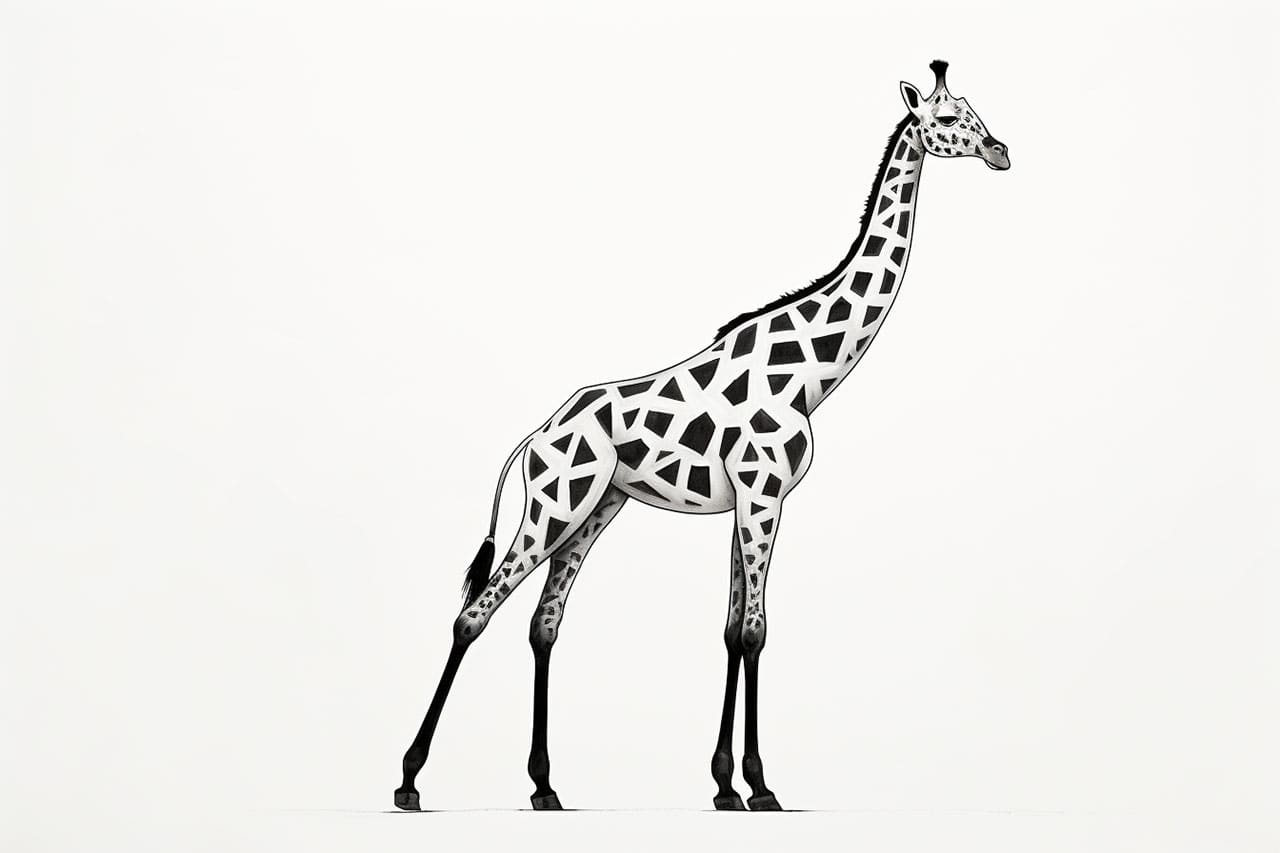
Step 1: Sketch the Giraffe’s Basic Shapes
To start, we will sketch the basic shapes that make up the giraffe’s body. Begin by drawing a large oval shape for the giraffe’s body, slightly tilted to one side. Then, add a smaller oval shape for the head, connecting it to the body by drawing a curved line. Next, add another small oval shape for the rump, positioned diagonally opposite to the head. Lastly, draw two long, curved lines that will form the giraffe’s neck.
Step 2: Define the Giraffe’s Head and Neck
In this step, we will add more details to define the giraffe’s head and neck. Use curved lines to outline the snout and neck, following the basic shape we sketched earlier. Draw a small oval for the eye, and a smaller circle within it for the iris. Add a few short lines above the eye to represent the eyebrow. Finally, sketch two small ovals for the giraffe’s ears.
Step 3: Add Facial Features and Horns
Now, let’s focus on the giraffe’s facial features. Start by drawing a small, rounded triangle shape for the giraffe’s nose. Add a line below it to define the mouth, curving slightly upwards at the ends to create a smile. Next, draw two small, curved lines on top of the giraffe’s head to form the ossicones, which are the horn-like structures found on giraffes. Add some small details to the ears by drawing curved lines within them.
Step 4: Outline the Giraffe’s Body and Legs
In this step, we will outline the giraffe’s body and legs. Use curved lines to connect the head to the body, following the basic shapes we sketched earlier. Next, draw two long, curved lines on each side of the body to represent the giraffe’s legs. Make sure to add some bends in the lines to depict joints.
Step 5: Define the Giraffe’s Spots and Tail
Giraffes are known for their beautiful spots, so let’s add them to our drawing. Start by drawing irregular shapes all over the giraffe’s body and legs. These shapes can vary in size and pattern, so feel free to be creative with your placement. Once you have added the spots, draw the giraffe’s tail by extending a long, thin shape from the rump towards the legs.
Step 6: Refine and Finalize Your Drawing
Now that we have the basic outline of the giraffe, it’s time to refine and finalize our drawing. Use an eraser to gently remove any unnecessary lines and smudges. Then, go over your sketch with darker lines to make it more defined. You can also use a fine-tip black pen or marker to outline the final drawing. Once you are satisfied with the outline, you can start adding color to your giraffe using colored pencils or markers. Giraffes typically have a yellowish-brown coat with spots, but feel free to experiment with different colors and patterns.
Conclusion
Congratulations on completing your giraffe drawing! By following the step-by-step instructions in this guide, you have learned how to draw a giraffe easily. Remember, practice makes perfect, so don’t be discouraged if your first attempt doesn’t turn out exactly as expected. Keep practicing and experimenting with different techniques to further refine your skills. With time and dedication, you will be able to create stunning giraffe drawings and expand your artistic abilities.
We hope you enjoyed this tutorial on how to draw a giraffe easily. Happy drawing!