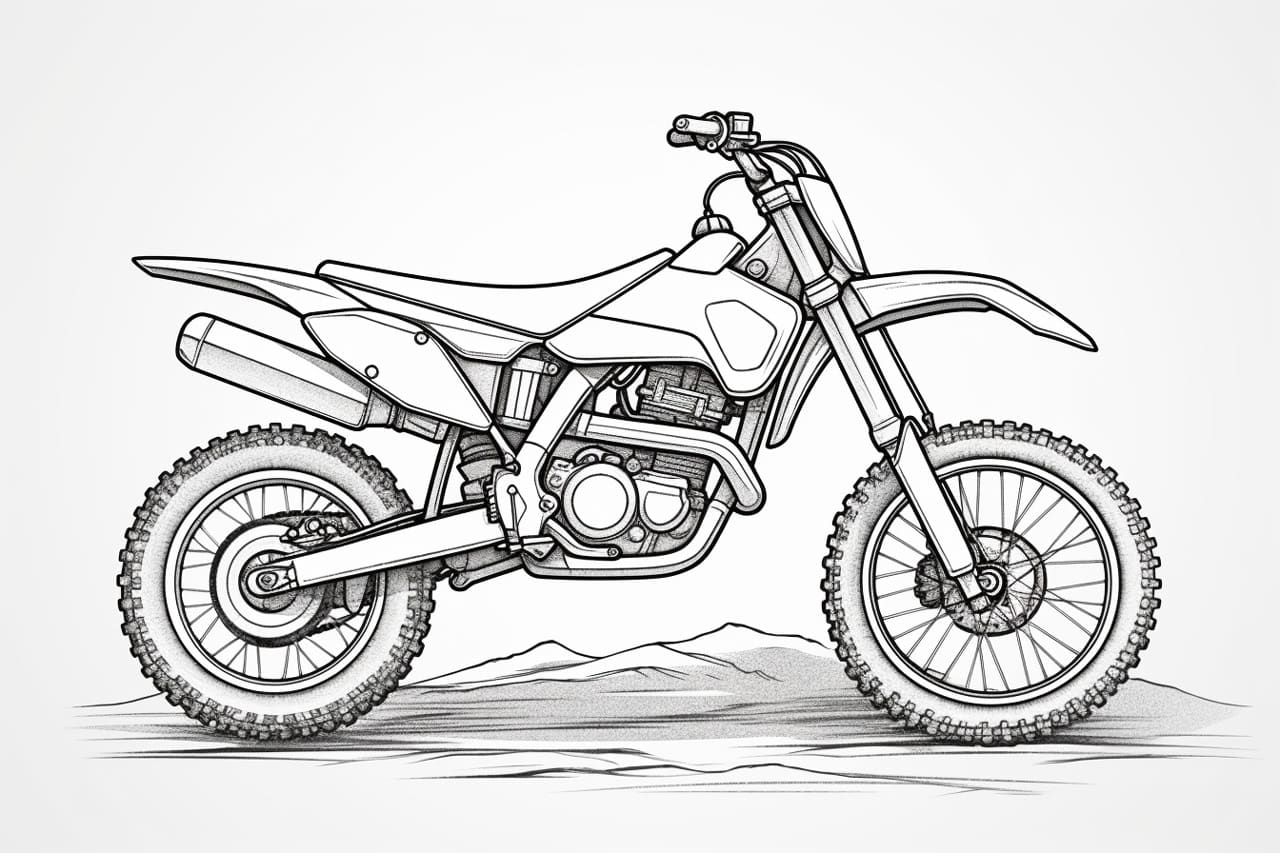
Are you an aspiring artist who wants to learn how to draw a dirtbike? Look no further! In this step-by-step guide, I will walk you through the process of drawing a dirtbike from scratch. With a few simple techniques and some practice, you’ll be able to create a realistic and detailed dirtbike drawing that will impress your friends and family. So, let’s grab our pencils and get started!
Materials Required
Before we begin, let’s make sure you have all the necessary materials. Here’s what you’ll need:
- Paper: Choose a smooth and sturdy paper that is suitable for drawing. A sheet of white sketch paper or drawing paper will work perfectly.
- Pencils: Get yourself a range of drawing pencils, including HB, 2B, and 4B. These different grades will help you achieve varying shades and tones in your drawing.
- Eraser: A good quality eraser is essential for correcting mistakes and refining your drawing.
- Pencil sharpener: Keep your pencils sharp and ready for use with a reliable pencil sharpener.
- Reference image: Find a clear and detailed image of a dirtbike that you can use as a reference. This will help you understand the structure and proportions of the bike.
Now that you have all the necessary materials, let’s dive into the step-by-step process of drawing a dirtbike.
Step 1: Start with Basic Shapes
Begin by lightly sketching the basic shapes that make up the dirtbike. Start with an oval shape for the main body of the bike, a smaller circle for the headlight, and rectangles for the handlebars and seat. These shapes will serve as a framework for your drawing.
Step 2: Refine the Outline
Using the basic shapes as a guide, start refining the outline of the dirtbike. Pay attention to the subtle curves and angles of the bike’s frame. Take your time and make sure the proportions are accurate.
Step 3: Add the Wheels and Tires
Next, draw the wheels and tires of the dirtbike. The wheels should be circular and positioned evenly on both sides of the bike’s frame. Add details to the tires by drawing the treads and any visible spokes.
Step 4: Sketch the Engine and Exhaust
Now it’s time to add some details to the dirtbike. Sketch the engine and exhaust pipes, making sure to capture the shape and placement accurately. Pay attention to any visible bolts or screws on the engine.
Step 5: Draw the Fenders and Seat
Move on to drawing the fenders and seat of the dirtbike. The fenders should follow the curves of the wheels and attach to the bike’s frame. The seat should be positioned above the rear wheel and have a distinct shape.
Step 6: Add Handlebars and Controls
Next, draw the handlebars and controls of the dirtbike. The handlebars should be angled and positioned in a way that looks natural. Add the throttle, brake, and clutch controls, as well as any other buttons or switches that are visible.
Step 7: Refine the Details
Take a step back and assess your drawing so far. Look for any areas that need refinement or additional details. Pay attention to the textures, shadows, and highlights on the different parts of the dirtbike. Use a darker pencil, such as a 4B, to add shading and depth to your drawing.
Step 8: Fine-tune and Erase
This step is all about fine-tuning your drawing. Use an eraser to remove any unnecessary lines or mistakes. Take your time to make sure all the proportions and details are accurate. Add any final touches or details that will bring your dirtbike drawing to life.
Conclusion
Congratulations, you have successfully learned how to draw a dirtbike! By following these step-by-step instructions and practicing regularly, you’ll be able to create stunning dirtbike drawings in no time. Remember to be patient with yourself and don’t be afraid to make mistakes. Drawing is a skill that takes time and practice to master. So, keep practicing and soon you’ll be able to create your own unique dirtbike drawings. Happy drawing!