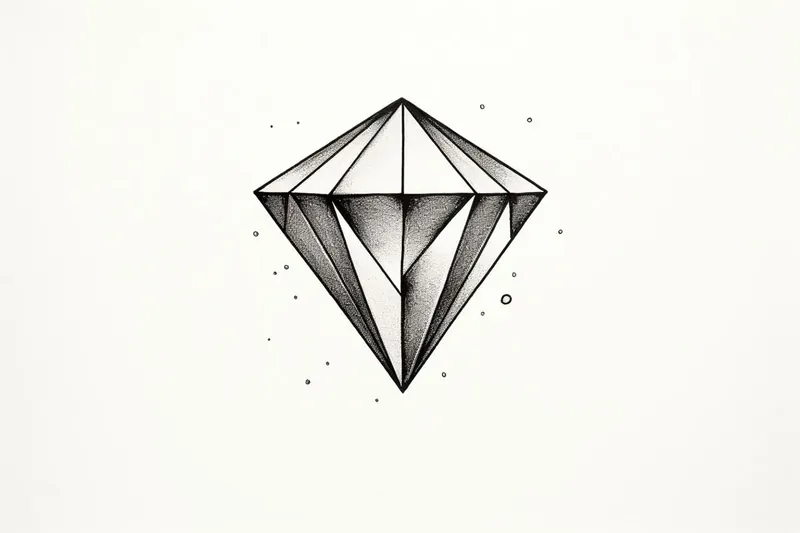
How to Draw a Diamond
Learn how to draw a diamond with step-by-step instructions from an expert artist. Follow these clear and concise steps to create a stunning diamond drawing.
Materials You'll Need
- Pencil
- Paper
- Eraser
Diamonds have long been a symbol of brilliance, luxury, and timeless beauty. Their sparkling facets and geometric precision make them a fascinating subject for artists of all skill levels. Whether you're captivated by the challenge of rendering their unique reflections or simply want to add a dazzling focal point to your artwork, learning how to draw a diamond offers both artistic satisfaction and a chance to hone your technique. Diamonds can be featured in jewelry sketches, fantasy illustrations, or even abstract compositions, making this skill versatile and valuable for any creative project.
Understanding how to draw a diamond goes beyond just outlining a shape—it's about capturing the intricate play of light and shadow that gives a diamond its iconic sparkle. This tutorial will break down the process into manageable steps, guiding you through sketching the basic structure, mapping out symmetrical facets, and using shading techniques to create a realistic, three-dimensional effect. Along the way, you'll explore concepts like perspective, contrast, and highlights, which are essential for creating convincing gemstones and can improve your overall drawing skills.
Drawing a diamond can seem challenging at first due to its complex geometry and reflective surfaces. However, this step-by-step guide is designed to make the process approachable for both beginners and more experienced artists. You'll need a few basic materials, such as drawing paper, a pencil, an eraser, a ruler, and a compass, to help achieve clean lines and precise angles. As we progress, you'll discover how simple shapes and careful observation can transform your sketch into a sparkling gem.
Whether you're aiming to improve your technical skills or simply looking for a fun and rewarding drawing project, mastering how to draw a diamond is a great way to expand your artistic repertoire. So, gather your materials, follow along with each step, and don't be afraid to experiment with your own style. With a bit of patience and practice, you'll soon be able to create diamonds that truly shine on the page!
Materials Required
Before we begin, make sure you have the following materials:
- Drawing paper
- Pencil
- Eraser
- Ruler
- Compass
Using these basic materials, you'll be able to create a beautiful diamond drawing.
Step 1: Draw a Square
Tip: To enhance the realism of your diamond drawing, pay close attention to the light source and how it affects the facets; practice shading gradually with varying pencil pressure to create smooth transitions between light and shadow, and remember to regularly step back from your drawing to assess the overall balance and symmetry, ensuring that the facets are consistent and visually appealing.
To start, draw a square in the center of your paper. This will act as the base shape for your diamond. Use your ruler to ensure that all four sides of the square are equal in length and that the corners are at right angles.
Step 2: Divide the Square into Triangles
Next, draw two diagonal lines inside the square, intersecting each other at the center. These lines will divide the square into four triangles. Take your time to ensure the lines are straight and accurately positioned.
Step 3: Add the Diamond's Top and Bottom
Now, draw two horizontal lines above and below the square. The length of these lines will determine the height of your diamond. Ideally, the distance between the upper and lower lines should be slightly shorter than the length of the square's sides.
Step 4: Connect the Lines
To give the diamond its shape, connect the ends of the upper and lower lines to the corresponding corners of the square. These lines should be diagonal and slant outward from the center of the square.
Step 5: Refine the Shape
At this stage, your diamond's shape should be taking form. Use your eraser to carefully remove any unnecessary construction lines, leaving only the outline of the diamond. Take your time to clean up the drawing and achieve a crisp shape.
Step 6: Add the Facets
Now, let's add the facets that make a diamond sparkle. Start by drawing a vertical line through the center of the diamond, from top to bottom. Then, draw two diagonal lines from the top and bottom corners of the square to the center line, creating a "V" shape at the top and bottom of the diamond.
Step 7: Add More Facets
To enhance the diamond's brilliance, draw additional diagonal lines on each side of the center line. These lines should start at the top and bottom corners of the square and taper towards the center line. Repeat this process on both sides to create a symmetrical pattern of facets.
Step 8: Shade the Diamond
To give your diamond a three-dimensional look, add shading. Determine the direction of the light source and imagine where the shadows would fall on the facets. Use your pencil to gently shade the areas that would be darker, creating a sense of depth and dimension.
Step 9: Add Highlights
To make your diamond truly shine, add highlights. Identify the areas of the facets that would catch the most light and lightly erase those sections. This will create a subtle gleaming effect, adding realism to your drawing.
Mistake Alert: A frequent mistake when drawing diamonds is neglecting symmetry in the facet arrangement, which can quickly make the gem look unbalanced or lopsided. This often happens because it's tempting to freehand the lines and shapes, especially when eager to capture the diamond's sparkle. To avoid this, use a ruler and lightly mark the center lines and main axes before adding any facets—think of these as the diamond's "skeleton." Take your time to measure each angle and ensure that facets on opposite sides mirror each other. Consistently checking for evenness as you go will help your diamond look crisp, realistic, and truly dazzling!
Conclusion
Congratulations! You have successfully drawn a beautiful diamond. By following these step-by-step instructions, you were able to create a stunning artwork that captures the elegance and brilliance of a diamond. Keep practicing and experimenting with different shading techniques to further refine your skills. Now, go ahead and showcase your diamond drawing skills to the world!
Gallery of Diamond Drawings


Fun Facts About Diamond
- Diamonds are the hardest natural material on Earth, ranking 10 on the Mohs scale of mineral hardness.
- Most natural diamonds are over a billion years old, formed deep within the Earth's mantle.
- Diamonds are made entirely of carbon atoms arranged in a crystal lattice.
- The word "diamond" comes from the Greek word "adamas," meaning "invincible" or "unbreakable."
- Some diamonds can glow under ultraviolet light, a phenomenon called fluorescence.
- The largest diamond ever discovered is the Cullinan Diamond, weighing 3,106 carats.
- Diamonds are not only used in jewelry but also in industrial applications like cutting, grinding, and drilling.
- Colored diamonds, such as blue, pink, and yellow, get their hues from trace elements or structural defects.
- Diamonds have been found in over 35 countries, with Russia, Botswana, and Canada among the top producers.
Suggestions for Scenes and Settings for Diamond Drawings
- A close-up of a diamond ring nestled in a velvet jewelry box, with dramatic lighting to highlight the sparkle.
- An abstract composition where diamond shapes are repeated and layered, playing with geometric patterns and reflective surfaces.
- A fantasy crown encrusted with diamonds, set against a royal cushion or an ornate background.
- A diamond suspended in midair, surrounded by swirling magical energy or beams of light to emphasize its brilliance.
- An elegant necklace with a large diamond pendant, draped over a silk fabric with soft shadows and gentle highlights.
- A hand holding a rough, uncut diamond next to a polished gem, illustrating the transformation process.
- A diamond resting on a mirror, creating a striking double-reflection effect that plays with symmetry and light.
- A treasure chest overflowing with diamonds and other gemstones, half-buried in sand or hidden in a mysterious cave.
- A macro view of a single diamond with exaggerated facets, focusing on the intricate play of light and shadow within the stone.
- Diamonds incorporated into a fantasy landscape, such as a mountain range with diamond peaks glinting in the sun.