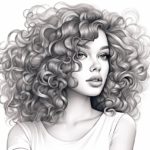
Welcome to this step-by-step tutorial on how to draw a curl. Whether you want to add a curly lock of hair to your portrait or create an intricate swirl in your artwork, mastering the skill of drawing curls can add depth and movement to your illustrations. In this guide, we will walk you through the process of drawing a curl, providing helpful tips and techniques along the way. So, grab your sketchbook and pencils, and let’s get started!
Materials Required
Before we begin, make sure you have the following materials on hand:
- Sketchbook or drawing paper
- Pencils (preferably a range of HB to 6B)
- Eraser (a kneaded eraser is recommended)
- Blending stump or cotton swabs
- Optional: Colored pencils or markers, if you’d like to add color to your curl drawing
Now that you have everything you need, let’s dive into the step-by-step process of drawing a curl.
Step 1: Basic Shape
Start by sketching the basic shape of the curl. Curls can take various forms, so choose a style that suits your artistic vision. Begin with a simple curved line or an elongated “S” shape to serve as the foundation of your curl.
Step 2: Adding Volume
To give your curl a three-dimensional appearance, add volume to the basic shape. Draw parallel lines following the contour of your curl, gradually widening the lines as you move towards the center. This will create the illusion of depth and make your curl look more realistic.
Step 3: Enhancing the Edges
Next, refine the edges of the curl to make them smoother and more defined. Pay attention to the curves and twists of the curl, adding subtle details to capture its natural flow. Use light, confident strokes to avoid creating harsh lines.
Step 4: Creating Textures
To make your curl drawing more realistic, add textures to mimic the appearance of hair or the material your curl represents. This can be achieved by using small, curved lines or short strokes along the length of the curl. Vary the direction and length of these lines to create a sense of movement and depth.
Step 5: Shading and Highlights
Now it’s time to add shading to your curl drawing, which will further enhance its three-dimensional look. Identify the light source in your artwork and imagine where the shadows would fall on the curl. Use your pencils to shade those areas, gradually building up the value and creating a smooth transition between light and shadow.
Don’t forget to add highlights to make your curl appear more glossy and realistic. Leave some areas untouched or use a kneaded eraser to lift off some graphite, creating bright spots that catch the light.
Step 6: Blending
To achieve a smooth and seamless look, use a blending stump or a cotton swab to gently blend the shading and textures in your curl drawing. This will soften the pencil marks and create a more realistic representation of a curl.
Step 7: Finishing Touches
Take a step back and assess your curl drawing. Look for any areas that need refinement or adjustments. Use your eraser to clean up stray marks or lighten areas that need more highlights. At this stage, you can also add additional details or embellishments to personalize your curl drawing.
Conclusion
Congratulations! You have successfully learned how to draw a curl. By following these step-by-step instructions, you can now add beautiful curls to your artwork with confidence. Remember to practice regularly to further improve your skills. So, grab your sketchbook and start experimenting with different types of curls. Let your creativity flow as you master this fundamental element of drawing.