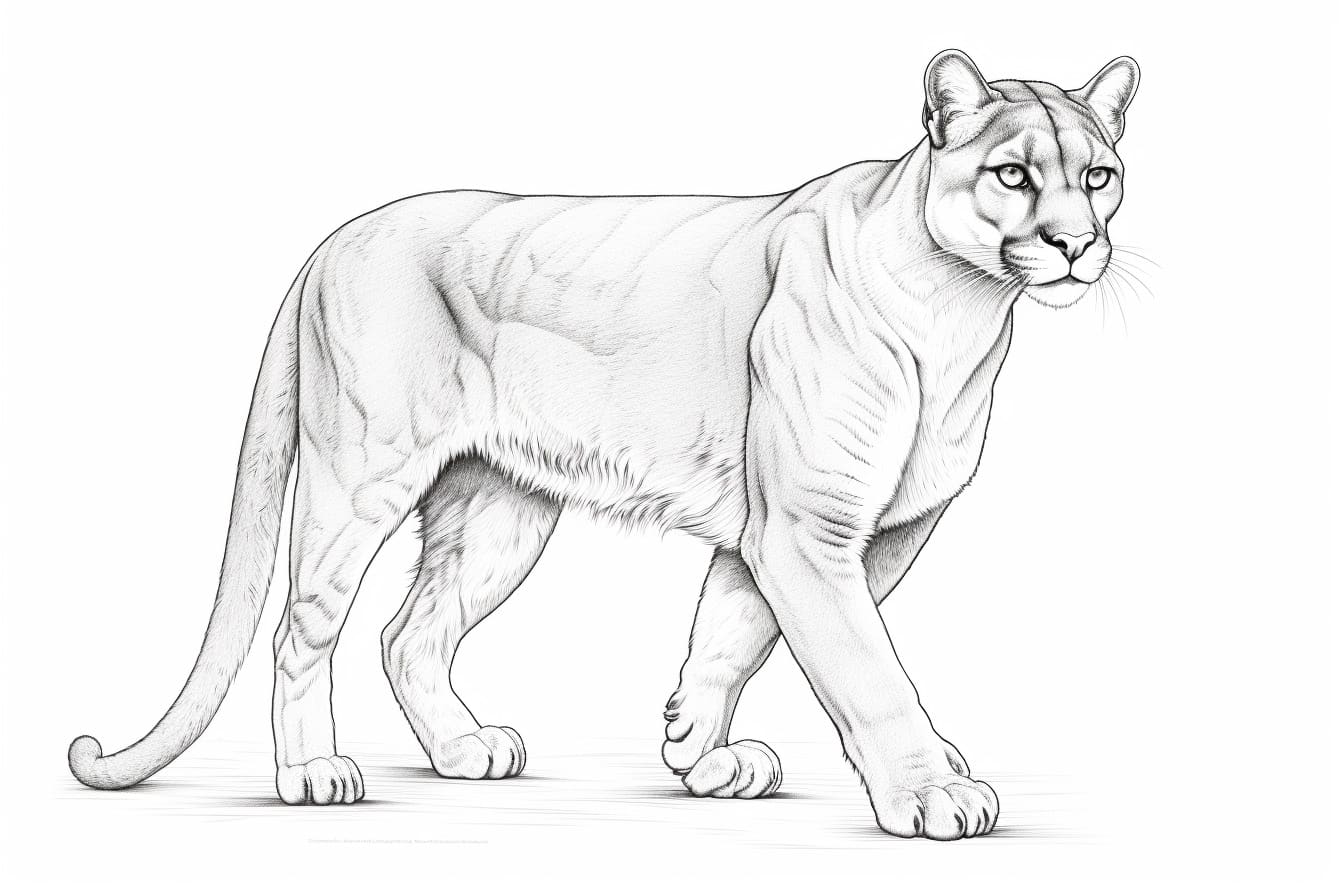
The cougar, also known as the mountain lion or puma, is a majestic and powerful big cat found in various regions of the Americas. Known for its muscular build, graceful movement, and intense gaze, the cougar makes an excellent subject for drawing. In this tutorial, we will guide you through how to draw a cougar step by step.
Materials Required
To begin drawing a cougar, you will need the following materials:
- Pencil – It is recommended to use a mechanical pencil or a set of drawing pencils with varying lead hardness (e.g., 2B, 4B, and 6B).
- Eraser – A kneaded eraser or a soft vinyl eraser will work best for correcting mistakes and refining details.
- Drawing paper – Choose a smooth surface paper that can handle shading and blending techniques. A heavier weight paper (around 70-90 lb) will prevent smudging and tearing.
Now that you have gathered your materials, let’s dive into the step-by-step process of drawing a stunning cougar.
Step 1: Basic Shapes
Start by drawing a large oval shape for the cougar’s head. Then, add a smaller circle within the oval to represent the muzzle. Position the circles slightly off-center to give it a more dynamic look. These basic shapes will serve as the foundation for the cougar’s facial features.
Step 2: Facial Features
Using the basic shapes as a guide, begin adding the cougar’s facial features. Draw two almond-shaped eyes, placing them above the muzzle. Add a small triangle-shaped nose just below the eyes, and a wide mouth slightly curved upwards on both ends. Take your time to capture the cougar’s fierce expression and subtle details.
Step 3: Ears and Mane
Next, draw the cougar’s ears on either side of the head. Cougars have distinctive rounded ears, so be sure to capture their shape accurately. Extend two curved lines from the top of the head towards the back to create the beginnings of the mane. The mane adds to the cougar’s majestic appearance and should flow smoothly along the contours of the head.
Step 4: Body Outline
Now, let’s move on to sketching the outline of the cougar’s body. Using long, flowing lines, draw an elongated shape starting from the back of the head down towards the back. This line will represent the back and spine of the cougar. Continue the line, curving it smoothly to form the back leg and tail. Add a smaller line in front of the back leg to create the chest and front leg.
Step 5: Legs and Paws
Refine the cougar’s legs by adding more details. The cougar has powerful and muscular legs, so emphasize their strength in your drawing. Add curved lines to outline the front and back legs, paying attention to the joints and muscles. Draw oval-shaped paws at the end of each leg, with visible claws. Take your time to make the paws look realistic and in proportion to the body.
Step 6: Tail and Whiskers
Continue refining the cougar’s body by adding the tail. The tail should be thick at the base and taper towards the end. Use curved lines to create a sense of movement and grace. Don’t forget to draw the distinctive long and curved whiskers on each side of the muzzle. These details will add depth and realism to your cougar drawing.
Step 7: Fur Details
To bring your cougar drawing to life, start adding fur details throughout the body. Cougars have short fur that lies close to their body. Use short, overlapping strokes to create the texture of fur, particularly around the neck, chest, and legs. Gradually build up the fur details, using lighter or darker pencil grades to add depth and shading.
Step 8: Shading and Blending
Now it’s time to add shading and depth to your cougar drawing. Use a variety of pencil grades to create contrast and shadow. Start by identifying the areas of the cougar that would be in shadow, such as the underside of the body, under the chin, and behind the ears. Gradually add shading to these areas, using a blending tool or your finger to blend the pencil strokes for a smooth transition.
Step 9: Refining and Final Touches
Take a step back and evaluate your drawing. Look for any areas that need refining or additional detail. Use an eraser to clean up any stray marks or correct any mistakes. Pay attention to the eyes, nose, and other facial features to make sure they accurately reflect the cougar’s unique characteristics. Add any final touches or highlights to bring out the cougar’s natural beauty.
Conclusion
Drawing a cougar requires careful observation of its features and a keen eye for detail. By following these step-by-step instructions, you can create a captivating drawing of this powerful big cat. Remember to take your time, practice, and enjoy the process. With each drawing, you will improve your skills and develop your unique artistic style. So grab your pencils, paper, and let’s start capturing the essence of the cougar on the page.