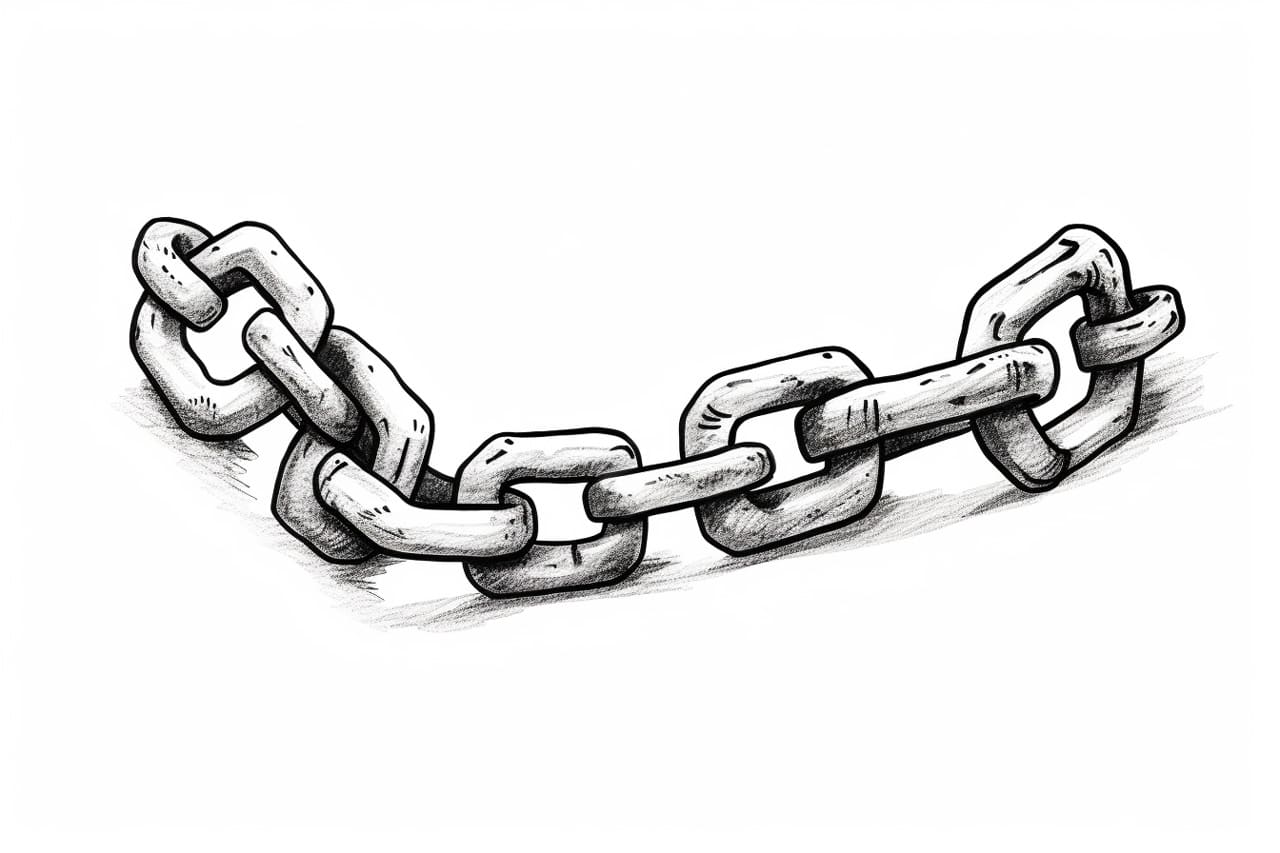
Welcome to this step-by-step guide on how to draw a chain link! Whether you are an aspiring artist or simply looking to expand your drawing skills, this tutorial will take you through the process of creating a realistic and detailed chain link.
Materials Required
Before we begin, let’s gather the materials you’ll need for this drawing:
- Pencil: A regular HB pencil will do just fine for sketching and outlining.
- Paper: Choose a smooth and sturdy paper that can handle shading and erasing.
- Eraser: A kneaded eraser is the best choice as it allows for precise erasing without smudging.
- Fine-tip Pen: A fine-tip pen comes in handy for outlining and adding details.
Now that you have all the necessary materials, let’s get started!
Step 1: Outline the Shape of the Chain Link
Begin by lightly sketching the basic shape of the chain link. A chain link consists of a series of interlocking loops. Start with a large oval shape, slightly slanted to the side. This will be the main body of the chain link.
Step 2: Add the Inner Loops
Inside the oval shape, draw a smaller oval that is intersecting the larger one. This smaller oval represents the inner loop of the chain link. Make sure the inner loop is slightly slanted in the opposite direction of the main body.
Step 3: Define the Thickness of the Chain
To give the chain link a three-dimensional appearance, add thickness to the inner and outer loops. Do this by drawing parallel lines along the inner and outer edges of the ovals. Make sure the lines on the inner loop are slightly closer together than those on the outer loop.
Step 4: Add the Connection Points
Chain links are connected by small metal bars. Draw a series of short, vertical lines inside the main body of the chain link to represent these connection points. Space them evenly along the inner and outer edges of the oval.
Step 5: Sketch the Hooks
At the ends of the chain link, draw two small hooks that connect to adjacent links. These hooks should be curved and slightly elongated. Make sure they are facing in the same direction as the main body of the chain link.
Step 6: Refine the Outline
With the basic structure in place, it’s time to refine the outline of the chain link. Using a fine-tip pen, go over the pencil lines, making them more defined and adding any necessary details. Erase any unwanted pencil marks to clean up the drawing.
Step 7: Shade and Add Texture
To make the chain link appear more realistic, add shading and texture. Begin by shading the areas where the light does not directly hit the chain link. Use a light touch and gradually build up the darkness. Pay attention to the areas between the loops, as they tend to be darker.
Next, add texture to the chain link by lightly sketching small lines or dots within each loop. This will give the chain link a metallic appearance. Be careful not to overdo it – a few well-placed details are enough to convey the texture.
Step 8: Highlight and Final Touches
To create a sense of dimension, add highlights to the chain link. Identify the areas where the light hits the chain link the most and use an eraser to lighten those sections. This will create contrast and make the drawing more realistic.
Finally, take a step back and assess your drawing. Make any necessary adjustments or add any additional details to enhance the overall appearance of the chain link.
Conclusion
Congratulations! You have successfully learned how to draw a chain link. By following these step-by-step instructions, you have created a realistic and detailed representation of a chain link. Remember to practice regularly to further improve your drawing skills.
I hope you enjoyed this tutorial and found it helpful in expanding your artistic abilities. Keep exploring and experimenting with different subjects and techniques. With time and practice, your artistic skills will continue to grow.