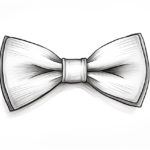
Welcome to this step-by-step tutorial on how to draw a beautiful and realistic bow ribbon. Whether you want to create a lovely gift wrapping design or incorporate a bow into your artwork, learning how to draw a bow ribbon can add a touch of elegance and charm to your creations.
So grab your pencils, paper, and let’s get started!
Materials Required
To follow along with this tutorial, you will need the following materials:
- Paper: It is recommended to use a smooth surface paper like drawing paper.
- Pencils: A range of graphite pencils, preferably with different hardness (2H, HB, 2B, etc.) to create varied line weights.
- Eraser: A kneaded eraser is ideal for lightening or completely erasing pencil lines without damaging the paper.
- Ruler: A straight edge ruler will help you create precise lines.
- Colored Pencils or Markers (optional): If you want to add color to your bow ribbon drawing, have some colored pencils or markers ready.
Now that you have gathered your materials, let’s begin drawing a bow ribbon!
Step 1: Draw the Bow Loop
Start by drawing a narrow rectangle using a light pencil. This will be the center knot of the bow. Make sure it is evenly sized and positioned towards the center of your paper.
Step 2: Add the First Loop
On the left side of the rectangle, create a curved line that starts at the top edge of the rectangle and ends slightly below it. This will form the first loop of the bow.
Step 3: Create the Second Loop
Next, draw a similar curved line on the right side of the rectangle, mirroring the shape of the first loop. The second loop should be slightly larger and extend a little further down than the first loop.
Step 4: Connect the Loops
To complete the bow shape, connect the ends of the two loops with a curved line at the bottom. This line should follow the general curve of the loops and form a gentle “V” shape.
Step 5: Refine the Bow Shape
Now that you have the basic shape of the bow, refine it by adjusting the curves and lines. Make the loops symmetrical and smooth out any rough edges or uneven lines. Take your time during this step to ensure your bow looks balanced and visually pleasing.
Step 6: Add Folds and Details
To give your bow more dimension and realism, add some folds and creases to the loops. Start by lightly drawing curved lines within each loop to indicate the folds. Then, sketch in some smaller lines along the edges of the loops to give the impression of ribbons crossing over each other.
Step 7: Render the Bow Knot
Focus on the center knot of the bow now. Add some depth and texture by drawing diagonal lines across the rectangle. These lines should curve slightly to match the shape of the knot. This will create the illusion of a textured and woven fabric.
Step 8: Define the Bow Ribbon Ends
Extend the lines of the loops at the bottom to create the ribbon ends. Make them taper towards the tips, and add some gentle curves to make them look more natural. You can also draw some faint lines across the ribbon ends to suggest folds or creases.
Step 9: Clean Up Your Drawing
Now that your bow ribbon is complete, take a moment to clean up your drawing. Use an eraser to remove any unnecessary guidelines or smudged lines. Ensure your bow shape is crisp and well-defined.
Step 10: Add Color (Optional)
If you prefer to add color to your bow ribbon, grab your colored pencils or markers and start shading. Choose colors that complement each other and create a realistic representation of the fabric. Consider adding highlights and shadows to enhance the three-dimensional effect.
Congratulations! You have successfully drawn a beautiful bow ribbon!
Conclusion
Drawing a bow ribbon may seem challenging at first, but with practice and patience, you’ll be able to create stunning designs effortlessly. This step-by-step tutorial has provided you with the necessary guidance and techniques to draw a realistic bow ribbon that can enhance your artwork or gift wrapping.
Remember to experiment with different styles, sizes, and colors to make your bow ribbon drawings unique and personal. The more you practice, the more confident you’ll become in your artistic abilities.
Now, go grab your pencils, paper, and enjoy the process of drawing a bow ribbon!