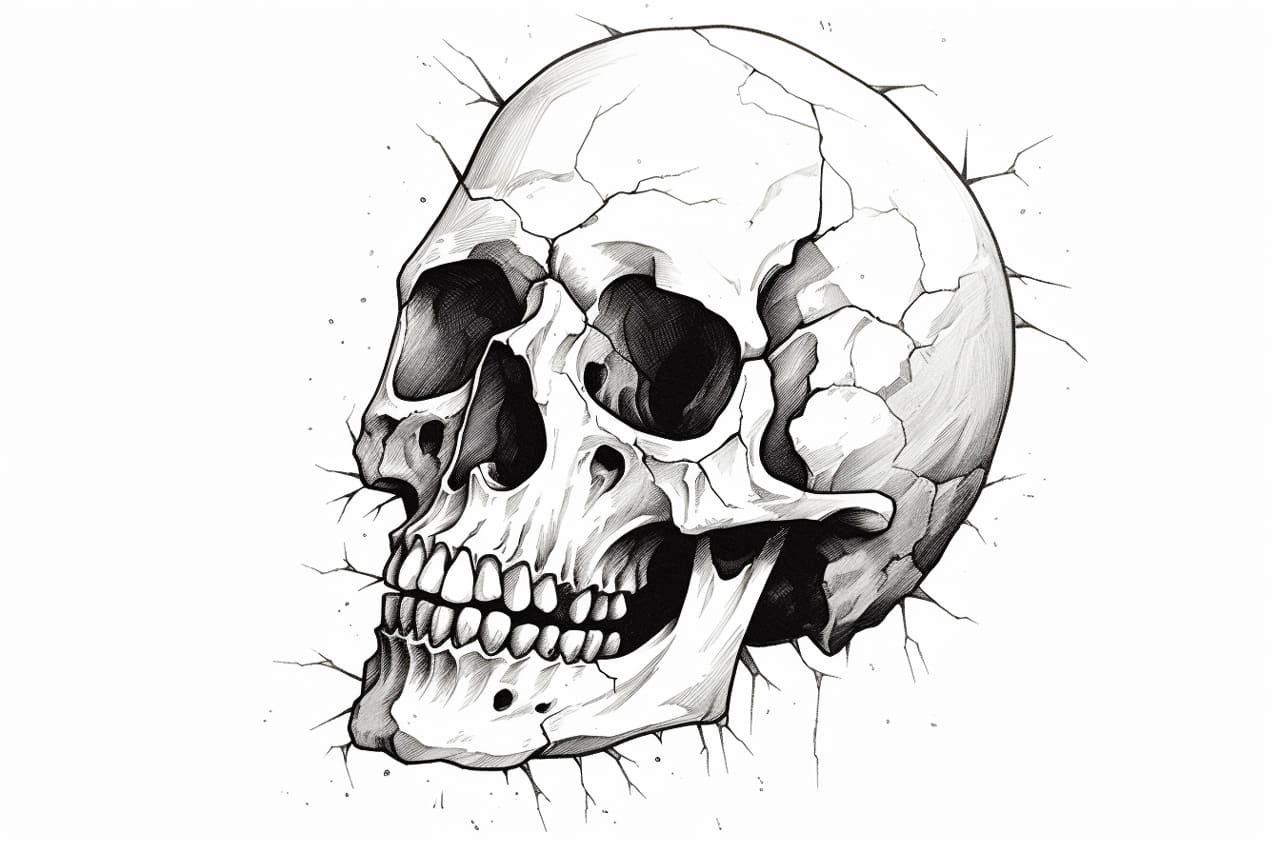
Welcome to this tutorial on how to draw a broken skull. In this step-by-step guide, I will walk you through the process of creating a realistic and visually striking image of a broken skull. Whether you are a beginner or an experienced artist, this tutorial will help you develop your skills in drawing anatomy and capturing the details and emotions associated with a broken skull.
Materials Required
Before we begin, let’s make sure you have all the necessary materials to complete this drawing:
- Pencil: Choose a graphite pencil with a medium hardness (HB or B) for sketching and shading.
- Eraser: Have a kneaded eraser or a soft eraser for making changes and corrections.
- Paper: Use a clean and smooth drawing paper that can handle graphite well.
- Reference Image: Find a high-quality reference image of a broken skull to guide your drawing. This will help you understand the form, contours, and details of the broken skull.
Now that you have all the materials ready, let’s dive into the step-by-step process.
Step 1: Sketch the Basic Outline
Start by lightly sketching the basic shape of the skull. Begin with a symmetrically drawn circle for the cranium, and then add the jawline. Remember that a broken skull may have irregularities and fractures, so don’t worry about making it perfect.
Step 2: Add Details to the Cranium
Next, sketch the details of the cranium. Pay attention to the shape of the eye sockets, nasal cavity, and any other distinct features of the skull. Take your time and make sure the proportions are accurate.
Step 3: Indicate the Fractures
Now, it’s time to draw the fractures that give the skull its broken appearance. Use thin, irregular lines to indicate these fractures, making sure they follow the natural contours of the skull. Vary the thickness and length of the fractures to add depth and complexity to your drawing.
Step 4: Refine the Jawline
Refine the jawline by drawing irregular lines to represent fractures and missing pieces. Remember to keep the overall shape of the jaw intact. Make these lines jagged and broken to enhance the broken appearance of the skull.
Step 5: Add Shading and Texture
To bring your drawing to life, begin adding shading to different areas of the skull. Observe the reference image carefully and note where the light hits and where shadows are cast. Gradually build up the values using a combination of light shading and deeper shadows.
Pay attention to the texture of the skull. Use short, hatching lines to create the impression of bone texture and the fractured surfaces. Don’t forget to blend the shading and highlights smoothly for a more realistic effect.
Step 6: Refine the Details
Now it is time to refine the details of the broken skull. Add more definition to the fractures, emphasizing the irregular edges and missing pieces. Pay attention to the smallest details, such as cracks or splintering lines.
Step 7: Final Touches
At this stage, take a step back and observe your drawing as a whole. Adjust any areas that need refinement or additional shading. Make sure the overall composition looks cohesive and balanced.
Conclusion
Congratulations on completing your drawing of a broken skull! By following these step-by-step instructions, you have learned how to capture the intricacies of a broken skull and create a visually captivating image.
Remember, drawing is a skill that improves with practice. Don’t be afraid to experiment with different techniques and styles to develop your own unique approach. Keep exploring and challenging yourself, and you will continue to progress as an artist.
I hope you found this tutorial helpful and inspiring. Now, grab your materials, find an interesting reference image, and enjoy the process of creating your own broken skull masterpiece.