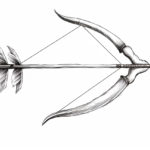
Drawing a bow can be a challenging task for artists of all levels, but with the right techniques and a bit of practice, it can also be a rewarding experience. In this step-by-step guide, I will walk you through the process of how to draw a bow in a clear, clean, and concise manner. So, grab your pencils and let’s get started!
Materials Required
Before we dive into the drawing process, let’s gather the materials you’ll need:
- Drawing paper
- Pencils (preferably a range of graphite pencils ranging from H to B)
- Eraser (preferably a kneaded eraser for easily removing graphite marks)
Now that we have all the materials ready, let’s begin the process of drawing a bow.
Step 1: Basic Outline
Start by drawing a rectangle shape in the center of your paper. This will be the main body of the bow. Make sure to leave enough space around it as we will be adding details later on.
Step 2: Bow Ends
Extend two curved lines from the top corners of the rectangle downwards. These lines will represent the ends of the bow. Make the curves smooth and symmetrical to create an aesthetically pleasing shape.
Step 3: Bowstring
Draw a straight line horizontally across the center of the bow. This will represent the bowstring. Ensure that the line is taut and evenly placed between the bow ends.
Step 4: Bow Limbs
From the ends of the bow, draw two slightly curved lines upwards and outwards. These lines will form the limbs of the bow. Make sure the curves are gentle and balanced to maintain the overall symmetry.
Step 5: Bow Tips
On the outer ends of the bow limbs, draw two small triangular shapes pointing inwards. These will be the tips of the bow. Ensure that the tips are evenly sized and positioned.
Step 6: Bow Details
Now that the basic structure of the bow is complete, it’s time to add some details. Draw two curved lines running parallel to the bowstring, one on each side. These lines will give the bow a three-dimensional appearance.
Step 7: Bow Grip
At the center of the rectangle, draw a small rectangle shape vertically. This will serve as the grip of the bow. Make sure it is proportionate to the overall size of the bow.
Step 8: Bowstring Details
To add realism to the drawing, draw small horizontal lines across the bowstring. These lines will represent the strands of the bowstring.
Step 9: Shadows and Highlights
To create depth and dimension, add shadows and highlights to your drawing. Identify the light source and shade the areas of the bow that would be in shadow. Use a range of graphite pencils to achieve various shades, from light to dark.
Step 10: Final Touches
Lastly, review your drawing and make any necessary adjustments. Erase any unwanted lines and refine the details to improve the overall appearance of the bow. Take your time and pay attention to small details to make your drawing truly remarkable.
Conclusion
Drawing a bow may seem intricate, but by following these step-by-step instructions, you can create a realistic and visually appealing bow in no time. Remember to practice regularly and experiment with different shading techniques to enhance your drawing skills. With patience and dedication, you’ll be able to draw bows and other complex objects effortlessly.
So, grab your pencils and get creative with your bow drawings. Happy sketching!