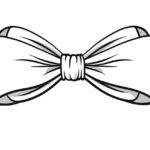
Cheer bows are an iconic accessory in the world of cheerleading. These oversized, brightly colored bows are a symbol of spirit, energy, and teamwork. If you want to add a cheer bow to your drawing, you’ve come to the right place! In this step-by-step guide, I’ll show you how to draw a cheer bow that is vibrant and full of life. Whether you’re an experienced artist or just starting out, follow along and let your creativity shine!
Materials Required
Before we begin, gather the following materials:
- A pencil
- Eraser
- Fine-tipped black pen or marker
- Colored pencils or markers
- Paper or sketchbook
Now that you have all the materials you need, let’s get started on creating a beautiful cheer bow!
Step 1: Draw the Outline
To start, draw a simple outline of the shape of the cheer bow. Begin by drawing a curved line that slightly resembles the letter “M” or an upside-down heart. This will be the top part of the bow. Then, draw two long, flowing tails coming down from the ends of the top shape. The tails should be flowing and curved, giving the bow a dynamic and energetic look.
Step 2: Add Details
Next, let’s add some details to our cheer bow. Draw a small, curved line in the center of the top shape, dividing it into two sections. This will create the illusion of a ribbon wrapping around the bow. Then, add some smaller curved lines along the edges of the top shape and tails to represent folds in the fabric of the bow.
Step 3: Enhance the Outline
Now, it’s time to enhance the outline of the cheer bow. Go over your initial sketch with a fine-tipped black pen or marker, refining the shape and adding more definition. Make sure to darken the lines that you want to stand out, such as the outline of the bow and the folds in the fabric. Don’t worry about erasing the pencil lines just yet; we’ll take care of that in the next step.
Step 4: Erase and Clean Up
Using an eraser, carefully remove any remaining pencil lines that are no longer needed. Be gentle and take your time to avoid smudging the ink lines. This step will give your drawing a clean and polished look.
Step 5: Color Your Cheer Bow
Once the ink is dry, it’s time to add some color to your cheer bow! Choose your favorite colors and use colored pencils or markers to bring your bow to life. Start by coloring the top part of the bow with a bold, vibrant color. Then, use a complementary color for the tails of the bow. You can add shading or highlights to create depth and dimension.
Step 6: Add Patterns and Designs
To make your cheer bow even more eye-catching, consider adding patterns and designs. These can include stripes, polka dots, or any other fun designs that suit your style. Use a contrasting color to create these patterns, and don’t be afraid to get creative!
Step 7: Final Touches
Finally, add any final touches to your cheer bow drawing. You can add some glitter or sparkle to make it stand out even more. You might also want to add some shading or highlights to make the bow look more three-dimensional. Take a step back and evaluate your drawing to see if there’s anything else you’d like to add or adjust.
Conclusion
Congratulations! You’ve successfully learned how to draw a cheer bow. By following these step-by-step instructions, you’ve created a vibrant and energetic accessory that would make any cheerleader proud. Remember, practice makes perfect, so keep honing your drawing skills and exploring your creativity. Have fun and keep cheering!