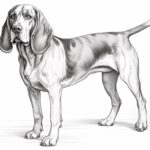
Welcome to this step-by-step guide on how to draw a Bloodhound! In this tutorial, I will walk you through the process of creating a realistic and detailed drawing of this noble and distinguished breed of dog. Whether you are an aspiring artist or simply looking to try your hand at drawing, this tutorial will provide you with the necessary guidance to create an accurate and captivating portrayal of a Bloodhound. So, let’s get started!
Materials Required
Before we begin, let’s gather the materials you will need for this drawing:
- Drawing paper or sketchpad
- Pencils (preferably a range of hardness, such as 2B, 4B, and 6B)
- Eraser
- Blending stump or tortillon (optional)
- Reference photo of a Bloodhound (to aid in capturing its unique features)
Now that we have our materials ready, let’s dive into the drawing process!
Step 1: Outline the Head and Ears
Start by lightly sketching an oval shape to outline the head of the Bloodhound. This oval will serve as the basic structure for the head. Next, add two long, droopy ears on either side of the head. Bloodhounds are known for their signature long and floppy ears, so make sure to capture that characteristic in your drawing.
Step 2: Define the Facial Features
Using the reference photo as a guide, carefully draw the eyes, nose, and mouth of the Bloodhound. Pay attention to the placement and proportions of these features to ensure accuracy. Bloodhounds have large, soulful eyes and a prominent nose, so try to capture these details as best as you can.
Step 3: Sketch the Body and Limbs
Extend the outline of the head to sketch the body of the Bloodhound. Add a slightly curved line to represent the back, and then draw the front and hind limbs. Bloodhounds are known for their sturdy and muscular bodies, so make sure to convey that strength in your drawing.
Step 4: Add Fur and Texture
Now it’s time to add some texture and detail to your drawing. Start by carefully shading the fur using light strokes in the direction of the hair growth. Pay attention to the different areas of light and shadow on the Bloodhound’s body. Use a range of pencil hardness to create depth and dimension in your drawing.
Step 5: Refine the Facial Features
Go back to the facial features and add more detail and shading. Define the eyes by adding darker tones around them to create depth and expression. Shade the nose to make it appear three-dimensional. Bloodhounds have wrinkles and folds on their faces, so make sure to capture those unique details.
Step 6: Work on the Ears and Body
Refine the shape and texture of the ears by adding more shading and emphasizing the folds and creases. Bloodhounds have soft and velvety ears, so try to recreate that texture in your drawing. Pay attention to the shadows and highlights on the body as well to create a realistic and lifelike representation.
Step 7: Finalize the Details
Take a step back and assess your drawing so far. Are there any areas that need more work or refinement? Make any necessary adjustments to ensure accuracy and realism. Add any additional details such as whiskers or small markings on the fur to enhance the overall appearance of your drawing.
Conclusion
Congratulations! You have successfully completed a detailed drawing of a Bloodhound. By following these step-by-step instructions and paying close attention to the unique features of this breed, you have created a captivating and realistic depiction of a Bloodhound. Remember, practice makes perfect, so keep honing your drawing skills and exploring different subjects. I hope you enjoyed this tutorial and that it has inspired you to continue your artistic journey!