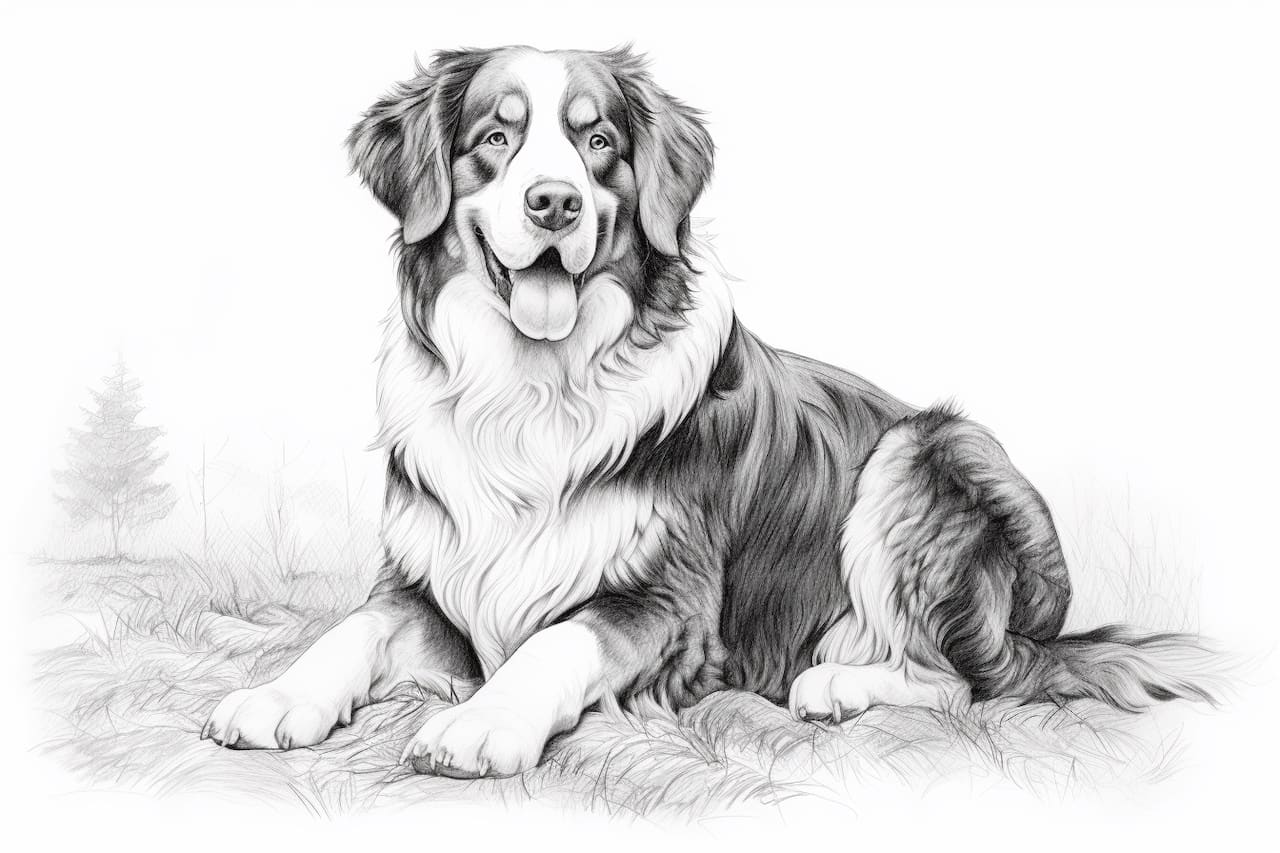
Welcome to this step-by-step guide on how to draw a Bernese Mountain Dog. Whether you are an experienced artist looking to expand your skills or a beginner looking to learn something new, this tutorial is for you. By following these simple steps, you will be able to create a realistic and detailed drawing of this beloved dog breed. So grab your drawing materials and let’s get started!
Materials Required
Before we begin, make sure you have the following materials handy:
- Drawing paper or sketchbook
- Pencils (HB, 2B, 4B)
- Eraser
- Blending stump or cotton swabs
- Reference photo of a Bernese Mountain Dog (optional but recommended)
Now that you have everything you need, let’s dive into the process of drawing a Bernese Mountain Dog.
Step 1: Outline the Basic Shapes
Start by lightly sketching the basic shapes that make up the Bernese Mountain Dog’s body. Begin with a large oval shape for the body and add smaller circles for the head, legs, and tail. Keep the lines loose and don’t worry about any details at this stage.
Step 2: Refine the Body Shape
Using the basic shapes as a guide, start refining the outline of the Bernese Mountain Dog. Pay attention to the proportions and try to capture the overall shape and stance of the dog. Outline the contours of the body, head, legs, and tail, making sure to add some curves to mimic the dog’s natural pose.
Step 3: Add Facial Features
Now it’s time to focus on the face. Start by drawing the eyes, which are almond-shaped and set apart. Add a small triangle-shaped nose and a smiling mouth with a lolling tongue. Study your reference photo closely to capture the unique features of a Bernese Mountain Dog’s face.
Step 4: Sketch the Ears
Bernese Mountain Dogs have triangular-shaped ears that are set high on the head. Sketch the ears near the top of the head, making them slightly tilted forward. Pay attention to the fur texture as you add some light strokes to indicate the hair on the ears.
Step 5: Outline the Fur
The Bernese Mountain Dog has a thick and fluffy double coat. Using short, light strokes, start outlining the fur on the body. Follow the natural direction of the hair and use varying stroke lengths to create depth and texture. Take your time with this step, as the fur is an important element in capturing the dog’s appearance.
Step 6: Detail the Face
Now it’s time to add more details to the face. Define the eyes by adding pupils and eyelashes. Darken the nose and add some shading to create dimension. Use short strokes to indicate the fur around the face and ears, paying attention to the direction and texture.
Step 7: Work on the Body
Continue adding more details to the body. Refine the outline and add more fur texture using short strokes. Pay special attention to areas where the fur appears darker or lighter, such as the chest and legs. Use a blending stump or cotton swabs to blend the strokes and create a smoother transition between the fur layers.
Step 8: Define the Paws
The Bernese Mountain Dog has large and sturdy paws. Use short, curved lines to outline the paw pads and add some shading to indicate depth. Study your reference photo to ensure accuracy in capturing the shape and structure of the paws.
Step 9: Refine the Tail and Fur
Give attention to the tail by defining its shape and adding fur texture. Use short, curved strokes to create the appearance of fur strands. Refer to your reference photo to capture the unique tail pattern of a Bernese Mountain Dog.
Step 10: Finalize the Drawing
Take a step back and evaluate your drawing. Make any necessary adjustments and add any additional details you may have missed. Darken the lines where needed, especially around the eyes, nose, and mouth, to enhance the overall appearance of the drawing. Erase any remaining guidelines or unnecessary lines, and your Bernese Mountain Dog drawing is complete!
Conclusion
Drawing a Bernese Mountain Dog may seem challenging at first, but by breaking it down into simple steps, anyone can create a beautiful representation of this majestic breed. Remember to be patient and have fun as you develop your skills. With practice, your drawings will continue to improve. So grab your pencils and bring this lovable dog to life on paper! Happy drawing!