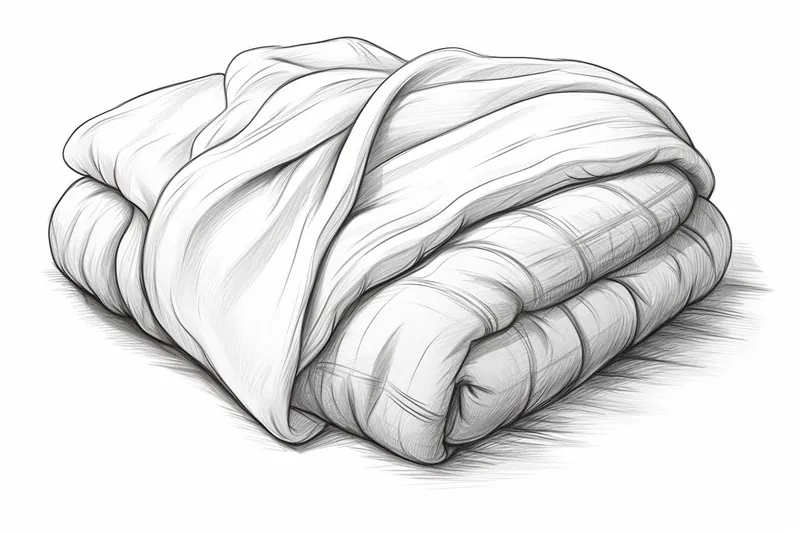
How to Draw a Blanket
Learn how to draw a realistic and detailed blanket with this step-by-step tutorial. Perfect for beginners and experienced artists. Master the art of drawing blankets now!
Materials You'll Need
- Pencil
- Paper
- Eraser
Drawing a blanket may initially appear to be a daunting challenge due to its soft textures, folds, and the way fabric drapes naturally. However, understanding the fundamental shapes, shading, and texture techniques can transform this task into an enjoyable and rewarding artistic exercise. Blankets are common household items that evoke feelings of warmth, comfort, and coziness, making them a meaningful subject to capture in your artwork. By learning how to draw a blanket, you can add a touch of realism and emotional depth to scenes featuring indoor settings, bedrooms, or even outdoor picnics.
This tutorial is designed to guide artists of all skill levels, whether you are just starting out or have experience with drawing fabric and textures. You will be introduced to essential techniques such as observing light and shadow, creating smooth folds, and rendering soft, tactile surfaces. These skills not only apply to blankets but also extend to other fabric-based objects, improving your overall ability to depict realistic textiles. As you progress through the step-by-step instructions on how to draw a blanket, you will gain confidence in capturing subtle details that bring your drawings to life.
Remember, practice and patience are key when mastering any new subject, especially one as nuanced as fabric. Embrace the learning process and allow yourself to experiment with different pencil pressures and shading methods. By the end of this tutorial, you'll not only have a beautifully rendered blanket but also valuable insights into drawing soft materials with realism and charm. So grab your sketchbook and pencils, and let's embark on this creative journey together!
Materials Required:
Before we begin, gather the following materials:
- Paper: Use a high-quality drawing paper or sketchbook that can handle different drawing techniques. The size is entirely up to your preference.
- Pencils: Have a range of pencils with varying degrees of hardness (e.g., 2H, HB, 2B) to achieve different shades and textures.
- Eraser: A kneaded eraser will be useful for correcting mistakes and creating highlights.
- Blending tools: Keep a blending stump or tortillon handy to smudge and blend pencil strokes.
- Reference image: Find a clear picture of a blanket that you would like to draw. This will help you understand its folds, textures, and shading.
Now that you have everything you need, let us dive into the step-by-step process of drawing a blanket.
Step 1: Outline the Shape of the Blanket
Begin by lightly sketching the basic shape of the blanket on your paper. Use gentle, loose strokes to create a rough outline. Remember that blankets come in various sizes and shapes, so make sure to reference your chosen image.
Step 2: Add the Folds and Creases
Next, carefully observe the reference image and start adding the folds and creases to your drawing. Take note of the main folds and their direction. Use gentle curved lines to indicate the folds, ensuring they flow naturally and create a sense of depth.
Step 3: Establish the Light Source
Identify the direction of the light source in your reference image. This will determine where the highlights and shadows fall on the blanket. Mark this direction on your drawing to ensure consistency throughout the process.
Step 4: Shade the Areas of Darkness
Begin shading the areas of the blanket that are in shadow. Use a soft graphite pencil, such as a 2B, and apply consistent pressure to create depth and darkness. Start by lightly shading the entire shadowed area, later building up the darkness gradually.
Step 5: Add Texture to the Blanket
Tip: As you progress through the steps of drawing a blanket, consider practicing with different light sources and fabric types to understand how they affect shadows and textures; experimenting with various materials, like colored pencils or pastels, can also enhance your ability to depict the unique qualities of different blankets and elevate your overall drawing skill.
To create a realistic texture, observe the reference image carefully. Blankets often have patterns or textures, such as knits or weaves. Use short, curved lines to mimic these textures, paying attention to the direction of the pattern. Start with light lines and gradually add more depth with darker pencil strokes.
Step 6: Emphasize the Highlights
Now, focus on the areas where the light hits the blanket and creates highlights. Using an eraser or a kneaded eraser, gently lift off some graphite to reveal the lighter tones. Be careful to retain some shading around the highlights to maintain the illusion of depth.
Step 7: Refine the Details
Take a step back and analyze your drawing as a whole. Look for any inconsistencies or areas that require adjustments. Refine the shapes, folds, and textures as needed. Remember that capturing the details is crucial in creating a realistic representation of a blanket.
Step 8: Blend and Smudge
To achieve a smoother and more seamless look, use a blending stump or tortillon to lightly blend and smudge certain areas of your drawing. This technique helps to soften the pencil strokes and create a more realistic texture.
Step 9: Finalize the Shading
Revisit the shading of your blanket to ensure a balanced and cohesive look. Adjust the darkness of the shadows and the depth of the highlights as necessary. Take your time and work gradually, always referring back to your reference image for guidance.
Conclusion
Congratulations! You have successfully learned how to draw a blanket step-by-step. By following these instructions, you can create a realistic and detailed representation of a blanket using basic drawing techniques. Remember to practice regularly and experiment with different drawing materials to further enhance your skills. Happy drawing!
Fun Facts About Blankets
- The oldest known blanket dates back over 3,000 years and was discovered in an Egyptian tomb, showcasing early textile craftsmanship.
- Blankets have been used historically not only for warmth but also as symbols of status and cultural identity in many indigenous communities.
- The term "blanket" originates from the 14th century and is believed to be named after a type of woolen cloth made by a weaver named Thomas Blanket.
- Electric blankets, invented in the early 20th century, revolutionized home heating by providing adjustable warmth and energy efficiency.
- Weighted blankets, designed to provide deep pressure stimulation, have been shown to reduce anxiety and improve sleep quality.
- Blankets are often used in art therapy to provide comfort and a sense of security during emotional healing processes.
- The Guinness World Record for the largest blanket ever made measured over 15,000 square meters and was created in India in 2019.
- In many cultures, blankets are gifted during significant life events such as births, weddings, and graduations as symbols of protection and care.
Suggestions for Scenes and Settings for Blanket Drawings
- A cozy living room scene with a blanket draped over a plush armchair next to a glowing fireplace.
- An inviting bedroom setting featuring a neatly folded blanket at the foot of a bed with soft pillows.
- A peaceful outdoor picnic blanket spread on the grass with a basket of fruits and a book nearby.
- A child's fort made of blankets and cushions, capturing playful folds and creases in the fabric.
- A close-up of a knitted or woven blanket, emphasizing texture and intricate patterns.
- A blanket casually tossed over a window seat, with sunlight casting gentle shadows on the folds.
- A pet curled up and partially covered by a soft blanket, highlighting warmth and comfort.
- A rustic cabin interior with a thick wool blanket hanging on a wooden bench or rack.
- A blanket wrapped around a person sitting outdoors under the stars, showing folds in motion.
- A vintage armchair with a fringed blanket draped over the back, showcasing fabric drape and texture.