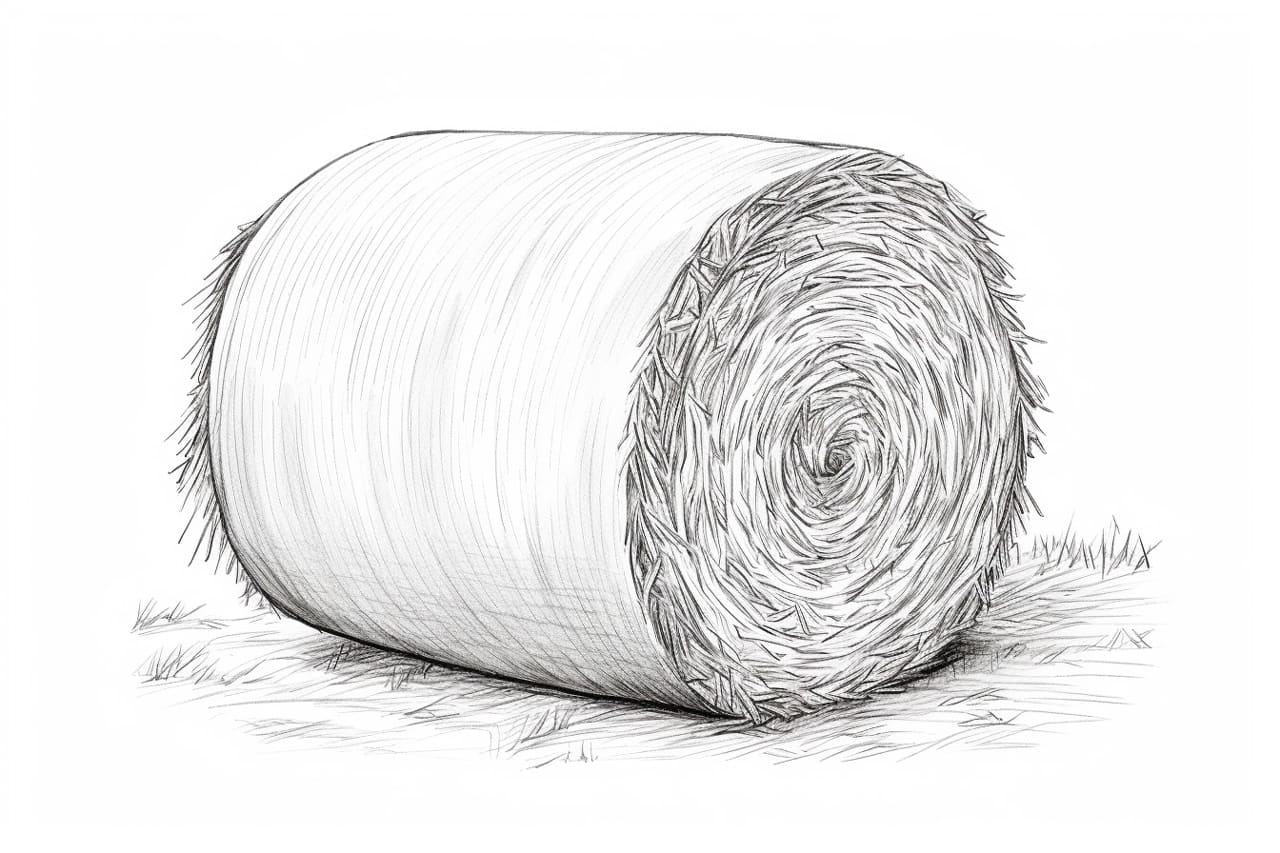
Drawing a bale of hay may seem challenging at first, but with a step-by-step approach, you can create a realistic and captivating artwork. Whether you are an experienced artist or just starting, this guide will help you break down the process into simple and manageable steps. So grab your sketchbook and pencils, and let’s get started with learning how to draw a bale of hay!
Materials Required
Before we begin, let’s gather the materials you will need for this drawing:
- Sketchpad or drawing paper
- Pencils (HB, 2B, 4B)
- Erasers (kneaded and/or vinyl eraser)
- A sharpener
- Blending stump (optional)
- Reference photo (optional)
Now that we have everything we need, let’s dive into the step-by-step instructions for drawing a bale of hay.
Step 1: Sketch the Basic Shape
Start by lightly sketching the basic shape of the bale of hay. Remember that bales of hay are typically rectangular with rounded edges. You can use a ruler to ensure straight lines if desired, but freehand sketching can also add a more organic feel to your drawing.
Step 2: Add Texture and Details
Next, we’ll add texture and details to make the bale of hay look more realistic. Draw crisscrossing lines across the surface of the bale, resembling the straw or hay strands. Vary the length and thickness of these lines to create a sense of depth and dimension. Pay attention to the shape of the bale and how the lines wrap around it.
Step 3: Shade and Add Shadows
To give depth to your drawing, it’s important to shade and add shadows. Determine the direction of the light source in your drawing and use a light pencil (such as HB) to lightly shade the areas that would be darker. Pay attention to the shape of the bale and any creases or folds. Gradually build up the values by layering with a softer pencil (such as 2B or 4B) to create shadows and darker areas.
Step 4: Blend and Smoothen
To achieve a smoother and more cohesive look, you can use a blending stump or your finger to blend and smoothen the shaded areas. This technique helps to eliminate any harsh lines and transitions between different values, creating a more realistic appearance.
Step 5: Refine the Details
Now, it’s time to refine the details of the bale of hay. Take a closer look at the reference photo or use your imagination to add additional texture and subtle variations in the hay strands. Pay attention to any folds, creases, or irregularities on the surface of the bale. Use an eraser to selectively lighten areas or create highlights, adding further dimension to your drawing.
Step 6: Finalize the Drawing
In this final step, go over your drawing and make any necessary adjustments or refinements. Take a step back and assess the overall composition, paying attention to proportions and perspective. Make sure all the elements are well defined and balanced. Once you are satisfied with the result, you can darken the lines or go over them with a pen for a more finished appearance.
Congratulations! You have successfully drawn a bale of hay. Remember, practice makes perfect, so don’t hesitate to try this exercise multiple times to improve your skills. Experiment with different techniques, such as using different pencils or adding color to your drawing, to create unique and personalized artworks.
Conclusion
Drawing a bale of hay is a great exercise to practice your observation skills and enhance your rendering techniques. By following these step-by-step instructions, you can create a detailed and realistic drawing that captures the essence of this agricultural staple. Remember to start with a basic shape, add texture and shadows, and refine the details to bring your artwork to life. Enjoy the process and let your creativity shine through!