Welcome to this step-by-step guide on how to draw a 3D square! Whether you’re an aspiring artist or just looking to improve your drawing skills, learning to draw a 3D square can be a great way to challenge yourself and add depth to your artwork. In this article, we will go through the process of drawing a realistic 3D square in a clear, clean, and concise style. So let’s get started!
Materials Required
Before we begin, let’s gather the materials you’ll need for this drawing tutorial:
- Paper: Choose a smooth-surface paper that works well with pencils or your preferred drawing medium.
- Pencils: You’ll need a range of pencils with different lead hardness, such as HB, 2B, 4B, and 6B.
- Eraser: Get a good-quality eraser that can easily remove any mistakes without damaging the paper.
- Ruler: A straight-edged ruler will help you maintain the precision of your lines.
- Optional: If you prefer, you can also use a compass to achieve accurate curves while drawing the square.
Now that we have our materials ready, let’s explore the step-by-step process of drawing a 3D square.
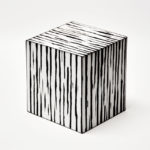
Step 1: Start with the Base Square
To begin, draw a square using your ruler. Make sure to use light and loose lines so that you can easily erase and adjust later if needed. The size of the square is up to you, but for this tutorial, let’s start with a medium-sized square. You can use any pencil hardness for this initial sketch.
Step 2: Add Depth with Guidelines
Now, let’s add guidelines to create the illusion of depth in our square. Draw diagonal lines from the corners of your square, meeting at a central point. These lines will serve as a guide for the 3D effect. Use a light pencil, such as an HB or 2B, to draw these lines, as they will be erased later.
Step 3: Define the Sides of the Cube
Next, it’s time to define the sides of the cube. Draw vertical lines extending from the corners of the base square to create the sides of the cube. Ensure that these lines are parallel to each other and aligned with the guidelines you drew in the previous step. Make the sides of the cube slightly shorter than the base square to create the illusion of depth.
Step 4: Create the Top Face of the Cube
Now, let’s draw the top face of the cube. Connect the top ends of the vertical lines you drew in the previous step with horizontal lines. These lines should be parallel to the base square and aligned with the guidelines. Take your time to make sure the lines are straight and evenly spaced.
Step 5: Add Details to the Cube
To make your 3D square look more realistic, add details such as shading and texture. Start by adding shading to one side of the cube to create a sense of volume. Use a softer pencil, like a 4B or 6B, and apply more pressure to create darker tones. Gradually blend the shading with a blending stump or your finger to achieve a smooth transition.
Step 6: Refine the Cube
Now that the basic structure of your 3D square is complete, it’s time to refine the details. Use an eraser to remove any unnecessary or overlapping lines, especially the guidelines and initial sketch. Pay attention to any areas that need adjustment or correction, and make the necessary changes to perfect your drawing.
Conclusion
Congratulations! You have successfully learned how to draw a 3D square. By following these step-by-step instructions, you can create a realistic and visually appealing square with depth and dimension. Remember, practice makes perfect, so don’t be discouraged if your first attempt doesn’t turn out exactly as expected. Keep honing your skills, experimenting with different shading techniques, and soon you’ll be able to draw 3D squares effortlessly.
We hope you found this tutorial helpful and enjoyable. Happy drawing!