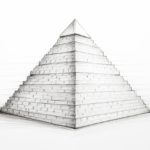
A triangular pyramid, also known as a tetrahedron, is a three-dimensional shape made up of four triangular faces. It is a simple yet interesting shape to draw and can be a great addition to your artistic repertoire. In this tutorial, we will guide you through the step-by-step process of how to draw a triangular pyramid, allowing you to create a 3D illusion on a 2D surface. So grab your pencil, paper, and let’s get started!
Materials Required
To draw a triangular pyramid, you will need the following materials:
- A pencil
- A ruler
- A compass
- A eraser
- A sheet of paper
Now that we have gathered our materials, let’s dive into the drawing process.
Step 1: Drawing the Base Triangle
Start by drawing a large equilateral triangle on your paper. To do this, follow these steps:
- Place the ruler horizontally on the paper to serve as the baseline for your triangle.
- Determine the length of the triangle’s sides. For example, let’s assume each side is 5 centimeters long.
- Measure and mark the midpoint of the baseline. This will be the center of your triangle.
- Position the compass at the center point and draw a circle with a radius equal to the length of the triangle’s side.
- Without changing the compass radius, place the compass on one of the marks on the baseline and draw an arc that intersects the circle.
- Repeat the previous step for the other mark on the baseline.
- Connect the two arc intersections to complete the equilateral triangle.
Congratulations! You have successfully drawn the base triangle of the triangular pyramid.
Step 2: Constructing the Pyramid
Now, it’s time to turn our base triangle into a pyramid by adding the remaining triangular faces. Follow these steps:
- Extend each side of the base triangle outward using a ruler. Each extension should be of equal length and meet at a single point above the triangle.
- Connect the three extended lines to the point above the triangle, forming three additional triangles.
- Erase the portion of the base triangle that is hidden by the newly added triangles, leaving only the visible portion.
You should now have a complete triangular pyramid, consisting of four symmetrical triangular faces.
Step 3: Adding Depth and Shadows
To enhance the three-dimensional appearance of your triangular pyramid, we can add depth and shadows. Follow these steps:
- Choose a light source direction. This will determine the placement of shadows on the pyramid.
- Shade the sides of the pyramid facing away from the light source, gradually darkening the tone as you move away from the light.
- Leave the sides of the pyramid facing the light source lighter or even unshaded, representing the illuminated areas.
- Use your pencil or shading tools to blend the tones smoothly, creating a more realistic effect.
With these shading techniques, you can bring your triangular pyramid to life, giving it a sense of depth and dimension.
Conclusion
Drawing a triangular pyramid may seem challenging at first, but by following these step-by-step instructions, you can create an impressive three-dimensional shape on a two-dimensional surface. Remember to take your time, use the necessary materials, and experiment with shading techniques to add depth and realism to your drawing. So grab your pencil, paper, and start creating your very own triangular pyramid masterpiece!