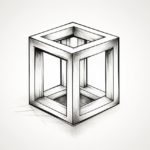
Drawing a 3D cube can be a fun and challenging experience. With some simple steps and practice, you can create a beautiful and realistic cube drawing. In this tutorial, we’ll break down the process of how to draw a 3D cube into easy-to-follow steps. Let’s get started!
Materials Required
- A drawing pencil
- Eraser
- Drawing paper
- Ruler
Step 1: Setting Up the Foundation
Start by drawing a perfect square in the center of your paper. Use a ruler to ensure that all four sides of the square are equal in length. This square will serve as the base for your 3D cube.
Step 2: Adding Depth
Now, let’s give your cube some depth. Choose one side of the square as the front face of your cube and draw two diagonal lines from the corners of this face to the corners of the square. These lines should converge at a single point on the paper, creating a vanishing point. This point will be essential for creating the illusion of depth.
Step 3: Extending the Lines
From the corners of the front face, extend lines towards the vanishing point. These lines will form the sides of your cube. Be sure to draw them evenly and parallel to each other. These lines represent the edges of your cube extending into the distance.
Step 4: Completing the Cube
Now, draw the back face of your cube by connecting the ends of the lines you extended in the previous step. The back face should also be a perfect square, parallel to the front face.
Step 5: Adding Thickness
To make your cube appear three-dimensional, add thickness to its sides. Extend lines from the corners of the front face, just like in Step 3, but this time, connect them to the corresponding corners on the back face. This will create the sides of your cube.
Step 6: Erase Unnecessary Lines
Carefully erase any unnecessary lines, such as those from the original square. You should now have a well-defined 3D cube on your paper.
Step 7: Shading and Detailing
Now that you have the basic structure of your 3D cube, it’s time to make it look more realistic by adding shading and fine-tuning the details.
Shading:
- Identify the Light Source: First, determine where your light source is coming from. This will help you decide which sides of the cube will be in shadow and which will be illuminated.
- Create Gradients: On the sides of the cube that are not facing the light source, use your pencil to add shading. Start by applying more pressure on your pencil near the edges of those sides and gradually lighten the pressure as you move towards the center. This creates a gradient effect, making the cube appear rounded and three-dimensional.
- Cross-Hatching: For a more textured appearance, you can use a technique called cross-hatching. This involves drawing a series of parallel lines in one direction and then adding another set of lines that cross over the first at an angle. Cross-hatching can be particularly useful for adding texture to the surfaces of your cube.
- Blend and Smudge: To create smoother transitions between light and shadow, you can use a blending tool or your finger to gently smudge and blend the pencil marks. This helps achieve a more realistic and subtle shading effect.
Adding Highlights:
- Identify the Reflective Surfaces: Determine which areas of the cube would catch the most light. These are the surfaces that should have highlights.
- Eraser Technique: Take a kneaded eraser or a fine-tip eraser and carefully lift off some graphite in the areas where you want highlights. This will create a contrast between the highlighted areas and the shaded ones, adding depth and dimension to your cube.
- Reflective Details: If you want to add more realism, consider including small reflective details, such as highlights along the edges or tiny glimmers on the surfaces that catch the most light. These subtle touches can make your cube look truly convincing.
Step 8: Final Touches
As you approach the final stages of your 3D cube drawing, here are some additional tips and considerations to perfect your artwork:
Refining Perspective:
- Double-Check Proportions: Ensure that all the lines and angles in your cube align correctly with the perspective you’ve established. Adjust any inconsistencies to maintain a convincing three-dimensional effect.
- Vanishing Point: Revisit the vanishing point you created in Step 2. Make sure all lines converge accurately toward this point to maintain a realistic sense of depth.
Fine Details:
- Texture and Surface Details: Depending on the material your cube is made of, you can add texture and surface details. For example, if it’s a wooden crate, you can draw wood grain or knots on the surfaces.
- Ground Shadows: To ground your cube in its environment, add shadows beneath it. The shape and intensity of these shadows will depend on the angle and direction of your light source.
Signing Your Artwork:
- Don’t forget to sign your artwork! You’ve put time and effort into creating your 3D cube, so be sure to add your signature in a discreet yet visible location.
Practice and Experiment:
- Keep practicing. Drawing is a skill that improves with time and effort. Don’t be discouraged if your first attempts aren’t perfect. Each drawing is a valuable learning experience.
- Experiment with different lighting conditions, materials, and perspectives to broaden your artistic abilities and discover your unique style.
Conclusion
Drawing a 3D cube is a fantastic way to practice your perspective drawing skills. With patience and practice, you can create impressive three-dimensional objects on paper. Remember that the key to success in art is practice, so keep experimenting and refining your skills. Happy drawing!