Welcome to this step-by-step guide on how to draw a bathroom! Whether you’re an experienced artist or just starting out, this tutorial will help you create a realistic and detailed drawing of a bathroom. Grab your pencils, paper, and let’s get started!
Materials Required:
- Pencil (HB or 2B)
- Eraser
- Ruler
- Paper (preferably white or sketch paper)
- Reference image of a bathroom (optional)
Step 1: Plan Your Drawing
Before we begin, it’s a good idea to plan out your drawing. Think about the perspective you want to use and the layout of the bathroom. Consider the position of the sink, toilet, bathtub, and any other elements you wish to include. Take your time to visualize your drawing before putting pencil to paper.
Step 2: Start with Basic Shapes
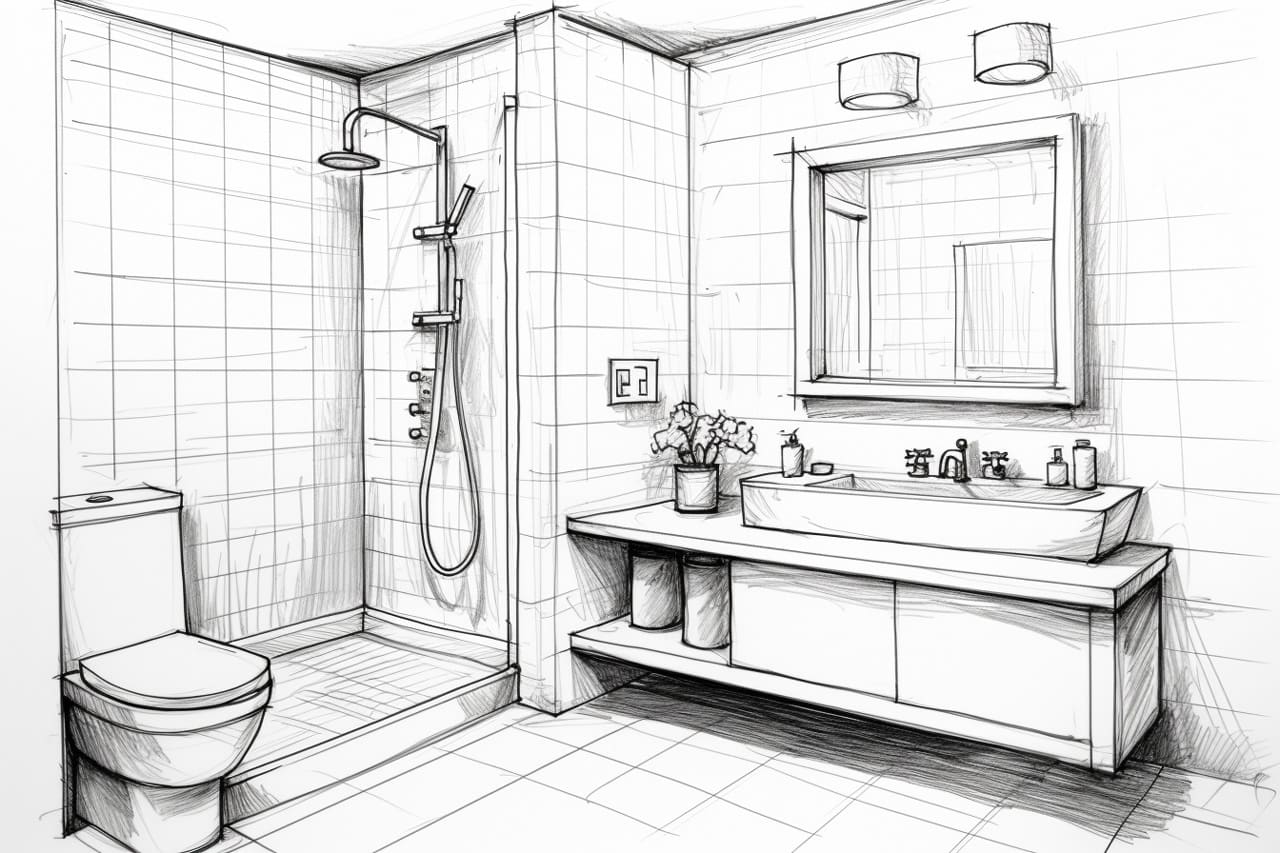
Begin by drawing the outline of the bathroom using basic shapes. Draw a rectangle for the walls and another smaller rectangle for the floor. Use light, loose lines to create a rough sketch of the space. Don’t worry about details at this stage, we’ll add those later.
Step 3: Define the Walls and Floor
Using your ruler, refine the outlines of the walls and floor. Straighten any uneven lines and ensure the corners are square. Erase any unnecessary lines from the initial sketch and darken the outlines of the walls and floor to make them more distinct.
Step 4: Draw the Fixtures
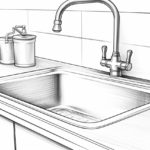
Now it’s time to add the fixtures to your bathroom. Start by drawing the sink. Using your ruler, draw a rectangular shape for the sink basin and add a curved line on top for the faucet. Next, draw the toilet by creating a rounded rectangle shape and adding a seat and lid. Finally, draw the bathtub by sketching a rectangular shape with curved corners.
Step 5: Add Details
To make your bathroom drawing more realistic, it’s important to add details. Start by drawing the mirror above the sink. Use straight lines to create the frame and a curved line for the reflection. Next, add the handles and knobs to the sink, toilet, and bathtub. Don’t forget to draw the faucet handles and the showerhead if you have one.
Step 6: Textures and Patterns
Textures and patterns can add interest and depth to your drawing. Use short, light strokes to indicate the texture of the walls and floor. If there are tiles in your reference image, carefully draw the lines and patterns to represent them. Pay attention to small details like grout lines and reflections on reflective surfaces.
Step 7: Shadows and Highlights
Shadows and highlights can bring your drawing to life. Observe your reference image or imagine the light source in your bathroom. Use shading techniques to create shadows in areas that are not directly hit by the light. Similarly, use lighter shading or leave areas white to create highlights on surfaces that are reflective or receive direct light.
Step 8: Fine-Tune Your Drawing
Take a step back and evaluate your drawing. Look for any areas that need adjustments or refinement. Use your eraser to correct any mistakes or clean up any stray lines. Make sure all the proportions are accurate and that the perspective is consistent throughout the drawing.
Step 9: Final Touches
Once you are happy with the overall drawing, it’s time to add the final touches. Use darker shading or a pen to emphasize certain areas or lines. Add more details such as towels, toiletries, or plants to bring your bathroom to life. Take your time with these final touches to ensure a polished and finished drawing.
Conclusion
Congratulations on completing your drawing of a bathroom! By following these step-by-step instructions, you have successfully created a detailed and realistic representation of a bathroom. Remember to practice regularly to improve your skills and try experimenting with different perspectives and styles. We hope you enjoyed this tutorial and found it helpful. Happy drawing!