Welcome to this step-by-step tutorial on how to draw Christmas lights! Whether you want to add some festive flair to a holiday-themed illustration or simply practice your drawing skills, this guide will walk you through the process. By the end, you’ll be able to create a beautiful and twinkling string of Christmas lights on your own. So, let’s dive right in!
Materials Required:
- Drawing paper
- Pencil
- Eraser
- Fine-tipped black marker or pen
- Colored pencils or markers in various vibrant colors
- Ruler (optional, for straight lines)
Step 1: Sketch the String of Lights
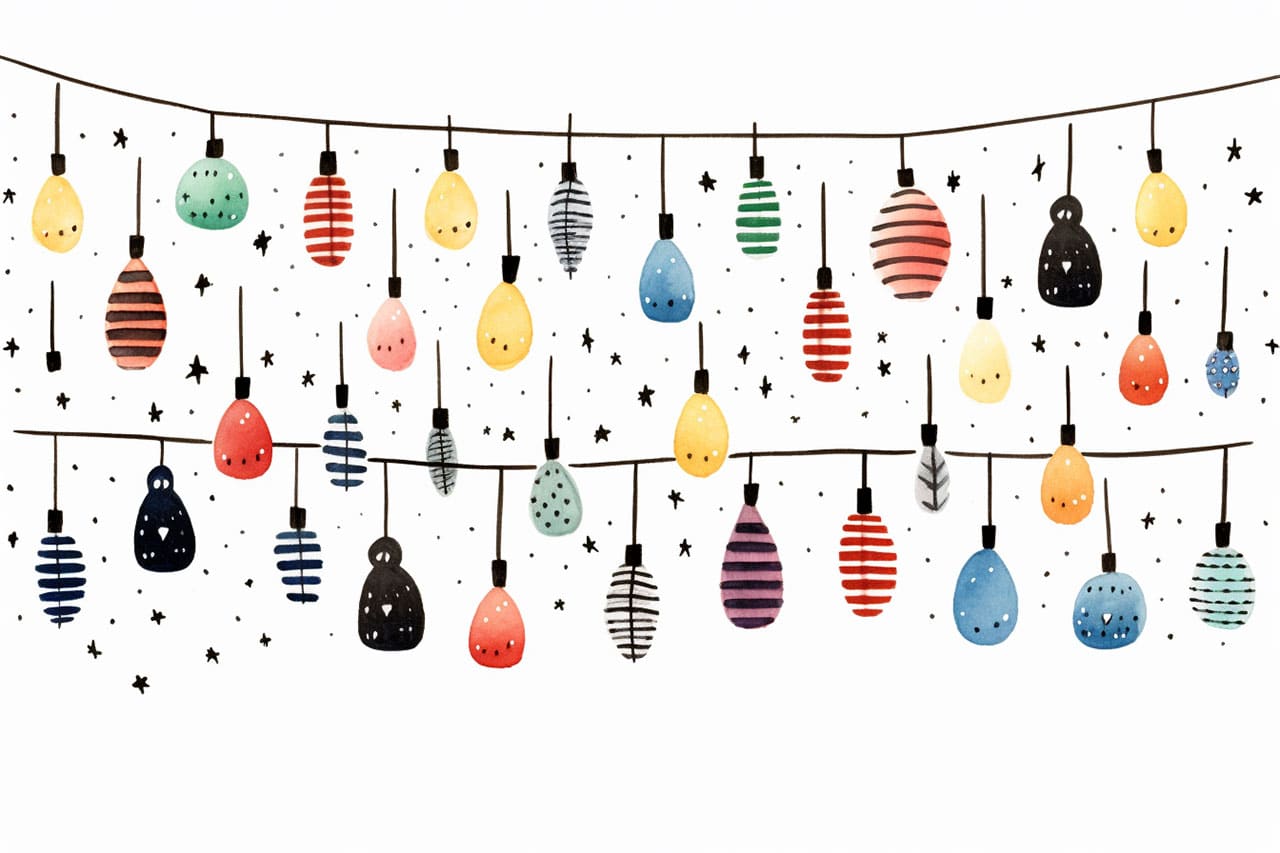
To begin, take your pencil and lightly sketch a slightly curved line across your paper. This line will serve as the base for your string of Christmas lights. You can make the line as long or as short as you like, depending on how many lights you want to draw.
Step 2: Add Bulb Shapes
Next, start adding bulb shapes along the curved line. These bulbs can be circular, oval, or even slightly squashed, just like real Christmas lights. Place them at regular intervals on the line, leaving some space between each bulb. Don’t worry about making them perfect since the irregularity adds to the charm.
Step 3: Outline the Bulbs
Now, go over your sketched bulb shapes with a fine-tipped black marker or pen. This step will give your drawing a neat and defined look. Be careful not to press too hard, as we’ll be adding color later, and you don’t want the marker lines to show through.
Step 4: Add Details
To make your Christmas lights look even more realistic, it’s time to add some details. Inside each bulb, draw a smaller circle or oval shape to represent the reflective glass surface. Then, draw a curved line at the top of each bulb, indicating the metal part that connects to the string. These small touches will make your lights shine brighter.
Step 5: Color the Bulbs
Now comes the fun part – coloring! Pick up your colored pencils or markers and choose vibrant colors for your lights. Traditional colors like red, green, blue, and yellow work well, but feel free to get creative with your color choices. You can mix and match different colors to make your lights more festive. Fill in each bulb with the chosen colors, pressing softly to create a smooth and even application.
Step 6: Add Shading and Highlights
To make your Christmas lights appear more three-dimensional, add some shading and highlights. Determine the light source, and imagine that the light falls on one side of each bulb while the opposite side remains in shadow. Shade the side of each bulb away from the light source using a slightly darker shade of the same color. Then, use a white colored pencil or marker to add a small highlight on the side of each bulb that faces the light.
Step 7: Draw the String
Now that your bulbs are colored and shaded, it’s time to draw the string that connects them. Starting from one end, draw a slightly curved line that connects each bulb along the bottom. Remember to keep the line thin and relatively straight, as it will provide support for your lights.
Step 8: Add More Strings (Optional)
If you want to make your drawing more elaborate, you can add additional strings of lights. Repeat Step 7 and draw parallel lines above or below the initial string, connecting the bulbs in the same way. You can vary the number of additional strings and their positions to create a visually appealing composition.
Step 9: Finalize Your Drawing
To complete your drawing, go over the string and any other necessary details with a fine-tipped black marker or pen. This step will give your drawing a polished look and make the colors of the lights pop even more. Take a moment to review your artwork and make any necessary adjustments.
Conclusion
Congratulations! You have successfully learned how to draw Christmas lights using simple step-by-step instructions. This festive drawing can be a delightful addition to your holiday-themed illustrations or a standalone artwork. Remember to have fun with colors and get creative with your designs. Now, grab your materials and enjoy creating beautiful and twinkling Christmas lights on paper.