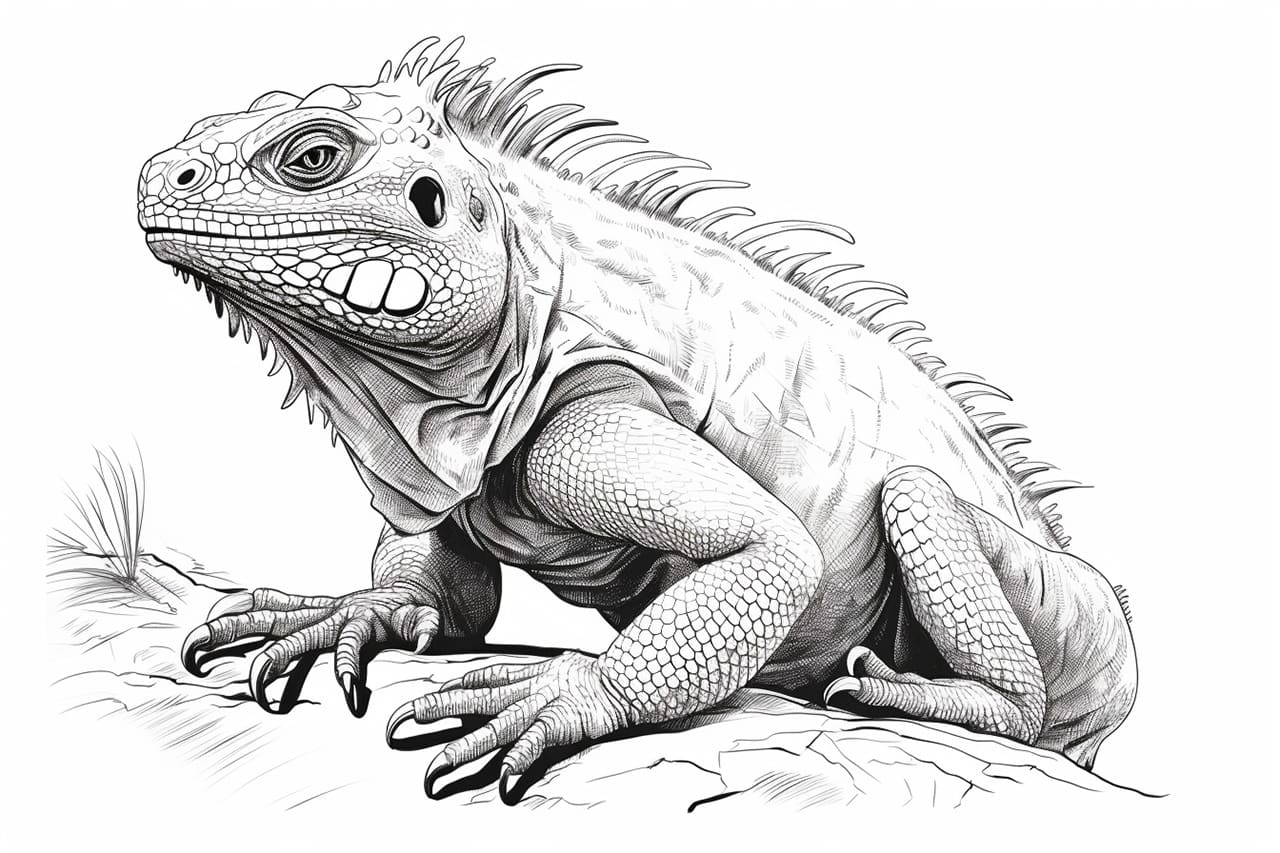
Welcome to this step-by-step guide on how to draw an iguana. Whether you’re an experienced artist or just starting out, this tutorial will guide you through the process of creating a stunning iguana drawing. By following the instructions carefully, you’ll be able to capture the unique features of this fascinating reptile and create a lifelike representation on paper. So let’s get started!
Materials Required
Before we begin, make sure you have the following materials:
- Pencil: Use a pencil with a medium lead for sketching and shading.
- Sketching paper: Choose a smooth, heavyweight paper that can handle multiple layers of pencil work.
- Eraser: Use a kneaded eraser for easy removal of mistakes and smudges.
- Blending stump/tortillon: This tool will help you achieve smooth shading and blending.
- Reference image: Find a clear and detailed reference image of an iguana to aid in your drawing.
Now that you have all the necessary materials, let’s dive into the step-by-step instructions.
Step 1: Basic Shape
Start by lightly sketching a basic shape for the iguana’s body using simple geometric forms. Begin with an oval shape for the head, followed by a triangular shape for the body and a long curved line for the tail. Keep the lines light and loose, as they will serve as a guideline for the final drawing.
Step 2: Head Details
Refine the shape of the head by adding more detail. Sketch the eyes, using almond shapes with a small circle for the iris. Add a ridge above the eyes, which is a prominent feature in iguanas. Include the nostril holes and a triangular mouth, slightly open to reveal the teeth. Don’t forget the small scales that cover the iguana’s head.
Step 3: Body and Limbs
Using the triangular shape as a guide, add more definition to the body. Sketch in the front and hind limbs, making sure to capture their proportion and alignment. Add the details of the iguana’s claws at the end of each limb. Remember to include the scales along the body, paying attention to their size and pattern.
Step 4: Tail
Define the tail by adding its unique shape and texture. Iguanas have a long and muscular tail with small, overlapping scales. Use curved lines to create a sense of volume and dimension. Pay attention to the tapering of the tail as it narrows towards the end.
Step 5: Shading
Now it’s time to add depth and realism to your drawing through shading. Start by identifying the light source and imagine how it falls on the iguana’s body. Use light, even strokes to shade the darker areas, such as the undersides, crevices, and areas in shadow. Gradually build up the layers of shading, using a combination of hatching, cross-hatching, and blending techniques.
Step 6: Textures and Details
To enhance the realism of your iguana drawing, focus on adding textures and details. Pay attention to the scales on the iguana’s body and tail, using short, curved lines to represent them. Add wrinkles and folds around the iguana’s neck and body to give it a lifelike appearance. Don’t forget to add fine details like the iguana’s claws, teeth, and the rough texture of its skin.
Step 7: Final Touches
Evaluate your drawing and make any necessary adjustments. Erase any stray lines or smudges with a kneaded eraser. Enhance the highlights and dark areas to create a sense of contrast and depth. Take a step back and observe your drawing from a distance to ensure overall balance and proportion.
Wrapping up How to Draw an Iguana
Congratulations! You’ve successfully learned how to draw an iguana in a realistic manner. By following these step-by-step instructions and using the right techniques, you’ve created a stunning representation of this fascinating reptile. Remember to practice regularly and experiment with different materials and styles to further develop your artistic skills. Enjoy the process of drawing, and keep exploring the wonderful world of art!