Welcome to this step-by-step guide on how to draw a cobra snake! Cobras are fascinating creatures known for their distinctive shape and powerful presence. Whether you’re a beginner or an experienced artist, follow these instructions to create your own stunning cobra snake drawing. Grab your pencils, papers, erasers, and let’s get started!
Materials Required
To draw a cobra snake, you will need the following materials:
- Drawing paper or sketchbook
- Pencils (HB, 2B, and 4B)
- Eraser (kneaded or soft eraser)
- Pencil sharpener
- Ruler (optional for guidelines)
- Reference photo of a cobra snake (for inspiration and guidance)
Now that you have your materials ready, let’s dive into the step-by-step process of drawing a cobra snake.
Step 1: Basic Shapes and Guidelines
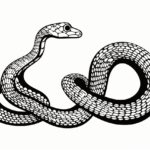
Begin by lightly sketching the basic shapes and guidelines of the cobra snake. Start with an oval shape for the snake’s head, followed by a long and curved line for the body. Add a smaller oval shape at the end of the line for the tail. In this step, focus on the proportions and positioning of the snake.
Step 2: Outline the Head
Using the basic oval shape as a guide, refine the outline of the cobra’s head. Pay attention to the shape of the head, the curves, and the distinctive hood. Remember to keep your lines light and loose at this stage, as you will be refining them later.
Step 3: Draw the Eyes and Nostrils
Within the outline of the head, draw the eyes and nostrils. Cobras have large, expressive eyes, so capture their shape and give them a sense of depth. Add small ovals for the nostrils on the upper side of the head.
Step 4: Add the Mouth and Fangs
Extend the shape of the head to create the mouth of the cobra. Draw a curved line to indicate the open mouth and add two long, curved fangs at the front. Pay attention to the positioning of the fangs, as they play a significant role in defining the cobra’s threat display.
Step 5: Detail the Hood
One of the distinctive features of a cobra snake is its hood. Extend the lines from the sides of the head to create the hood shape. Keep in mind that the hood expands when the snake feels threatened or aggressive. Add curves and lines to depict the texture and patterns on the hood.
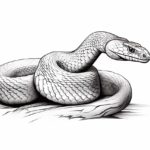
Step 6: Sketch the Body
Now, focus on the body of the cobra snake. Follow the curved line you drew earlier and add thickness and volume to it. Cobras have muscular bodies, so make sure to emphasize their structure and movements. Add a few lines to indicate the scales on the body.
Step 7: Draw the Tail
Extend the body line to create the tail of the cobra. Keep it thin and taper it gradually towards the end. Add a few lines to show the texture and scales on the tail.
Step 8: Refine the Details
In this step, focus on refining the details of the cobra snake. Use different pencil grades (HB, 2B, and 4B) to add depth and value to your drawing. Darken the areas that need shadow and use lighter strokes for the lighter areas. Pay attention to the texture, patterns, and scales on the snake’s body.
Step 9: Erase and Adjust
Take a step back and evaluate your drawing. Use an eraser to carefully remove any unwanted lines or smudges. Adjust any areas that may need refinement or correction. This step is essential for achieving a clean and polished look in your drawing.
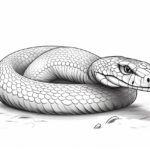
Step 10: Final Touches and Details
In the final step, add the finishing touches and details to your cobra snake drawing. Focus on enhancing the texture, patterns, and scales to bring your artwork to life. Use your reference photo to guide you and add any additional elements or shading to make your drawing stand out.
Congratulations! You have successfully drawn a realistic cobra snake. With patience, practice, and attention to detail, your drawing skills will continue to improve. Remember, art is all about expression and creativity, so feel free to experiment and add your unique style to your cobra snake drawing.
Conclusion
Drawing a cobra snake may seem intimidating at first, but by following these step-by-step instructions, you can create a stunning piece of art. Remember to start with basic shapes and guidelines, then gradually add details and refine your drawing. With practice and perseverance, you’ll be amazed at how much progress you can make. So grab your materials, let your creativity flow, and enjoy the process of drawing a magnificent cobra snake!