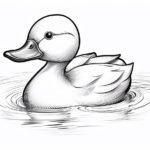
Welcome to this step-by-step tutorial on how to draw a wood duck. Known for its vibrant colors and unique markings, the wood duck is a beautiful subject for any artist. In this guide, I will walk you through the process of creating a realistic and detailed drawing of this magnificent bird. So grab your sketchbook and let’s get started!
Materials Required
To begin your wood duck drawing, gather the following materials:
- Pencil (preferably an HB or 2B for smoother lines)
- Eraser (either a kneaded eraser or a soft vinyl eraser)
- Drawing paper (choose a heavyweight paper with a smooth surface)
- Fine-tip black marker (optional, for outlining)
- Colored pencils or watercolors (optional, for adding color)
Now that you have your materials ready, let’s dive into the steps of drawing a wood duck.
Step 1: Outline the Basic Shape
Start by lightly sketching an oval shape for the wood duck’s body. This oval will serve as a guide for the duck’s overall posture and size. Next, add a smaller oval shape at the front for the head. Connect the body and head with a curved line, creating a smooth transition. Don’t worry about adding too much detail at this stage; we’ll refine the shape in the following steps.
Step 2: Define the Head and Beak
Using the outline you created, start shaping the head of the wood duck. Add more definition and detail by drawing a rounded shape for the top of the head, and a curved line below it for the lower jaw. Draw a small, pointed triangle at the end of the lower jaw to represent the beak. Wood ducks have a distinctively long and narrow beak, so be sure to capture its shape accurately.
Step 3: Draw the Eye and Facial Features
Now it’s time to add some life to your wood duck drawing by adding the eye and facial features. Draw a small circle within the head shape for the eye. Within the eye, add a smaller circle to represent the pupil. Around the eye, lightly sketch a series of short lines to indicate the feathers. Take your time to carefully observe the reference photo or real-life wood ducks to capture the intricate details.
Step 4: Sketch the Neck and Body
Extend the curved line from the head to create the neck of the wood duck. Then, using quick and light strokes, sketch the body shape around the oval guide. Focus on creating the outline of the bird’s back, chest, and tail feathers. Remember, wood ducks have a distinctive long tail, so take care to represent its shape accurately.
Step 5: Add Feathers and Wing Details
Next, we’ll add more details to the wood duck’s feathers and wings. Start by sketching the wing shape extending from the body. Wood ducks have unique patterns on their feathers, so take your time to capture their intricate designs. Use short, curved lines to represent the individual feathers. Pay attention to the direction and flow of the feathers, as this will add realism and depth to your drawing.
Step 6: Refine the Details
Now that you’ve established the basic shape and overall structure of the wood duck, it’s time to refine the details. Go over your initial sketch and darken the lines, focusing on adding depth and dimension. Take a closer look at the reference photo or observe the duck in real life to notice any subtle variations in color and marking. Use your pencil to add shading and texture to create a more realistic representation.
Step 7: Optional Outlining
If you want to give your wood duck drawing a bolder and more defined look, you can use a fine-tip black marker to outline the main features. This step is optional but can help enhance the contrast and make your drawing stand out.
Step 8: Adding Color (Optional)
If you prefer, you can add color to your wood duck drawing using colored pencils or watercolors. Wood ducks have vibrant feathers, so choose colors that closely match their natural hues. Gradually build up layers of color, starting with lighter shades and gradually adding darker tones to create depth and texture. Be sure to blend and layer the colors smoothly for a realistic effect.
Conclusion
Congratulations! You have successfully learned how to draw a wood duck from start to finish. By following these step-by-step instructions, you have created a detailed and lifelike representation of this beautiful bird. Remember to keep practicing, as it takes time and patience to develop your drawing skills. I hope you enjoyed this tutorial and that it has inspired you to explore the world of wildlife art further. Happy drawing!