Welcome to this step-by-step guide on how to draw a tortoise! Whether you are a beginner or an experienced artist, this tutorial will provide you with clear instructions on how to create a realistic and detailed drawing of a tortoise. So grab your art supplies and let’s get started!
Materials Required
Before we begin, gather the following materials:
- Drawing paper
- Pencils (preferably an HB or 2B for sketching and a lighter pencil for shading)
- Eraser
- Tortillon or blending stump (optional)
- Reference photo of a tortoise (highly recommended)
The reference photo will help you understand the details and structure of a tortoise, ensuring that your drawing looks accurate. Let’s move on to the step-by-step instructions!
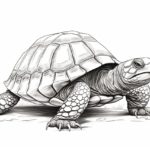
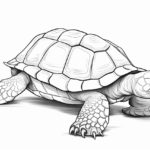
Step 1: Sketch the Basic Shape
Start by lightly sketching an oval shape for the tortoise’s body, a smaller circle towards one end for the head, and four curved lines for the limbs. This will establish the basic proportions of the tortoise.
Step 2: Add the Shell
Next, add the tortoise’s shell by drawing a curved line connecting the body and the head. Then, starting from the bottom of the oval shape, draw a series of overlapping curved lines to create the individual sections of the shell. These lines should follow the contour of the oval shape and get smaller as they approach the tortoise’s tail.
Step 3: Define the Head and Limbs
Refine the shape of the tortoise’s head by sketching the eyes, beak, and any other visible details. Remember to observe your reference photo for accuracy. Similarly, add more definition to the limbs by creating the outlines of the legs and feet.
Step 4: Refine the Shell
Working on the shell, add further detail by drawing small, hexagonal shapes within each section. These shapes will represent the bony plates on the tortoise’s shell. Take your time and ensure that the sections are evenly spaced and sized.
Step 5: Add Texture and Shading
To give your tortoise depth and texture, use a lighter pencil to add shading. Observe the reference photo and identify areas that are darker or have more texture, such as the folds of the skin and the crevices of the shell. Gradually build up the shading, starting with light strokes and gradually adding darker tones.
Step 6: Refine Details
Now it’s time to focus on the smaller details. Add highlights to the eyes and define the scales on the tortoise’s limbs. Pay attention to the patterns and textures that you observe in your reference photo. Take your time with this step, as the details will bring your drawing to life.
Step 7: Finalize the Drawing
Review your drawing and make any necessary adjustments. Erase any stray lines or unwanted marks, and ensure that the proportions and details are accurate. Take a step back and assess your drawing as a whole to ensure that it captures the essence of a tortoise.
Conclusion
Congratulations on completing your tortoise drawing! By following these step-by-step instructions, you have created a detailed and realistic representation of a tortoise. Drawing animals can be a fun and rewarding experience, allowing you to appreciate the beauty and intricacy of the natural world. Remember to practice regularly to hone your skills, and soon you’ll be able to draw a wide variety of animals with confidence.
We hope this tutorial has been helpful to you in learning how to draw a tortoise. Enjoy the process and happy drawing!