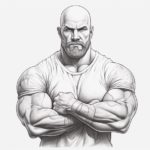
Drawing a realistic man can be a challenging task, but with the right technique and practice, anyone can do it! In this step-by-step guide, I will walk you through the process of how to draw a man, focusing on the key features and proportions that will bring your drawing to life. So grab your pencils and let’s get started!
Materials Required
To draw a man, you will need the following materials:
- Paper: Use a good quality drawing paper that can handle various shades of pencil.
- Pencils: Start with a set of graphite pencils ranging from 2H (light) to 6B (dark). This will allow you to achieve different tones and shades.
- Eraser: Have a soft eraser on hand for making corrections and lightening areas.
- Sharpener: Keep a sharp pencil point for precision and clean lines.
- Blending tools: Use a blending stump or a piece of tissue to smooth out shading and create gradients.
Now that you have your materials ready, let’s dive into the step-by-step process of drawing a man.
Step 1: Basic Proportions
Start by drawing a vertical line in the center of your paper. This line will act as the backbone of your drawing and will help you maintain proper proportions throughout the process. Next, sketch a circle for the head at the top of the line. Divide the lower part of the line into eight equal sections. These sections will represent the body, with each section being the size of the head. This technique will help you achieve a realistic and proportional figure.
Step 2: Head and Face
Using the circle as a guide, draw the outline of the head. Pay attention to the shape and size of the head, as it can vary depending on the age and gender of the man you are drawing. Next, draw a horizontal line across the middle of the circle. This will serve as the eye level. From here, you can sketch the eyes, nose, and mouth, using the guidelines to place them in the correct positions. Remember to observe the reference you are working from and carefully capture the unique features of the man you are drawing.
Step 3: Body and Limbs
Now that you have established the basic proportions and the head, it’s time to work on the body and limbs. Using the guidelines you drew earlier, start sketching the shape of the shoulders, torso, and hips. Pay attention to the angles and curves of the body to create a sense of movement and realism. Add the arms and legs, remembering that they should be in proportion to the rest of the body. Use straight lines for the limbs and circles or ovals for the joints.
Step 4: Clothing and Details
With the basic figure in place, you can now add clothing and details to your drawing. Consider the style of clothing you want your man to wear and sketch it accordingly. Pay attention to the folds and creases of the fabric, as they can add depth and realism to your drawing. Add more details to the face, such as eyebrows, eyelashes, and facial hair, if applicable. Don’t forget to draw hands and feet, as they can greatly enhance the overall look of your drawing.
Step 5: Shading and Texture
To give your drawing a three-dimensional look, it’s important to add shading and texture. Start by identifying the light source in your drawing and imagine where the shadows would fall. Use a lighter pencil (e.g., 2H) to lightly shade the areas that are not directly hit by the light. Then, use a darker pencil (e.g., 4B) to add deeper shadows and contrast to your drawing. Pay attention to the small details like wrinkles, hair texture, and skin tone, as they can greatly enhance the realism of your drawing.
Step 6: Refine and Review
Take a step back and review your drawing. Are the proportions accurate? Does the pose and expression capture the essence of a man? Make any necessary adjustments and refinements to ensure that your drawing looks as realistic as possible. Use your eraser to lighten any areas that need it and smudge or blend certain areas to create smooth transitions and gradients.
Conclusion
Drawing a man requires practice and attention to detail, but with the right techniques, anyone can create a realistic and lifelike depiction. By following the step-by-step process outlined in this guide, you can gain confidence in your abilities and improve your drawing skills. Remember to be patient with yourself and keep practicing. With time, you will be able to create stunning drawings of men that showcase your artistic talent.
So, grab your pencils, continue to practice, and enjoy the process of bringing your drawings to life!