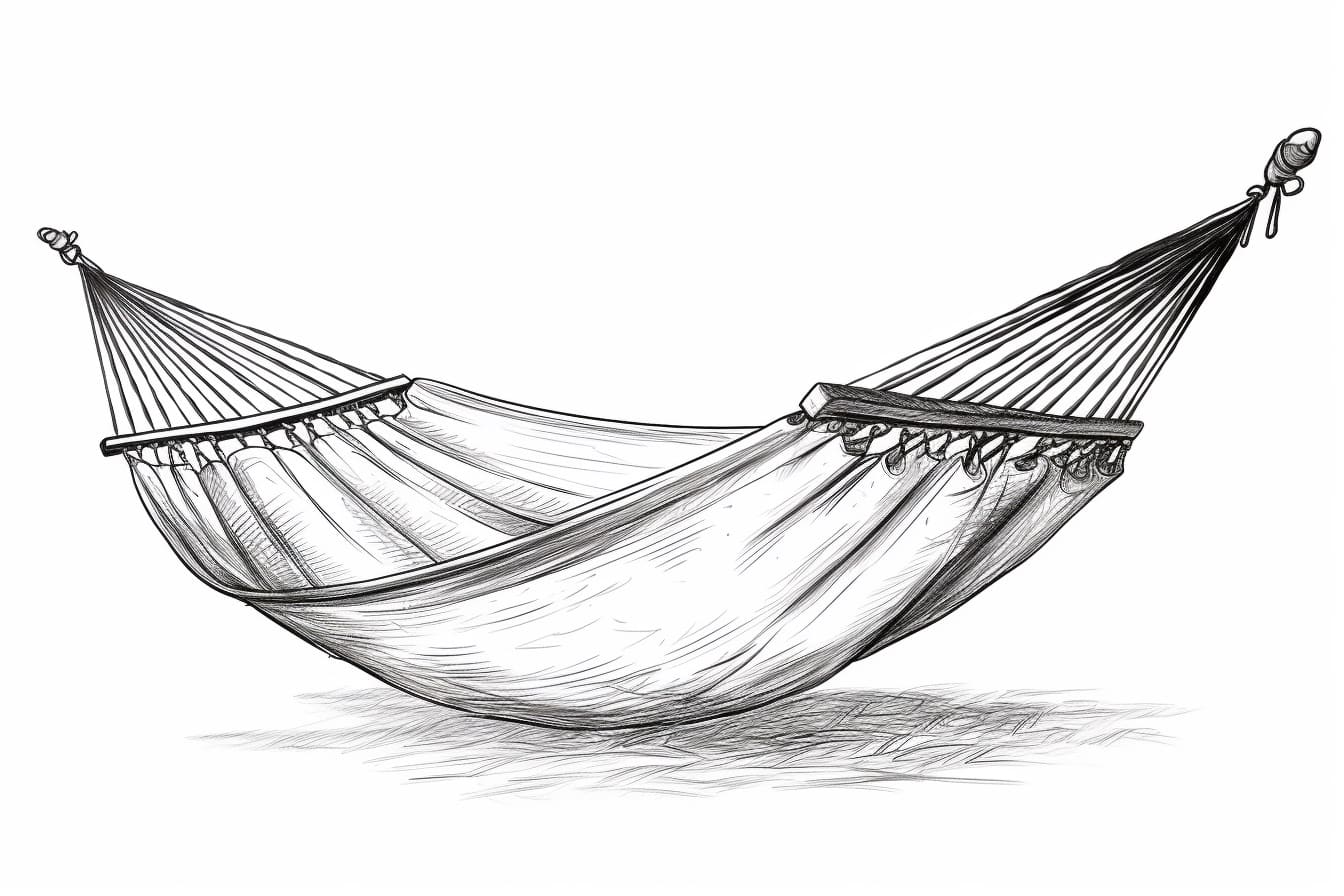
Welcome to this step-by-step guide on how to draw a hammock! Drawing a hammock can be a relaxing and enjoyable activity. Whether you want to create a summer-themed artwork or simply practice your drawing skills, this tutorial will help you create a realistic and inviting hammock scene. So, let’s get started!
Materials Required:
To draw a hammock, here are the materials you will need:
- Pencil: Use a regular pencil with a soft lead to create your initial sketch and shading.
- Paper: Choose a smooth and sturdy paper that is suitable for drawing.
- Eraser: Have a good quality eraser handy for making corrections and refining your drawing.
- Colored Pencils (optional): If you want to add color to your hammock drawing, you can use colored pencils or any other coloring tools of your choice.
Now that you have your materials ready, let’s move on to the step-by-step instructions.
Step 1: Sketch the Basic Shape
Start by drawing two parallel lines that slightly curve downwards. These lines will form the outline of the hammock. Make sure to leave enough space between the lines for the width of the hammock you desire.
Step 2: Add the Support Posts
Draw two vertical lines at each end of the parallel lines. These lines will serve as the support posts for the hammock. Extend the lines slightly below the bottom of the hammock outline.
Step 3: Add the Hammock Ends
At each end of the hammock outline, draw a curved line connecting the parallel lines to the support posts. This will create the ends of the hammock. The shape of the curves will depend on the style of the hammock you want to draw.
Step 4: Draw the Hammock Weaving
Inside the hammock outline, draw a series of curved lines running parallel to the top and bottom edges. These lines represent the weaving of the hammock fabric. Space them evenly and make sure they follow the curvature of the hammock.
Step 5: Add Texture to the Hammock
To make the hammock look more realistic, add some texture to the fabric. Draw small curved lines across the weaving lines to indicate the individual threads. Vary the length and direction of these lines to create a sense of depth and dimension.
Step 6: Shade the Hammock
Using your pencil, lightly shade the areas of the hammock that would be in shadow. Pay attention to the folds and curves of the fabric. Use hatching and cross-hatching techniques to create the illusion of depth and form.
Step 7: Add the Hammock Ropes
Draw a series of curved lines extending from the support posts to the edges of the hammock. These lines represent the ropes that hold the hammock in place. Make the lines thicker towards the support posts and gradually taper them as they reach the edges.
Step 8: Add Details
Now it’s time to add some extra details to make your hammock drawing more interesting. You can draw a pattern or design on the fabric, add fringes or tassels to the ends of the hammock, or even place some objects like pillows or a book inside the hammock.
Step 9: Refine and Erase
Take a moment to step back and assess your drawing. Make any necessary adjustments or corrections to improve the overall composition and accuracy. Use an eraser to lightly remove any unwanted lines or smudges.
Step 10: Optional – Add Color
If you prefer a colorful hammock drawing, you can now use colored pencils or any other coloring tools to add vibrant hues to your artwork. Experiment with different shading techniques to create a sense of depth and realism.
Conclusion
Drawing a hammock can be a delightful and relaxing artistic endeavor. By following these step-by-step instructions, you can create a lifelike hammock illustration that captures the essence of relaxation and tranquility. So grab your pencil and paper, and let your creativity soar as you draw your own inviting hammock scene.