Flutes have been around for thousands of years and have played an important role in various cultures and musical traditions. Drawing a flute can be a great way to express your love for music and art. Whether you are a beginner or an experienced artist, this step-by-step guide will help you create a realistic drawing of a flute. So grab your pencils and let’s get started!
Materials Required
To draw a flute, you will need the following materials:
- A pencil (preferably an HB or 2B for sketching and shading)
- Eraser
- Drawing paper (any type of paper will do, but using a thicker paper will prevent smudging)
- Ruler (optional, but helpful for drawing straight lines)
- Reference photo or an actual flute (to study its details)
Now that you have your materials ready, let’s dive into the drawing process.
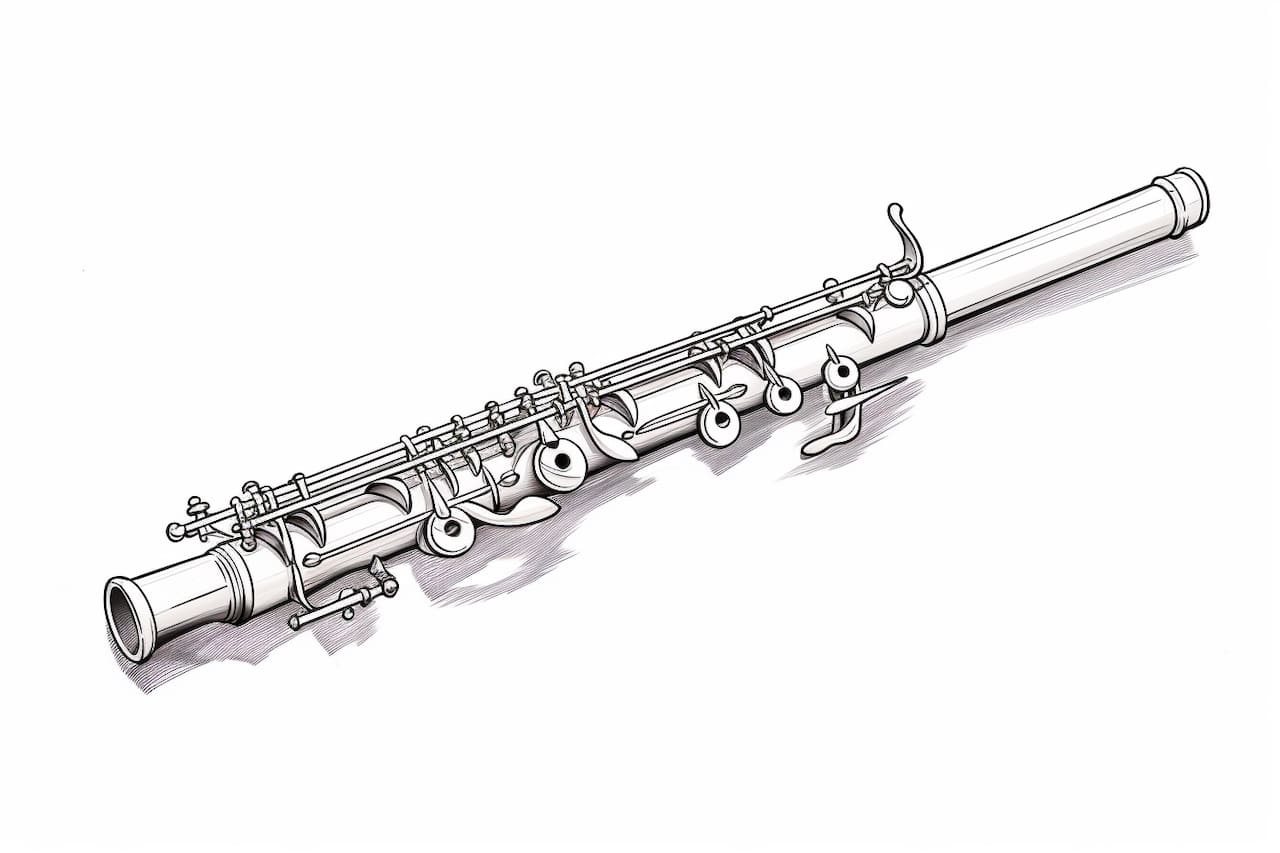
Step 1: Start with Basic Shapes
Begin by drawing a long, vertical rectangle to create the body of the flute. This rectangle will represent the main tube of the instrument. Make sure it is centered on your paper and proportionate to the size you want for your drawing. You can use a ruler to ensure straight lines if needed.
Step 2: Add the Keys and Fingers Holes
Next, we need to add the keys and finger holes to our flute. These are the key components that allow musicians to produce different notes. Start by drawing small circles or oval shapes along the length of the flute to represent the keys. Leave a small gap between each key. Then, draw smaller circles for the finger holes. The number and placement of keys and finger holes may vary depending on the type of flute you are drawing.
Step 3: Sketch the Mouthpiece
Now it’s time to draw the mouthpiece of the flute. At the top of the flute, draw a curved line that extends slightly outward. This line represents the lip plate or embouchure hole, where the musician blows air into the instrument. Connect the bottom of this line to the body of the flute using two curved lines to create a smooth transition.
Step 4: Refine the Details
To make our drawing more realistic, we need to add some important details. Start by refining the shape of the flute body, making it slightly rounded near the keys and finger holes. Add lines to indicate the separate sections of the flute. These lines should be parallel to the length of the instrument and spaced evenly.
Step 5: Add Texture and Shadows
To bring our drawing to life, we need to add texture and shadows. Begin by lightly shading the areas where the keys and finger holes are located. This will give them a three-dimensional appearance. Use your pencil to create a gradient effect, making the shading darker near the edges and lighter towards the center.
Next, add some subtle lines along the length of the flute to show the texture of the instrument. Be careful not to overdo it; we want the lines to be gentle and realistic. Finally, add some shading under the keys to create the illusion of depth.
Step 6: Finalize the Drawing
Now that we have captured the main details, it’s time to finalize our drawing. Use an eraser to clean up any unwanted lines or smudges. Pay close attention to the areas where the keys and finger holes intersect with the body of the flute, making sure they blend seamlessly.
Take a step back and evaluate your drawing. Make any necessary adjustments to ensure accuracy and balance. You can also add additional shading or details if desired. Once you are satisfied with the overall look, your flute drawing is complete!
Conclusion
Drawing a flute may seem challenging at first, but with the right techniques and practice, you can create a beautiful and realistic representation of this musical instrument. Remember to take your time, study the details of the flute, and use reference photos or an actual flute to guide your drawing. With each stroke of your pencil, you’ll be one step closer to creating a stunning work of art.
So grab your materials and let your creativity flow as you embark on this artistic journey of drawing a flute!