Clouds are a beautiful and essential element of nature that can add depth and movement to your artwork. Whether you’re a beginner or an experienced artist, learning how to draw a cloud can help enhance your drawings, paintings, or even digital illustrations. This step-by-step tutorial will guide you through drawing a realistic and fluffy cloud. So, grab your drawing tools, and let’s get started!
Materials Required
To draw a cloud, you will need the following materials:
- Paper (preferably a sketching or drawing paper)
- Pencil (HB or 2B)
- Eraser
- Blending stump or cotton swabs (optional)
- Charcoal or soft pastels (optional)
Step 1: Prepare your Workspace
Before we begin, make sure you have a clean and well-lit workspace. This will ensure that you can see your drawing clearly and prevent any distractions while you work.
Step 2: Understand the Cloud’s Shape
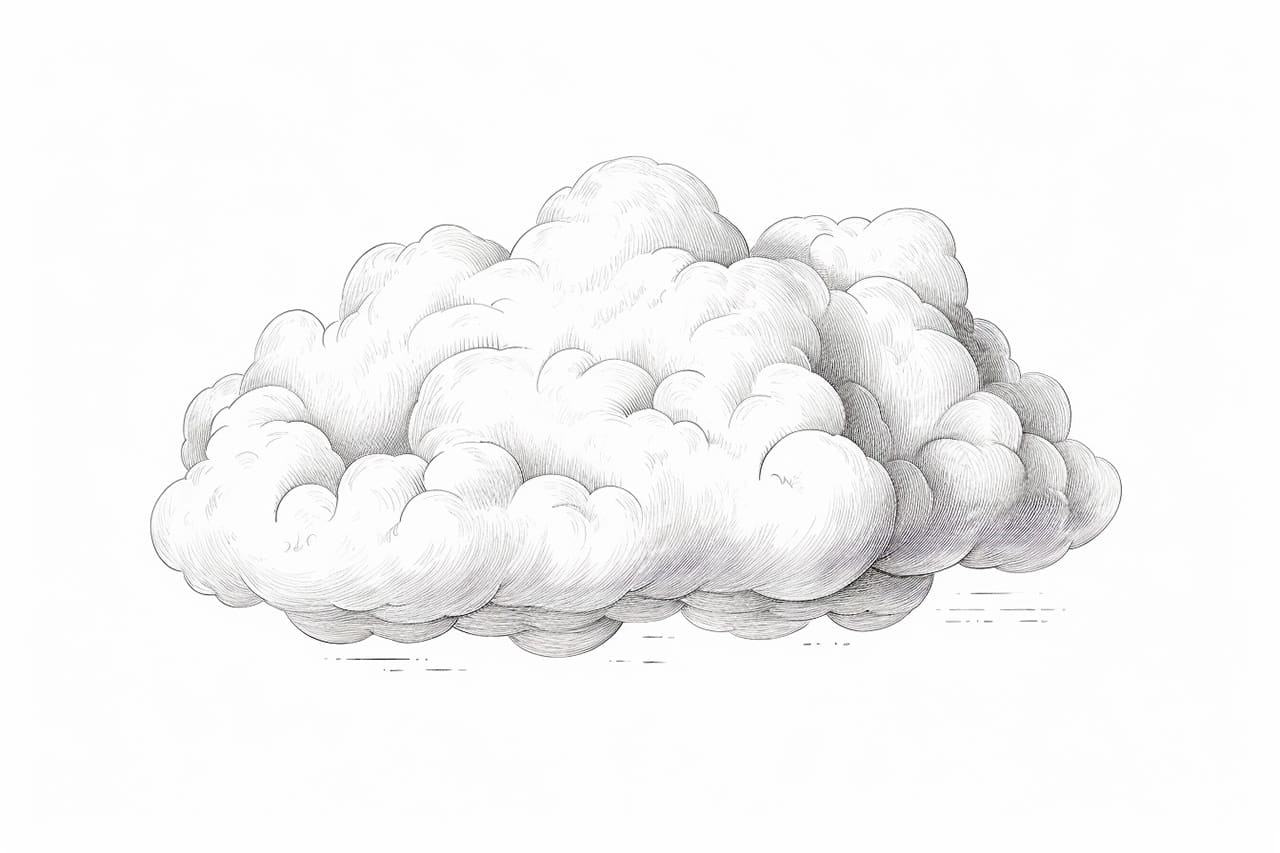
Clouds come in various shapes and sizes, so it’s essential to understand the basic structure before you start drawing. Most clouds have a fluffy and irregular shape with soft edges. They can resemble cotton balls, stretched cotton candy, or even irregular blobs. Keep this in mind as we proceed to the next steps.
Step 3: Start with Basic Shapes
Begin by lightly sketching the basic shapes of your cloud using simple curved lines. You can use circular or oval shapes as a foundation and then add irregularities to give it a more realistic appearance. Remember, clouds are not perfect, so don’t worry about making them symmetrical or precise at this stage.
Step 4: Add Volume and Depth
To make your cloud look more three-dimensional, start adding volume and depth. Use shading techniques to create dark and light areas within the cloud, giving it a sense of roundness and fluffiness. Start by shading the areas where the shadows would naturally fall, such as the bottom and sides of the cloud.
Step 5: Create Texture
Clouds have a unique texture that consists of soft, wispy lines and fluffy edges. To create this texture, lightly sketch in some curved and irregular lines throughout your cloud. These lines should follow the general shape of the cloud and help define its volume and form. Avoid making the lines too harsh or perfectly straight, as this will give your cloud a more natural and organic appearance.
Step 6: Blend and Soften
To achieve a more realistic and seamless look, blend and soften the shaded areas and texture of your cloud. You can do this by gently rubbing the pencil marks with a blending stump or a cotton swab. This technique will help to create a smoother transition between the light and dark areas, mimicking the softness of a cloud.
Step 7: Refine and Detail
Now that you have the basic structure and shading in place, it’s time to refine and add more details to your cloud. Take a step back and observe your drawing carefully. Pay attention to any areas that may need adjustment or additional shading. Use your pencil to add more texture and details, such as smaller clusters of clouds within the main shape or subtle highlights on the edges.
Step 8: Optional – Experiment with Charcoal or Soft Pastels
If you want to add more depth and drama to your cloud drawing, you can experiment with charcoal or soft pastels. These mediums allow you to create darker shadows, richer textures, and more vibrant highlights. Use them sparingly and gradually build up the layers to achieve the desired effect. Remember to blend and smudge the charcoal or pastels with a blending stump or your fingers for a smooth finish.
Conclusion
Drawing a cloud may seem challenging at first, but with practice and patience, you can capture the ethereal beauty of these natural wonders. By following the step-by-step instructions outlined in this tutorial, you can create a realistic and fluffy cloud that will add depth and visual interest to your artwork. So, grab your drawing materials, let your creativity soar, and enjoy the process of bringing clouds to life on paper.