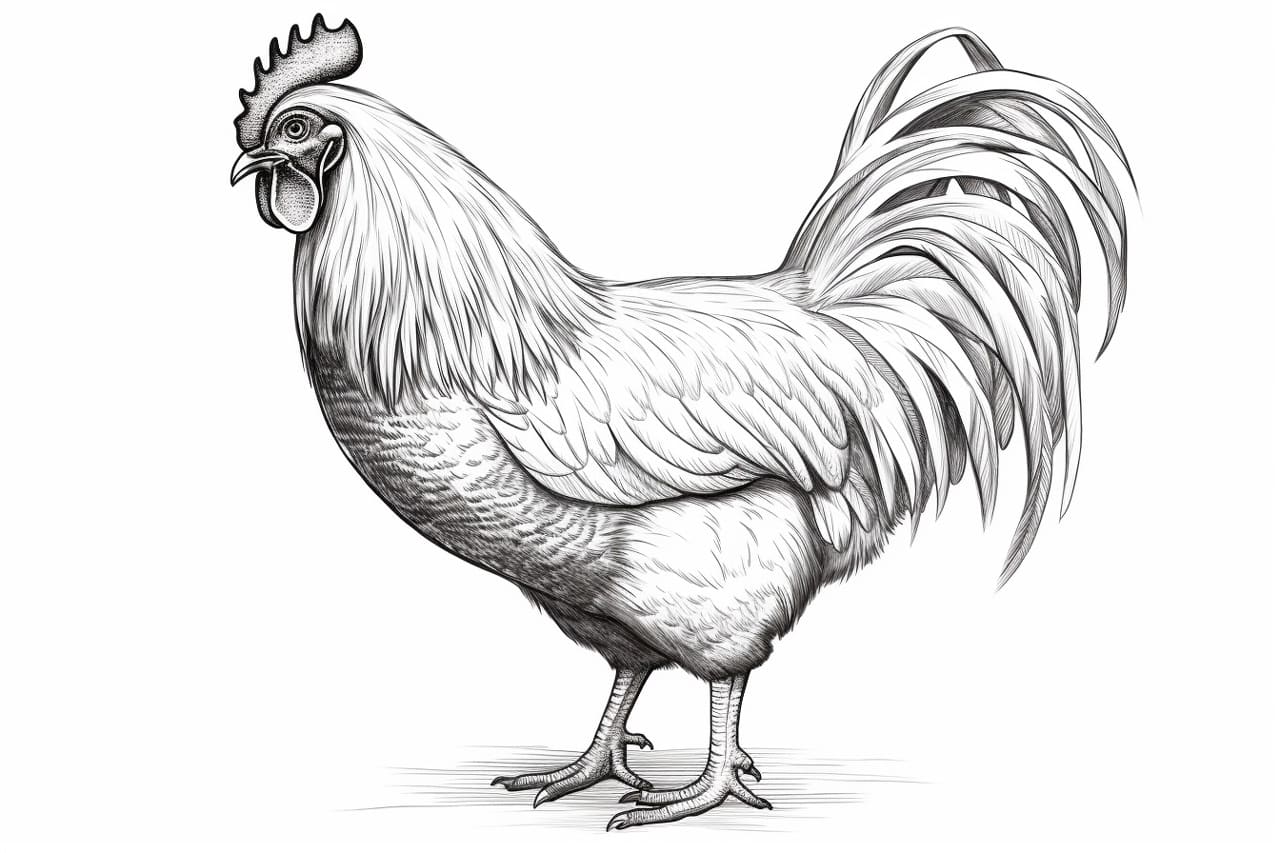
Welcome to this step-by-step guide on how to draw a chook, also known as a chicken, in a clear, clean, and concise style. Whether you’re an aspiring artist or simply looking to have some fun with drawing, this tutorial will provide you with the necessary instructions to create a charming chook illustration. So grab your pencils and paper, and let’s get started!
Materials Required
Before we begin, make sure you have the following materials handy:
- Drawing paper or sketchbook
- Pencils (HB, 2B, 4B)
- Eraser
- Sharpener
- Fine-tipped black pen (optional)
Now that we have our materials ready, let’s dive into the step-by-step process of drawing a chook.
Step 1: Basic Shapes
Begin by lightly sketching the basic shapes that will serve as the chook’s framework. Start with an oval shape for the body, followed by a smaller circle for the head. Connect the head and body using a curved line. These basic shapes will act as your guide throughout the drawing process.
Step 2: Adding Details
Next, let’s add some details to our chook. Sketch a long curved line starting from the bottom of the head to form the beak. Then, draw a small circle for the eye on the side of the head. Add a small curved line beneath the eye to indicate the beak’s opening.
Step 3: Feather Patterns
To make the chook look more realistic, let’s add some feather patterns. Use short, curved lines to create the texture of feathers on the body. Start from the neck area and work your way down to the tail. Remember to follow the shape of the body and vary the size and direction of the lines to add depth and dimension.
Step 4: Wings and Tail
Now, it’s time to draw the wings and tail. Sketch a curved line starting from the body’s side and extending towards the back to represent the wing. Then, draw a series of short, curved lines at the chook’s rear end to create the tail feathers. Remember to keep the lines light and gentle, as these are just guidelines for now.
Step 5: Refine the Details
With the foundation laid out, let’s refine the details of our chook drawing. Use a darker pencil (2B or 4B) to darken the lines and add more definition to the body, beak, eye, and feathers. Pay attention to the reference photo or your imagination to capture the nuances of a chook’s features.
Step 6: Shading and Texture
To give your chook a more three-dimensional appearance, let’s add shading and texture. Identify the light source in your drawing (e.g., the top left corner) and imagine where the shadows would fall on the chook’s body. Use light, hatching strokes to add shadows to the areas that would be darker, such as beneath the wings and between the feathers.
Step 7: Final Touches
Lastly, it’s time for the final touches. Erase any unnecessary guide lines and adjust any proportions or details that need refining. If you’d like to outline your chook drawing with a black pen, now is the time to do so. This step is optional but can add a neat finishing touch to your artwork.
And there you have it! You’ve successfully drawn a chook. Don’t forget to step back and admire your creation – you’ve done a fantastic job!
Conclusion
In this tutorial, we’ve explored the step-by-step process of drawing a chook. Starting with basic shapes, adding details, incorporating feather patterns, refining the drawing, and adding shading and texture, we’ve covered all the necessary steps to create a delightful chook illustration. Remember, practice makes perfect, so don’t hesitate to experiment with different poses or expressions for your chook. Keep honing your drawing skills, and before you know it, you’ll be creating beautiful chook illustrations with ease.
Now, grab your pencils and get ready to let your creativity soar as you draw your very own chook masterpiece!