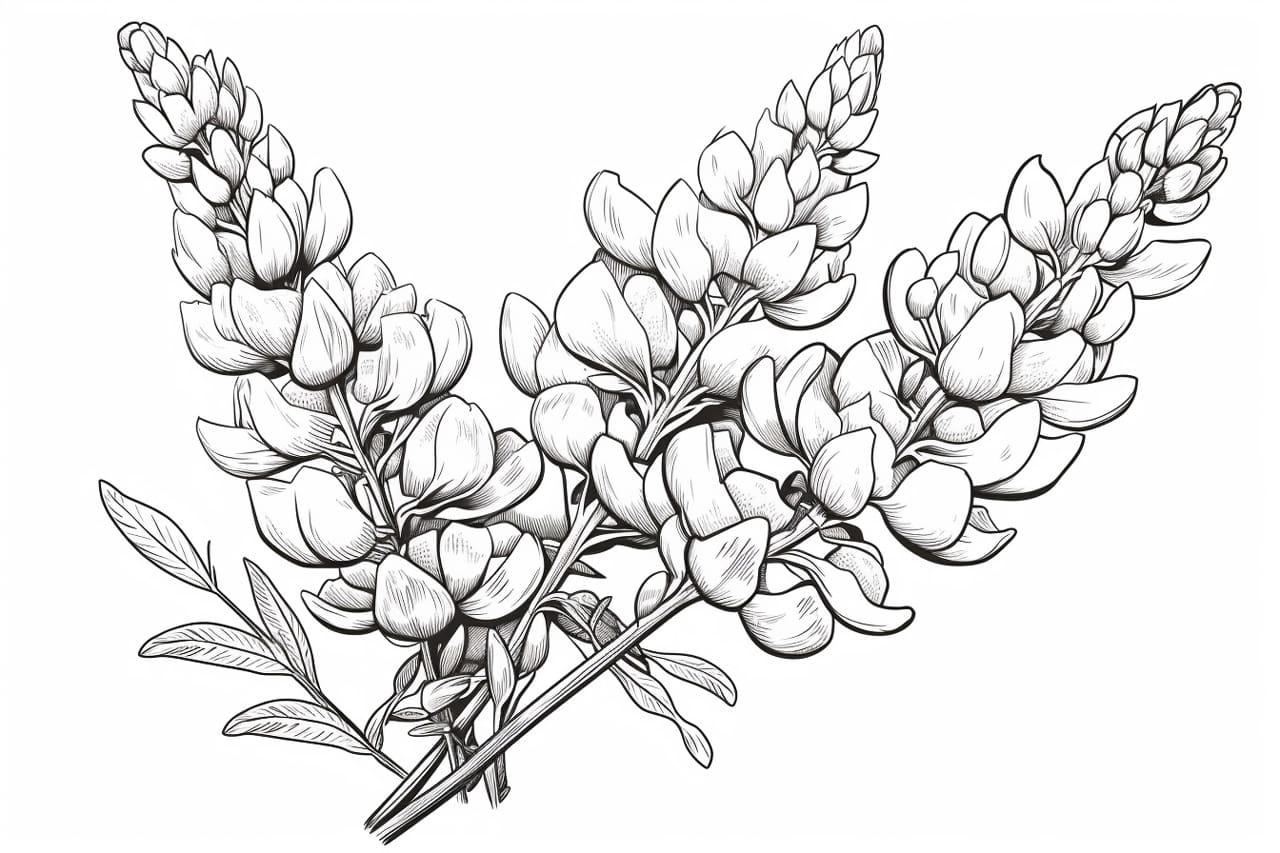
Welcome to this step-by-step tutorial on how to draw a bluebonnet, the beautiful and iconic flower of Texas. Whether you’re a beginner or an experienced artist, this guide will help you create a stunning representation of this vibrant and delicate wildflower. So, let’s gather our materials and get started!
Materials Required
To draw a bluebonnet, you will need the following materials:
- Pencil: Choose a pencil with a medium hardness (HB) for sketching and outlining.
- Eraser: Select a soft eraser that won’t damage the paper.
- Sketching Paper: Use a smooth and heavyweight paper for better results.
- Colored Pencils or Watercolor Paints: You can choose either colored pencils or watercolors to add color to your drawing.
- Fine-tip Pen (Optional): A fine-tip pen can be used for adding precise details to your bluebonnet drawing.
Now that we have our materials ready, let’s dive into the step-by-step instructions.
Step 1: Preliminary Sketch
Start by lightly sketching the basic shape of the bluebonnet flower using your pencil. Begin with a small oval shape for the center of the flower, and then draw five elongated petals around it. Remember that bluebonnet petals have a unique shape, resembling a rounded triangle.
Step 2: Define Petal Outlines
Using your pencil, carefully define the outlines of the petals, making them thicker and distinct. Add slight curves and irregularities to mimic the natural look of the flower. Bluebonnet petals tend to curl slightly, so keep that in mind while drawing.
Step 3: Create Petal Details
Add curved lines within each petal to create the delicate veins and textures of the flower. These lines should start from the base of the petal and extend towards the tip, following the natural curve of the petal.
Step 4: Draw the Stem and Leaves
Extend a long, slender line downward from the center of the flower to create the stem. Bluebonnet stems are usually green and slightly wavy. Next, draw two small, lobed leaves on either side of the stem. These leaves should have rounded tips.
Step 5: Refine the Outline
Carefully review your initial sketch and make any necessary adjustments to refine the overall shape and proportions of your bluebonnet drawing. Pay attention to the curves of the petals, ensuring they look natural and flow gracefully.
Step 6: Add Color
Now it’s time to add color to your bluebonnet drawing. If you’re using colored pencils, lightly layer shades of blue for the petals, gradually intensifying the color towards the outer edges. Use a lighter shade of green for the stem and leaves.
Alternatively, if you’re using watercolor paints, start by wetting the petals with clean water. Then, apply a light wash of blue, gradually adding darker tones for a realistic effect. Allow the paint to dry completely before moving on to the next step.
Step 7: Enhance with Details
To bring your bluebonnet drawing to life, add some fine details using either colored pencils or a fine-tip pen. Define the petal veins further, and add small dots or lines to represent the flower’s stamen and stigma. Be subtle with the details, as bluebonnets have a delicate appearance.
Step 8: Final Touches
Take a step back and evaluate your drawing. Make any necessary adjustments and add final touches to enhance its overall appeal. Erase any remaining pencil marks that aren’t needed and clean up any smudges or stray lines to give your bluebonnet a polished look.
Conclusion
Congratulations on completing your bluebonnet drawing! By following these step-by-step instructions, you’ve learned how to capture the beauty of this iconic flower on paper. Remember, practice makes perfect, so feel free to experiment and try different techniques to further refine your skills.
Now that you know how to draw a bluebonnet, let your creativity bloom and enjoy the process of creating stunning botanical artwork. Capture the essence of nature’s wonders and share your masterpiece with the world!