Welcome to this step-by-step guide on how to draw a Bengal Tiger. In this tutorial, you will learn how to capture the majestic beauty of this magnificent creature. By following these easy instructions, anyone can create a realistic representation of a Bengal Tiger. So grab your art supplies and let’s get started!
Materials Required:
Before we begin, gather the following materials:
- Drawing paper
- Pencil (preferably an HB or 2B)
- Eraser
- Black pen or fine-tip marker
- Colored pencils or markers (optional)
- Reference photo of a Bengal tiger
Now that you have everything you need, let’s dive into the steps of drawing a Bengal Tiger.
Step 1: Sketch the Basic Shapes
Start by lightly sketching the basic shapes that make up the body of the Bengal Tiger. Begin with a large oval for the head and a smaller oval for the body. Add a triangle for the snout and two smaller triangles for the ears. Place two circles for the eyes and a smaller circle for the nose.
Step 2: Define the Outline
Using your pencil, carefully refine the outline of the tiger’s head and body. Pay close attention to the contours and proportions of the animal. Take your time and make small adjustments as needed. Once you are satisfied with the shape, darken the lines.
Step 3: Add Facial Features
Focus on the facial features of the tiger. Sketch the eyes, making them almond-shaped and adding pupils in the center. Draw the eyebrows, using short, curved lines to depict the furrowed brow. Next, draw the nose, mouth, and whiskers. Remember to maintain the proportions and shape of the Bengal Tiger.
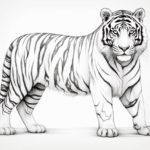
Step 4: Detail the Ears and Fur
Move on to the ears, adding the inner structure and fur details. Tigers have distinct fur patterns, so take your time and carefully observe the reference image or your imagination. Use short, curved lines to create the fur texture. Continue adding detailing throughout the body, paying attention to the unique patterns that characterize the Bengal Tiger.
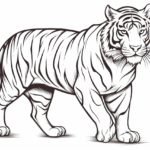
Step 5: Add Stripes and Whiskers
Now it’s time to add the iconic stripes. Tigers have a pattern of dark stripes across their body, which contribute to their striking appearance. Use short, curved lines to recreate these stripes, following the contours of the tiger’s body. Don’t forget to add the long whiskers on either side of the mouth.
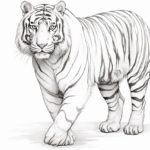
Step 6: Refine and Erase
Take a step back and analyze your drawing. Look for any areas that need refining and make necessary adjustments. Once you are satisfied, use your eraser to carefully remove any remaining pencil lines, leaving only the clean, defined lines of your Bengal Tiger drawing.
Step 7: Add Color (Optional)
Now comes the fun part – adding color to your drawing! You can use colored pencils or markers to enhance your Bengal Tiger. Tigers are typically orange or tawny in color, with white fur on their belly and black stripes. Pay attention to the lighting and shading to bring your drawing to life. Experiment with different techniques to achieve the desired effect.
Conclusion
Congratulations! You have successfully learned how to draw a Bengal Tiger. By following these step-by-step instructions, you have created a stunning representation of this magnificent animal. Remember to practice regularly to improve your skills and develop your unique style. Enjoy the process and keep exploring the world of art!