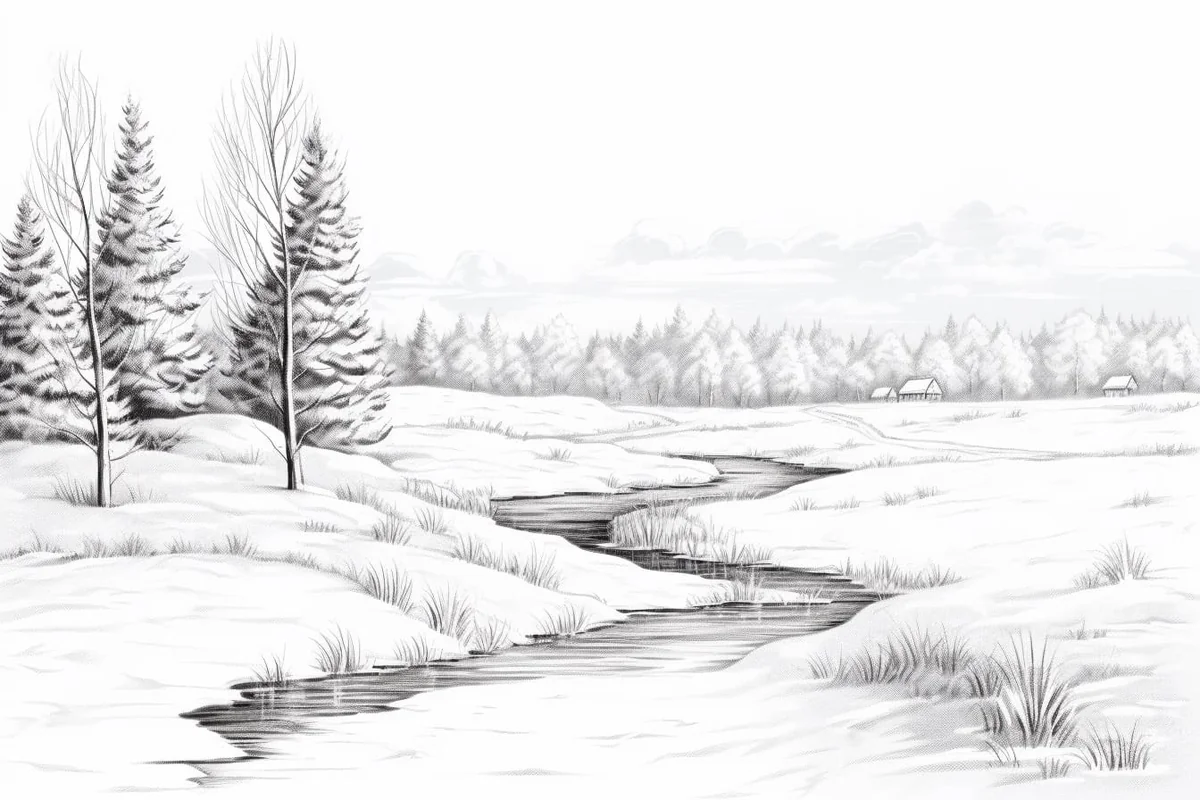
How to Draw a Winter Landscape in 7 Simple Steps
Learn how to draw with this step-by-step tutorial.
Materials You'll Need
- Drawing paper
- Pencil (HB or 2B)
- Eraser
- Colored pencils
- Markers
- Blending stump
- Watercolor paints
Winter landscapes possess a distinctive allure that captivates both the eye and the soul. With their blanketed snowy fields, elegantly frosted trees, and tranquil atmospheres, they create a serene setting that beckons to artists of all skill levels. Whether you have experienced the icy charm of winter firsthand or are only familiar with it through imagery, there is something undeniably magical about transforming that beauty onto paper.
In this comprehensive tutorial, we invite you to embark on a creative journey into the world of winter art. We will take you through each stage of how to draw a winter landscape step by step, ensuring that you feel guided and inspired throughout the process. From laying down the initial sketch to adding the finishing details, you will learn techniques to capture the essence of winter's splendor.
So, gather your art supplies, find a cozy spot where you can let your imagination roam, and get ready to bring your vision to life. Whether it's a picturesque cabin nestled among the trees, a frozen lake shimmering under a soft blanket of snow, or a horizon draped in icy blues and grays, by the end of this guide, you will have the tools to create your very own winter wonderland. Let's dive in and explore the joy of drawing winter landscapes!
Materials Required
To complete this drawing, you will need the following materials:
-
Paper: Choose a good quality drawing paper that can handle wet media if you plan to use watercolors or markers. Alternatively, a regular sketchpad or drawing paper will work fine for pencil or colored pencil drawings.
-
Pencils: A range of graphite pencils, such as 2H, HB, and 2B, will give you enough variety in shading to create depth in your drawing.
-
**Eraser:**A kneaded eraser is ideal for removing graphite or charcoal without damaging the paper. A regular eraser will work as well.
-
Brushes: If you plan to use watercolors, have a selection of watercolor brushes in different sizes, including a round brush for detail work.
-
Watercolors or markers: These can add beautiful colors to your winter landscape. Choose colors that evoke a winter scene, such as cool blues, whites, grays, and browns.
-
**Colored pencils:**These are great for adding finer details and enhancing your drawing with a touch of color.
Now that you have gathered your materials, let's dive into the steps for drawing a winter landscape.
How to Draw a Winter Landscape: A Step-by-Step Guide
A winter landscape offers a peaceful, serene beauty that makes it an ideal subject for artists of all skill levels. Whether you're envisioning a quiet snowy forest, a cozy cabin tucked in the hills, or a frozen lake under a pale sky, this guide will walk you through the process of creating your very own winter wonderland on paper.
Step 1: Sketch the Basic Layout
Begin by lightly sketching the overall structure of your scene using a pencil. Think about the composition: Do you want to include mountains, trees, a cabin, or a river? Use simple shapes—triangles for trees, rectangles for buildings, ovals for hills or lakes—to block out where these elements will go on the page.
Don't worry about details just yet—focus on balance and spacing to create a well-composed scene.
Step 2: Develop the Foreground
Now start adding detail to the foreground—the part of the scene closest to the viewer. This could include textured snowbanks, tree trunks, rocks, or shrubs. Use short, irregular pencil strokes to give the appearance of snow resting unevenly on surfaces.
Objects in the foreground should have crisper lines and more texture to help them stand out.
Step 3: Define the Background
Shift your focus to the background, where objects appear lighter and less detailed. Sketch in snowy hills, distant forests, or soft mountain ridges using gentle lines and less contrast. Let these elements fade toward the horizon.
The farther away something is, the fainter and smaller it should appear—this creates a sense of depth.
Step 4: Draw Trees and Winter Vegetation
Add trees to your scene, starting with the foreground and working backward. Draw bare deciduous trees with jagged, uneven branches, or snowy evergreens with layered, triangular shapes. Keep trees in the distance small and simplified.
Vary the size, angle, and placement of trees to make the landscape feel natural and dynamic.
Step 5: Create Depth with Light and Shadow
Determine the direction of your light source—usually from one side of the page. Add shading on the opposite side of hills, trees, and buildings to suggest shadow. Use soft pencils or blending tools to smooth out shadows and suggest the soft, diffuse lighting of winter.
Use a kneaded eraser to gently lift graphite and create soft highlights on snow-covered areas.
Step 6: Add Color and Atmosphere (Optional)
If you'd like to use color, lightly build it up with watercolors, colored pencils, or soft pastels. Cool tones—like soft blues, grays, and purples—help convey a chilly, quiet mood. Warm colors can be added subtly to a cabin window or sunset sky for contrast.
Layer colors slowly for soft transitions—don't rush the process, especially with water-based media.
Step 7: Finalize the Details
Go back and add any final touches—extra lines for tree bark, footprints in the snow, icicles hanging from rooftops, or smoke curling from chimneys. Add fine details with a sharp pencil or fine-tip pen to bring the scene to life.
Take a break and return with fresh eyes—it's easier to spot what needs tweaking.
Capturing the Stillness of Winter
Drawing a winter landscape is more than just sketching snow—it's about capturing the quiet magic of a season filled with calm skies, frosted trees, and soft light. With each layer of shading and detail, your scene will gain depth, atmosphere, and charm.
Whether you're drawing for practice, relaxation, or a seasonal project, remember to enjoy the process. Let your creativity guide you, and don't be afraid to experiment with your own wintery touches.
So grab your art supplies, bundle up in inspiration, and start sketching your own snowy world today. Happy drawing!
Gallery of Winter Landscape Drawings


Tip: To effectively capture the chill and charm of a winter landscape, consider using a combination of soft pastels and watercolor pencils for your drawing. Start with a light sketch using a graphite pencil to outline key elements like trees, hills, and any structures, then build up layers of color to suggest depth and texture. For the snow, use a white pastel or gel pen to create highlights that mimic the way light reflects off the surface. Don't hesitate to experiment with blending techniques; for instance, blending blues and grays can evoke the cool shadows found in snow-covered areas. Lastly, adding a touch of warm colors—like soft yellows or pinks—can beautifully contrast the icy palette, making your winter scene truly come alive!
Fun Facts About Winter
-
Winter officially begins on the winter solstice, the shortest day and longest night of the year—typically around December 21st in the Northern Hemisphere.
-
Snowflakes are all unique, and no two are exactly alike! Each one forms around a tiny speck of dust and develops its shape based on temperature and humidity.
-
Some animals, like bears and hedgehogs, hibernate during winter, slowing their heart rate and metabolism to conserve energy while food is scarce.
-
The coldest temperature ever recorded on Earth was −128.6°F (−89.2°C) in Antarctica in 1983—definitely no snowball fights happening there!
-
Icicles form when melting snow refreezes, usually as water drips off a roof or branch and meets sub-freezing air.
-
In some regions, people experience "diamond dust", a rare phenomenon where tiny ice crystals float in the air and sparkle like glitter in the sunlight.
-
Snow isn't actually white—it's made of clear ice crystals. It looks white because of the way light reflects and scatters off its surfaces.
-
Many animals adapt to the season with winter camouflage—arctic foxes, hares, and even ptarmigans turn white to blend into snowy landscapes.
-
Frost flowers are delicate ice formations that bloom on plants or sea ice, resembling petals—nature's chilly artwork.
-
Winter has inspired countless celebrations and stories, from cozy traditions like hot cocoa and fireplaces to magical tales like The Nutcracker and Frozen.