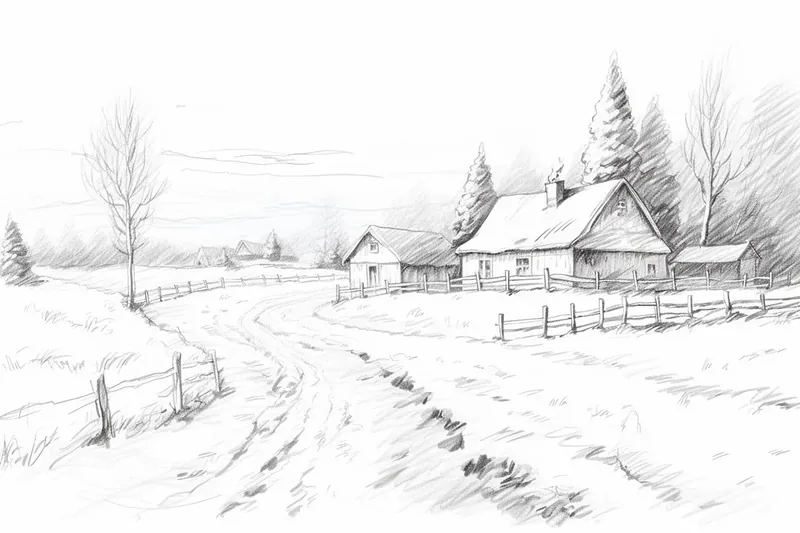
How to Draw a Winter Scenery
Learn how to draw a winter scenery with this step-by-step tutorial. Capture the serene charm of the season and create a stunning landscape on paper.
Materials You'll Need
- Pencil
- Paper
- Eraser
Winter scenery has long inspired artists and nature lovers alike with its tranquil beauty, quiet landscapes, and the soft glow of snow-covered fields and forests. The gentle stillness of a snowy day, the delicate branches dusted with frost, and the cozy warmth of cabins nestled among pine trees all contribute to the magical atmosphere that makes winter so enchanting. Learning how to draw a winter scenery allows you to capture the peaceful essence of the season, whether you're recreating a memory, designing a holiday card, or simply exploring the unique textures and colors found only in wintertime landscapes.
People are often drawn to winter scenes for their calming effect and the emotional resonance they bring—drawing one can be both relaxing and rewarding. This subject is perfect for artists of all levels, from beginners eager to practice basic shapes and shading, to more advanced creators looking to refine their understanding of light, composition, and atmospheric perspective. In this tutorial on how to draw a winter scenery, we'll use step-by-step guidance to break down the process, covering techniques like layering, blending, and creating the illusion of snow and distance. You'll learn how to sketch wintry trees, add snowy textures, and bring your own personal touch to your artwork.
Whether you want to improve your drawing skills or simply spend some creative time immersed in the peaceful world of winter, you're in the right place. Remember, each artist's interpretation is unique—so don't be afraid to experiment and make the scene your own. Gather your pencils and paper, settle into your favorite spot, and get ready to enjoy the magical process of bringing a winter wonderland to life on your page!
Materials Required
Before we begin, make sure you have the following materials handy:
- Drawing paper or sketchbook
- Pencils (HB, 2B, 4B, and 6B)
- Eraser
- Blending stump or cotton swabs
- Colored pencils (optional)
- White gel pen or white acrylic paint (optional)
Now that we have our materials ready, let's dive into the creative process!
Step 1: Sketch the Basic Composition
Start by lightly sketching the basic composition of your winter scenery. Imagine the elements you want to include, such as snow-covered trees, a distant mountain, or a frozen lake. Use a light pencil (HB) to loosely outline these elements, focusing on the overall placement and proportions. Remember, this is just a preliminary sketch, so don't worry about adding too many details at this stage.
Step 2: Define the Foreground
Next, let's define the foreground of our winter scenery. Start by adding more details to the trees or any other prominent objects in the front. Use a softer pencil (2B or 4B) to create darker lines and shading. Pay attention to the shape and texture of the objects, as well as the direction of the tree branches. Remember to keep it loose and organic, as the aim is to capture the scene's natural beauty.
Step 3: Add Depth with Middle Ground Elements
To create a sense of depth in your winter scenery, it's important to include middle ground elements. These could be additional trees, rocks, or any other objects that appear closer to the viewer than the background elements. Use a combination of light and shadow to give these objects dimension. Experiment with different pencil grades to achieve varying levels of darkness and texture.
Step 4: Detail the Background
Now it's time to add details to the background of your winter scenery. Draw a distant mountain range or hills to create a sense of distance. Use a light pencil (HB or 2B) to sketch the outlines, and gradually add shading to give the mountains a three-dimensional appearance. Keep in mind that as objects recede into the distance, they become less defined and lighter in value.
Step 5: Depict a Snowy Landscape
To capture the essence of winter, we need to depict a snowy landscape. Start by lightly shading the ground area with a light pencil (HB), leaving areas untouched to represent the snow. Then, use a blending stump or cotton swab to gently blend the shading, creating a smooth and even texture. Leave some areas untouched to add variety and mimic the natural unevenness of snow on the ground.
Step 6: Add Falling Snow
To create a more dynamic and whimsical winter scenery, let's add falling snow. Use a softer pencil (4B or 6B) to create a few soft, curving lines descending from the top of your drawing. These lines will act as the snowflakes falling from the sky. You can also use a white gel pen or white acrylic paint to add small dots or splatters to simulate snowflakes. Be careful not to overdo it, as subtlety is key.
Step 7: Enhance with Colored Pencils (optional)
If you want to add a touch of color to your winter scenery, you can use colored pencils to enhance certain areas. Consider using cool tones like blues and purples for shadows, or warm tones like oranges and yellows for the glow of sunlight. Apply the colored pencils lightly and gradually build up the layers to achieve the desired effect. Remember to blend the colors smoothly for a realistic and harmonious look.
Step 8: Final Details
Now that you've completed the main elements of your winter scenery, it's time to add the final details. Use a sharper pencil to refine the edges, add intricate patterns on the tree trunks, or create a sense of texture on the objects. Pay close attention to the smaller elements, such as branches, twigs, or footprints in the snow. These details will elevate the overall realism and add interest to your drawing.
Tip: To create a captivating winter scenery, focus on layering your colors and textures to convey depth and realism. Start with a light wash of blue or gray for the sky, allowing it to dry before adding white for clouds, which can be softly blended to achieve a fluffy appearance. For the snow, use a combination of white and very light blues, applying them in layers to mimic the uneven texture of snow drifts; a soft brush or blending stump can help achieve a smooth transition. When drawing trees, use varying shades of brown and green for the trunks and branches, and don't forget to add touches of white to indicate snow accumulation. Finally, consider incorporating shadows with light gray or blue to create contrast, enhancing the three-dimensional feel of your winter scene.
Conclusion
Congratulations on completing your winter scenery drawing! By following these step-by-step instructions, you'll be able to create a stunning artwork that captures the peaceful and enchanting atmosphere of winter. Remember to practice and experiment with different techniques to develop your unique style. So gather your materials, embrace your creativity, and let the beauty of the winter season inspire your artistic journey!
Fun Facts About Winter Scenery
- Snow appears white because its complex structure scatters all wavelengths of visible light.
- Diamond dust is a phenomenon where tiny ice crystals sparkle in the air in winter landscapes.
- Some animals, like the Arctic fox, change their fur color to white in winter to blend into snowy scenery.
- Snowflakes are unique, with no two being exactly alike.
- Winter scenes often feature hoarfrost, a beautiful ice crystal formation that occurs on cold, clear nights.
- Frozen lakes and rivers in winter scenery can produce mysterious ice sounds or singing ice.
- Winter landscapes have inspired famous artists like Claude Monet, whose snowy scenes are celebrated.
- In some regions, winter brings blue hour, a period of twilight with a magical blue glow.
Suggestions for Scenes and Settings for Winter Scenery Drawings
- A cozy cabin nestled in a snowy pine forest, with smoke curling from the chimney and animal tracks in the fresh snow.
- A frozen lake surrounded by bare trees, with children ice skating and distant mountains in the background.
- A peaceful country road blanketed in snow, lined with frosty trees and an old wooden fence partially buried in drifts.
- An evening city park transformed by snow, with glowing street lamps, benches, and silhouettes of bundled-up walkers.
- A group of deer or foxes exploring a quiet, snowy meadow at sunrise, with mist rising from the ground.
- A dramatic mountain landscape with snow-capped peaks, icy rivers, and swirling snow clouds in the sky.
- A winter village scene with quaint houses decorated for the holidays, twinkling lights, and snowmen in front yards.
- An isolated lighthouse on a snowy coastline, with crashing waves and ice-covered rocks below.
- A moonlit forest with snow-covered trees casting long shadows, and a bright full moon illuminating the scene.
- A close-up of frosted tree branches and pine cones, with delicate icicles and sparkling snowflakes catching the light.