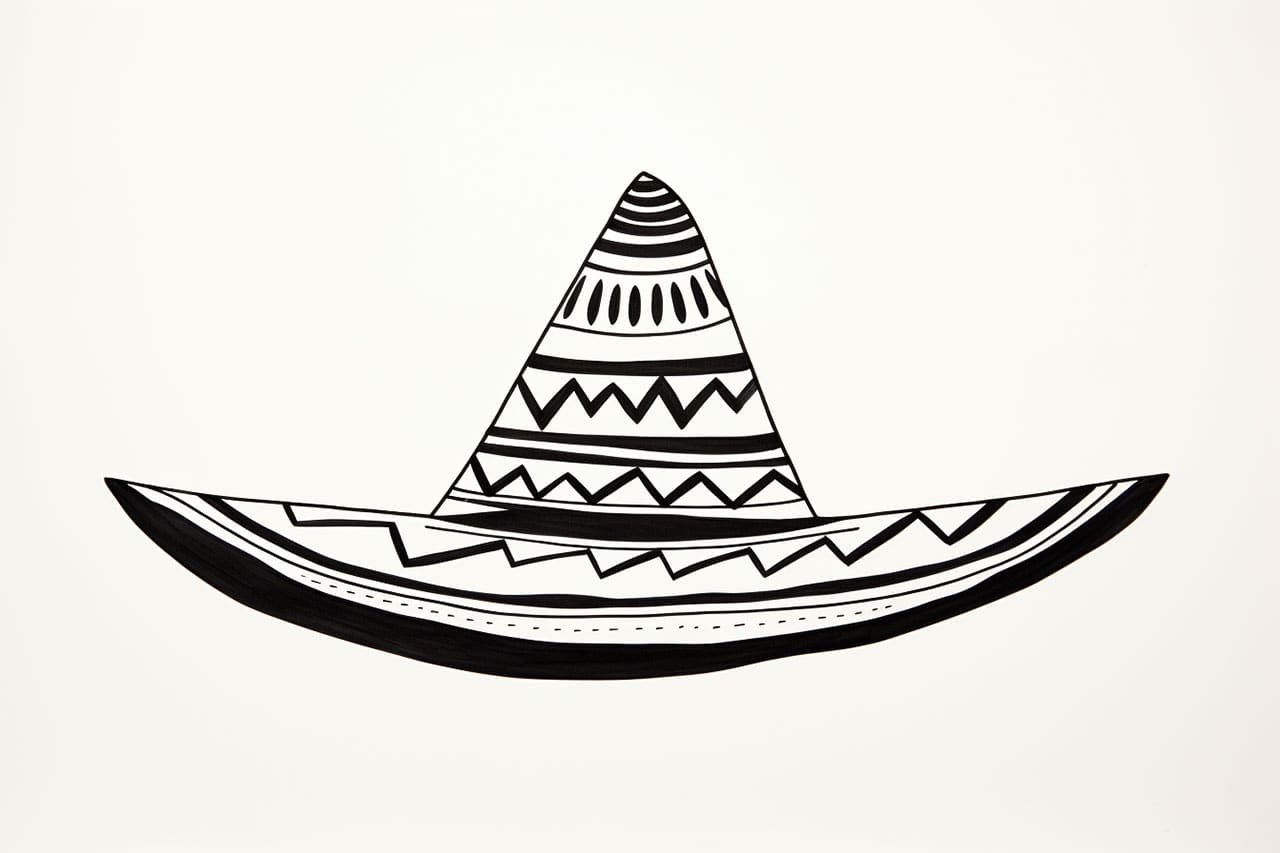
Do you want to learn how to draw a sombrero? Whether you’re an aspiring artist or just looking to have some fun, this step-by-step guide will help you create a beautiful sombrero drawing. A sombrero is a traditional Mexican hat with a wide brim and a high, pointed crown. It’s a symbol of Mexican culture and often associated with fiestas, celebrations, and mariachi bands. So, grab your drawing supplies and let’s get started!
Materials Required
Before we begin, make sure you have the following materials:
- A pencil
- A sheet of paper (preferably drawing paper or sketchbook)
- Eraser
- Black ink pen or fine-tip marker (optional)
- Colored pencils, markers, or watercolors (optional, for adding color to your drawing)
Now that you have everything you need, let’s dive into the steps!
Step 1: Draw the Basic Shape
Start by drawing a large oval shape in the center of your paper. This will be the crown of the sombrero. Make sure it’s slightly tilted to the side for a more dynamic look. Don’t worry about making it perfect at this stage; we’ll refine it later.
Step 2: Add the Brim
Extend two curved lines downward from each side of the oval shape to create the brim of the sombrero. The brim should be wide and slightly curved upwards at the ends. Imagine a smiley face, and the brim should resemble the curve of the smile.
Step 3: Shape the Crown
On top of the oval shape, draw a slightly curved line connecting the two ends of the brim. This will define the top of the crown. Then, extend two lines upwards from each end of the brim. These lines should slant slightly inward and meet at a point, creating a triangular shape.
Step 4: Add Details to the Crown
To give the crown some texture, draw several vertical lines along the triangular shape. These lines should be evenly spaced and extend from the base of the crown to the tip. This will simulate the woven pattern often seen on sombreros.
Step 5: Refine the Brim
Now, it’s time to refine the shape of the brim. Smooth out any rough edges or uneven curves by erasing and redrawing as needed. The brim should appear smooth and symmetrical.
Step 6: Draw the Hatband
To enhance the sombrero’s appearance, draw a horizontal band around the base of the crown. This can be a simple band or decorated with patterns of your choice. You can add stripes, dots, or any other design that appeals to you.
Step 7: Add Details to the Hatband
If you want to add more depth and dimension to your drawing, you can embellish the hatband with additional details. Consider drawing intricate patterns or even adding small decorative objects like flowers or miniature sombrero charms.
Step 8: Refine and Ink
Take a moment to evaluate your drawing and make any necessary adjustments. Erase any unwanted lines and refine the shape of the sombrero as needed. Once you’re happy with the drawing, go over the final lines with a black ink pen or fine-tip marker to make them more prominent.
Step 9: Color Your Drawing (Optional)
If you prefer a colored sombrero, now is the time to add some vibrant hues. Use colored pencils, markers, or watercolors to bring your sombrero to life. Choose traditional Mexican colors like red, green, yellow, or blue, or get creative and use any color palette you desire.
Conclusion
Congratulations, you have successfully learned how to draw a sombrero! With just a few simple steps, you’ve created a beautiful representation of this iconic Mexican hat. So grab your materials and practice this drawing to perfection. Whether you’re creating a standalone sombrero drawing or incorporating it into a larger artwork, this skill will surely impress. Remember to have fun, enjoy the process, and keep practicing. Viva el arte!