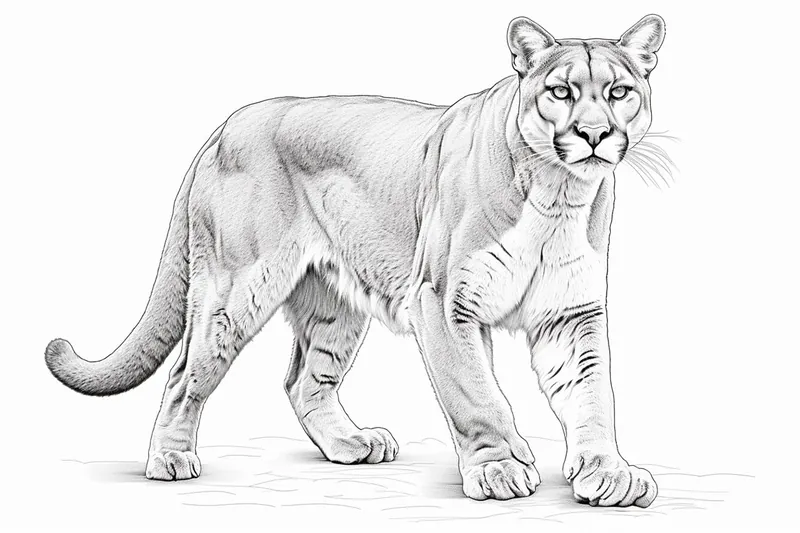
How to Draw a Puma
Learn how to draw a realistic puma with this step-by-step guide. Capture the grace and power of this magnificent animal in your drawings.
Materials You'll Need
- Pencil
- Paper
- Eraser
The puma, also known as the mountain lion or cougar, is one of the most magnificent big cats native to the Americas. Known for its sleek body, powerful limbs, and expressive face, the puma embodies both agility and grace. Capturing this majestic animal on paper can be both an exciting challenge and a rewarding artistic experience. Learning how to draw a puma not only deepens your appreciation for wildlife art but also helps you develop vital techniques for drawing other animals with realistic anatomy and dynamic poses.
Whether you are a beginner looking to expand your skills or an experienced artist seeking to refine your depiction of animals, drawing a puma provides a wonderful opportunity to practice observing proportions, fur textures, and subtle shading. This tutorial will guide you step by step, from sketching the basic shapes and outlines to adding the final details that bring your puma to life. Along the way, you'll pick up useful tips on capturing the characteristic features of a puma, such as its muscular build and intense gaze.
By the end of this lesson, you'll have a beautiful drawing and a greater confidence in tackling complex animal subjects. Remember, every artist improves with practice, so don't be discouraged by challenges along the way. Let's dive in and discover how to draw a puma together—your creative journey starts now!
Materials Required
Before we begin, let's gather the materials needed for this drawing:
- Pencils (HB, 2B, 4B, and 6B)
- Drawing paper or sketchbook
- Eraser (kneaded eraser recommended)
- Pencil sharpener
Now that we have all our materials ready, let's dive into the step-by-step instructions.
Step 1: Basic Guidelines
To start, lightly sketch an oval shape for the puma's head. Then, draw a slightly curved line extending from the oval to form the back. Add two circles for the shoulders and another larger oval for the body, connecting it to the backline.
Step 2: Outline the Head
Using the basic guidelines, begin refining the shape of the puma's head. Add the snout by drawing a triangular shape extending from the lower part of the oval. Sketch the ears, keeping them tall and pointy. Don't forget to add the facial guidelines for the eyes and nose.
Step 3: Facial Features
Now, it's time to focus on the puma's facial features. Start by drawing the eyes, keeping them almond-shaped and placing them on the horizontal facial guideline. Add a small circle in each eye for the pupils. Beneath the eyes, draw a triangular nose, and give the puma a wide mouth with a subtle smile.
Step 4: Detail the Ears
Refine the shape of the puma's ears by adding smaller curves and lines within the initial outline. Pay attention to the reference image or your imagination to capture the unique details of a puma's ears. They should be pointy and have tufts of fur on the top.
Step 5: Define the Body
Working from the initial guidelines, sketch the puma's muscular body. Pay close attention to the reference image or your knowledge of pumas to capture the curves and proportions accurately. Use long, smooth strokes to create the impression of fur as you outline the shape.
Step 6: Add Limbs and Tail
Next, draw the limbs and tail of the puma. Starting with the front legs, sketch them with a slight curve to convey the animal's power and agility. Add details such as muscular definition and the puma's characteristic large paws. For the hind legs, remember to capture the extended length and gracefulness. Finally, draw a long, thick tail with a slightly curved tip.
Step 7: Refine the Facial Details
With the main body structure complete, focus on detailing the puma's face further. Add texture to the fur around the eyes, nose, and mouth. Pay close attention to shading and highlights to give depth and realism to the drawing. Use softer pencils, such as a 4B or 6B, for darker areas and a smooth transition of tones.
Step 8: Shading and Texturing
Now, it's time to bring your puma to life with shading and texturing. Begin by shading the body with smooth, even strokes. Observe the reference image or use your intuition to create darker areas where shadows fall. Gradually build up the tones, applying lighter pressure for lighter areas and darker for shadows and depth.
Step 9: Final Touches
Take a step back and assess your drawing. Make any necessary adjustments to the proportions, shading, or details. Erase any stray lines or smudges, and refine the fur texture if needed. Remember, practice makes perfect, so don't be afraid to keep refining until you're satisfied with your masterpiece.
Tip: When drawing a puma, start by breaking down its form into simple geometric shapes; use ovals for the body and circles for the head to establish proportion. Pay close attention to the puma's muscular build, which can be highlighted by using a 2B pencil for initial sketches to achieve a softer line. Once you're satisfied with the shape, switch to a darker pencil, like 4B or 6B, to define the contours and details of the face, especially around the eyes and mouth, which convey its expressive nature. Remember to observe reference images to capture the unique fur texture; using short, sweeping strokes will help mimic the sleekness of its coat. Lastly, layering your shading gradually will create depth and realism, so don't rush the process—take your time to build up the tones!
Conclusion
Congratulations on completing your drawing of a puma! By following these step-by-step instructions, you have learned how to capture the grace and power of this magnificent animal. Remember to experiment, practice, and have fun with your drawings. With time, dedication, and a little imagination, you'll be amazed at how much progress you can make. Happy drawing!
Fun Facts About Puma
- The puma is also known as the mountain lion, cougar, and panther, making it one of the animals with the most names in the world.
- Pumas have the largest range of any wild terrestrial mammal in the Western Hemisphere, stretching from Canada to the southern Andes.
- Unlike other big cats, pumas cannot roar; instead, they communicate with screams, hisses, and purrs.
- Pumas are excellent jumpers and can leap up to 18 feet vertically and 40 feet horizontally.
- These solitary cats are highly adaptable and can live in forests, deserts, mountains, and even near urban areas.
- Puma kittens are born with blue eyes and spotted coats, which help camouflage them from predators.
- The puma is the fourth largest cat in the world, after the tiger, lion, and jaguar.
Suggestions for Scenes and Settings for Puma Drawings
- [A puma leaping gracefully between rocky ledges in a mountainous landscape at sunset](https://yonderoo.com/how-to-draw-a-sunset/).
- A close-up portrait of a puma's intense gaze, with dramatic lighting emphasizing its facial features.
- A mother puma gently grooming her playful cubs in a secluded forest den.
- A puma stalking through tall grasses, with its body low and eyes fixed on unseen prey.
- A night scene with a puma perched on a tree branch, silhouetted against a full moon.
- A dynamic action shot of a puma chasing a deer across a riverbank.
- A tranquil moment of a puma resting on a sunlit boulder, surrounded by wildflowers.
- A winter setting with a puma's paw prints trailing through fresh snow as it moves stealthily.
- A puma cautiously drinking from a mountain stream, its reflection shimmering in the water.
- An abstract composition focusing on the patterns of the puma's fur and the powerful curves of its muscles.