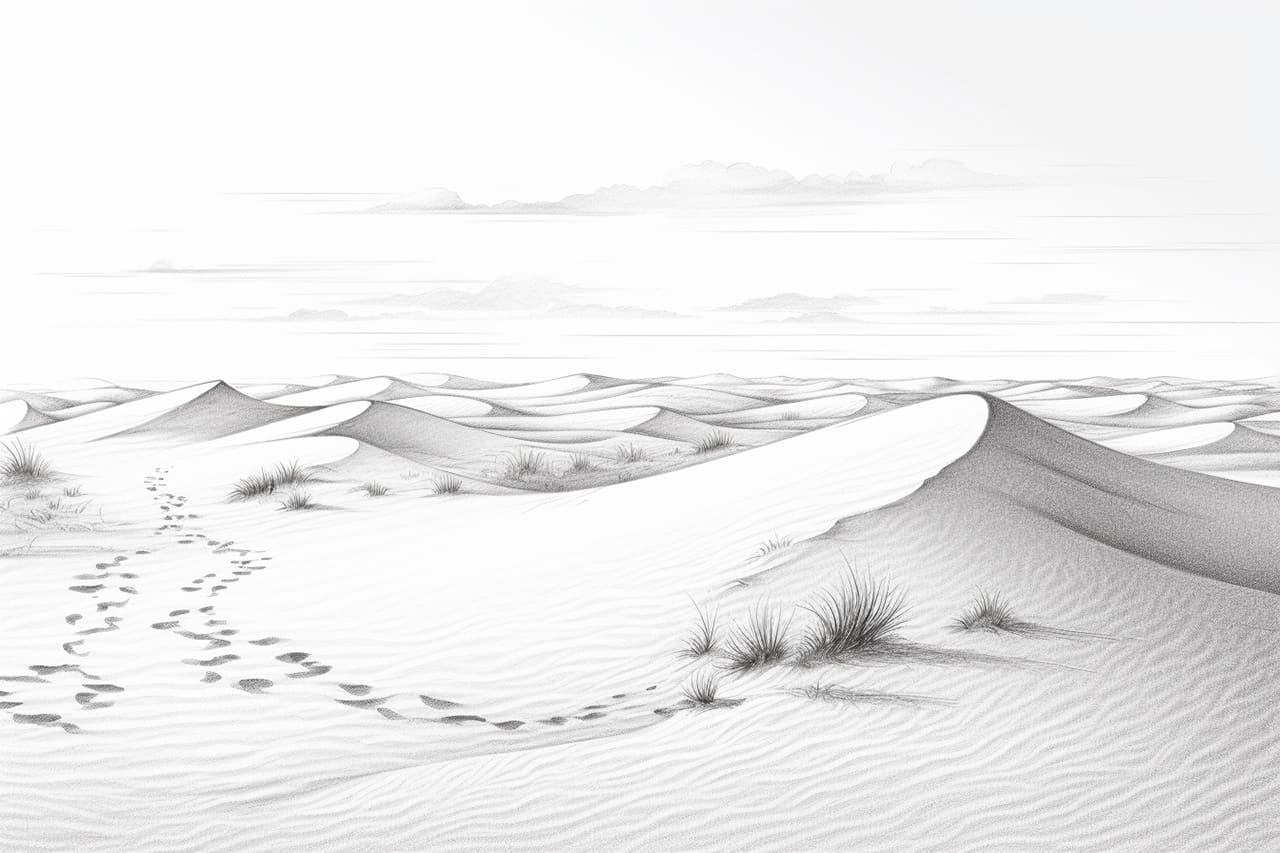
As an artist, capturing the beauty of nature can be a rewarding experience. One fascinating subject that often sparks interest is a sand dune. With its unique shape and texture, drawing a sand dune can be a great way to improve your artistic skills. In this article, we will guide you through the process step-by-step, helping you create a realistic representation of a sand dune. So, grab your drawing materials and let’s get started!
Materials Required
Before we begin, make sure you have the following materials ready:
- Drawing paper or sketchbook
- Pencil set (graphite or mechanical pencils)
- Eraser
- Blending stump or tortillon (optional, for shading)
- Sand dune reference photos (optional, for inspiration)
Now that you have your materials prepared, let’s dive into the process of drawing a sand dune.
Step 1: Start with Basic Shapes
To begin, lightly sketch the outline of the sand dune using simple shapes. Start with a curved line to define the crest of the dune. Then, draw an elongated oval shape beneath the crest, representing the bulk of the sand dune. Don’t worry about making it perfect at this stage; this initial sketch will serve as a guideline for the final drawing.
Step 2: Add Details
Now, it’s time to add more definition to the sand dune. Begin by emphasizing the edges of the dune using slightly curved lines. This will help create a sense of depth and form. Next, add smaller sand ripples or ridges along the sides of the dune to give it a realistic texture and appearance. Remember to observe your reference photos for inspiration and accuracy.
Step 3: Shade the Sand Dune
Shading is crucial to bring your sand dune drawing to life. Start by determining the light source in your composition. This will help you establish the areas of light and shadow on the dune. Shade the lower part of the sand dune, opposite to the light source, using light, horizontal strokes to create the illusion of sand grains.
Step 4: Enhance the Texture
To enhance the texture of the sand dune, you can use a blending stump or tortillon. Gently blend the shaded areas with circular motions, softening the transitions between light and shadow. This technique will give your drawing a more realistic appearance, mimicking the granular nature of sand.
Step 5: Refine the Details
Now that the overall shape and shading of your sand dune are complete, it’s time to refine the details and add more depth. Pay attention to the varying tones of sand, as well as any distinctive features or formations present in your reference photo. Use your pencil to add subtle highlights and shadows where necessary, capturing the fine nuances of the sand dune’s surface.
Step 6: Finalize Your Drawing
Take a step back and assess your drawing. Check for any areas that require adjustment or refinement. Make sure the highlights and shadows are balanced and the overall composition is pleasing to the eye. Once you’re satisfied with the result, carefully erase any remaining visible guidelines, leaving only the well-defined sand dune. Congratulations, you have successfully drawn a sand dune!
Conclusion
Drawing a sand dune is a wonderful exercise for improving your artistic skills and capturing the beauty of nature. By following these step-by-step instructions and using the right materials, you can create a realistic depiction of a sand dune. Remember to observe reference photos for inspiration and focus on shading and texture to bring your drawing to life. So, grab your pencil and paper, and start drawing your own sand dune masterpiece today!