Welcome to this step-by-step guide on how to draw a paper duck. Whether you’re a beginner or an experienced artist, this tutorial will take you through the process of creating your very own adorable duck using simple materials. Get ready to unleash your creativity and bring a touch of quack-tacular artistry into your world!
Materials Required
Before we dive into the steps, make sure you have the following materials ready:
- A blank sheet of paper (preferably white)
- Pencil
- Eraser
- Black marker or pen
- Colored pencils or markers (optional)
That’s it! With just these basic materials, you’ll be able to create your very own paper duck masterpiece.
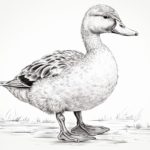
Step 1: Sketch the Basic Outline
To begin, take your pencil and lightly sketch the basic outline of the duck. Start by drawing an oval shape for the body, and then add a smaller oval for the head on top. Connect the head and body with a slightly curved line to form the neck. Next, draw a horizontal line across the body to mark the center.
Step 2: Add the Wings and Tail
Using the guidelines you’ve just drawn, add the wings to your duck. Start by drawing a curved line on each side of the body, starting from the middle and extending outwards. Then, add a V-shaped tail at the back of the body.
Step 3: Outline the Head and Bill
Now it’s time to outline the head in more detail. Sketch the eyes by drawing two small circles on the head, leaving some space in between them. Add a smaller circle inside each eye to represent the pupils. Next, draw a small triangle shape below the eyes to form the bill of the duck. Make sure the bill is slightly curved and pointed.
Step 4: Define the Body and Wings
Let’s add more definition to the body and wings of our duck. Start by tracing over the basic outline with your pencil, making the lines more pronounced. Add some curves and details to the wings, following the shape you sketched earlier. Don’t forget to erase any unnecessary guidelines as you go along.
Step 5: Draw the Feet and Water Ripples
A duck wouldn’t be complete without its adorable webbed feet. Sketch two curved lines coming down from the body to represent the feet, and then add three equally spaced triangles at the end of each line to create the webbed effect. Now, draw some wavy lines below the feet to represent water ripples.
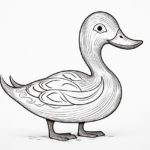
Step 6: Finalize the Outline
Take your black marker or pen and go over the final outline of your duck. Use confident, smooth strokes to make your drawing stand out. Be sure to trace over the most important lines, such as the body, wings, head, and feet. Allow the ink to dry completely before erasing any remaining pencil lines.
Step 7: Add Details and Expression
To give your duck some personality, it’s time to add some details and expressions. Use your black marker or pen to draw a small dot inside each eye to bring them to life. Add a few curved lines near the base of the bill to create the impression of feathers. You can also draw some small lines along the wings to represent the texture.
Step 8: Color Your Duck (Optional)
If you want to add some vibrant color to your paper duck, grab your colored pencils or markers and let your imagination run wild. Ducks can come in various shades, so feel free to experiment with different colors. Use a light touch when coloring and gradually build up the layers to create depth and dimension.
Conclusion
Congratulations! You’ve successfully learned how to draw a paper duck from start to finish. By following these simple steps, you can create your own flock of adorable ducks to brighten up your artwork or share with friends and family.
Remember, practice makes perfect, so don’t be afraid to experiment and try out different styles or poses. The more you draw, the more your skills will grow, and soon you’ll be able to create even more intricate and detailed artwork.
So go ahead, grab your pencil, and start quacking – there’s a whole world of creative possibilities waiting for you!