How to Draw a Hat on a Person
Learn how to draw a hat on a person with this step-by-step drawing tutorial. Add flair and style to your character drawings with different hat styles.
Materials You'll Need
- Pencil
- Paper
- Eraser
Drawing is an incredible way to express your creativity and bring your imagination to life. One fun and versatile element you can add to your artwork is a hat, which can instantly transform the personality and style of your character. Whether you want to sketch a casual baseball cap, a mysterious fedora, or a charming sunhat, knowing how to draw a hat on a figure opens up countless possibilities for storytelling and character design. Hats not only add visual interest but also help convey mood, era, or cultural background, making your drawings more dynamic and engaging.
Learning how to draw a hat on a person can seem challenging at first, especially when considering perspective, proportions, and how the hat interacts with the head and hair. This tutorial will guide you through those complexities step-by-step, focusing on techniques such as shading, contouring, and capturing fabric texture. Whether you are a beginner eager to improve your skills or an intermediate artist looking to refine your approach, this guide is designed to help you build confidence and develop a keen eye for detail. With patience and practice, you'll be able to add hats to your characters seamlessly and creatively.
So, if you're ready to enhance your character drawings and explore new creative avenues, grab your sketching tools and join me as we dive into the art of how to draw a hat on a person. By the end of this tutorial, you'll not only have a stylish hat adorning your drawing but also a deeper understanding of how accessories can enrich your artwork. Remember, every great artist started with simple steps—let's take yours today!
Materials Required
Before we begin, here are the materials you'll need for this drawing tutorial:
- Paper: Choose a smooth surface to draw on. A sketchpad or drawing paper will work well.
- Pencils: You'll need a range of pencils, including an HB or 2B for sketching and softer pencils like 4B or 6B for shading.
- Eraser: A kneaded eraser is ideal for removing any unwanted lines without smudging your drawing.
Now that you have your materials ready, let's dive into the step-by-step process.
Step 1: Sketch the Basic Head Shape
Start by sketching a circle to represent the head of your person. This will serve as a guideline for the placement of the hat. Keep the lines light and loose, as you'll be refining them later.
Step 2: Define the Hat Style
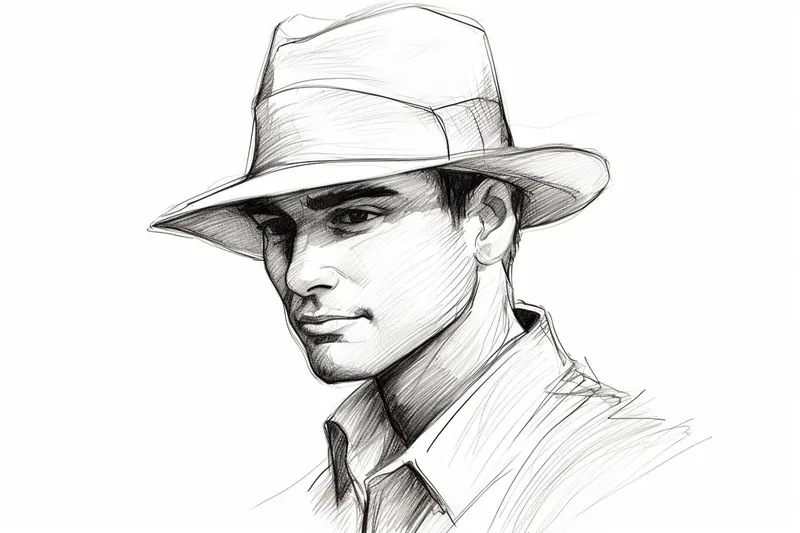
Next, decide on the style of hat you want to draw. It could be a baseball cap, a sun hat, a fedora, or any other style that catches your fancy. Imagine how the hat will sit on the head and which direction it will face. This will help you determine the angle and size of the brim.
Step 3: Draw the Brim of the Hat
Using your sketch as a guide, draw the brim of the hat. Start by lightly sketching a curved line around the head, following the shape you defined in the previous step. The brim's width and shape will vary depending on the hat style. Make sure the brim looks balanced and proportional to the head.
Step 4: Add Depth to the Brim
To give the hat a three-dimensional look, add some depth to the brim. Imagine where the light source is coming from and add shading accordingly. Use darker pencil grades, such as 4B or 6B, to create shadows on the underside of the brim. Lightly shade the top of the brim to show its curvature.
Step 5: Draw the Crown of the Hat
Now it's time to draw the crown of the hat. The crown is the part that sits on top of the head. Depending on the hat style, it may be a simple dome shape or have more intricate details. Use your sketch as a reference and draw the shape of the crown, making sure it fits well with the brim.
Step 6: Add Texture and Details
To make your hat drawing more realistic, add texture and details. If you're drawing a baseball cap, for example, sketch the stitching lines on the front panel and add small details like the brand logo or a button on top. For a sun hat, you can add some folds and creases to show its fabric.
Step 7: Refine and Clean Up
Take a step back and evaluate your drawing so far. Make any necessary adjustments to the proportions, shape, or positioning of the hat. Use an eraser to clean up any unnecessary lines and refine the edges of the hat. If you're satisfied with your drawing, you can move on to the final step.
Step 8: Add Shadows and Highlights
To give your hat more depth and dimension, add shadows and highlights. Determine where the light source is coming from and shade the appropriate areas. Use softer pencil grades for the shadows and a white pencil or eraser for the highlights. This will make the hat appear more realistic and three-dimensional.
Conclusion
Congratulations! You have successfully learned how to draw a hat on a person. With practice, you'll become more confident in adding hats to your character drawings. Remember to experiment with different hat styles and have fun exploring various textures and details. Drawing hats can greatly enhance the overall look and feel of your artwork. So grab your pencils and keep honing your skills. Happy drawing!
Fun Facts About Hat on a Person
- Hats have been used for thousands of years to signify social status and profession; for example, the Phrygian cap was a symbol of freedom in ancient times.
- The brim of a hat not only provides shade but also helps frame the face, influencing how a person's features are perceived, as explained by fashion experts.
- Drawing hats accurately requires understanding perspective and how fabric folds, which is why artists often study hat drawing tutorials to master these skills.
- The fedora, a popular hat style, gained fame in the early 20th century and was often associated with detectives and film noir characters.
- In many cultures, hats are worn during ceremonies and rituals to convey respect or spiritual significance, as documented by the Metropolitan Museum of Art.
- Baseball caps, one of the most common hat styles, originated in the 19th century and were initially part of sports uniforms, according to the Smithsonian Magazine.
- Adding a hat to a character drawing can instantly communicate personality traits, such as mystery or playfulness, a technique often used in character design.
- Sun hats are designed with wide brims to protect
Suggestions for Scenes and Settings for Hat on a Person Drawings
- A vintage 1920s jazz club scene featuring a person wearing a stylish fedora, with dim lighting and musical instruments in the background.
- A sunny beach setting where a character sports a wide-brimmed sunhat, surrounded by sand, seashells, and palm trees.
- A bustling city street with a person wearing a trendy baseball cap, headphones on, and graffiti-covered walls behind them.
- A mysterious forest scene showing a character in a tall witch's hat, with glowing eyes peeking from the shadows and twisted branches overhead.
- A countryside picnic featuring a person in a straw hat, sitting on a blanket with a basket of fruits and wildflowers nearby.
- An elegant ballroom event where a character dons a decorative top hat with feathers and ribbons, against a backdrop of chandeliers and dancers.
- A futuristic cyberpunk setting with a person wearing a sleek, tech-inspired visor hat, neon lights reflecting off metallic surfaces.
- A cozy winter scene with a character bundled up in a knitted beanie, surrounded by snow-covered trees and softly falling snowflakes.
- A cowboy riding through a dusty desert landscape, wearing a classic wide-brimmed cowboy hat with cacti and rugged mountains in the distance.
- A whimsical fairy tale forest where a character wears a floppy wizard's hat adorned with stars and moons, with magical sparkles in the air.
Fun Facts About Hat on a Person
- Hats have been used for thousands of years to signify social status and profession; for example, the Phrygian cap was a symbol of freedom in ancient times.
- The brim of a hat not only provides shade but also helps frame the face, influencing how a person's features are perceived, as explained by fashion experts.
- Drawing hats accurately requires understanding perspective and how fabric folds, which is why artists often study hat drawing tutorials to master these skills.
- The fedora, a popular hat style, gained fame in the early 20th century and was often associated with detectives and film noir characters.
- In many cultures, hats are worn during ceremonies and rituals to convey respect or spiritual significance, as documented by the Metropolitan Museum of Art.
- Baseball caps, one of the most common hat styles, originated in the 19th century and were initially part of sports uniforms, according to the Smithsonian Magazine.
- Adding a hat to a character drawing can instantly communicate personality traits, such as mystery or playfulness, a technique often used in character design.
- Sun hats are designed with wide brims to protect the wearer from harmful UV rays
Suggestions for Scenes and Settings for Hat on a Person Drawings
- A vintage 1920s jazz club scene featuring a person wearing a stylish fedora, with dim lighting and musical instruments in the background.
- A sunny beach setting where a character sports a wide-brimmed sunhat, surrounded by sand, seashells, and palm trees.
- A bustling city street with a person wearing a trendy baseball cap, headphones on, and graffiti-covered walls behind them.
- A mysterious forest scene showing a character in a tall witch's hat, with glowing eyes peeking from the shadows and twisted branches overhead.
- A countryside picnic featuring a person in a straw hat, sitting on a blanket with a basket of fruits and wildflowers nearby.
- An elegant ballroom event where a character dons a decorative top hat with feathers and ribbons, against a backdrop of chandeliers and dancers.
- A futuristic cyberpunk setting with a person wearing a sleek, tech-inspired visor hat, neon lights reflecting off metallic surfaces.
- A cozy winter scene with a character bundled up in a knitted beanie, surrounded by snow-covered trees and softly falling snowflakes.
- A cowboy riding through a dusty desert landscape, wearing a classic wide-brimmed cowboy hat with cacti and rugged mountains in the distance.
- A whimsical fairy tale forest where a character wears a floppy wizard's hat adorned with stars and moons, with magical sparkles in the air.