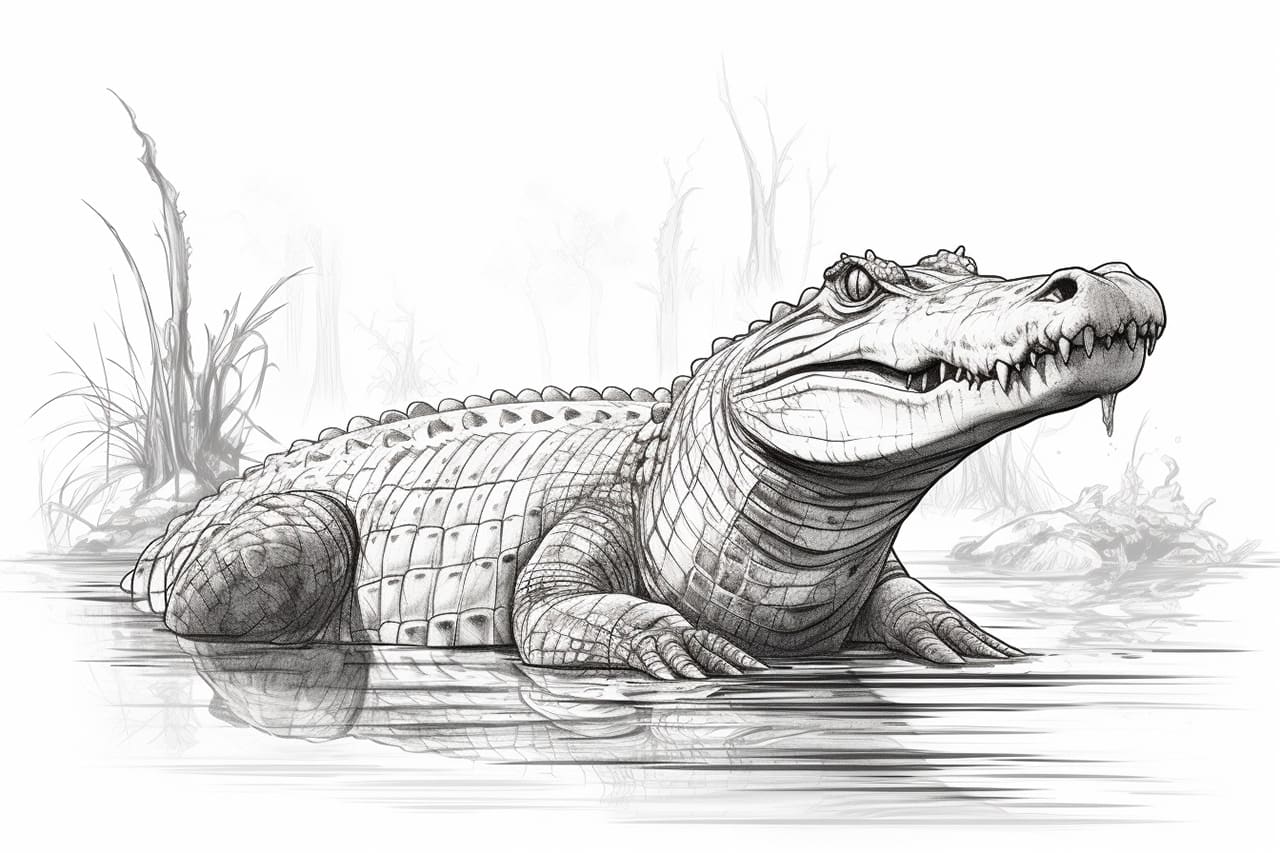
Gharials are fascinating creatures with their long snouts and unique physical features. If you’re interested in learning how to draw these magnificent creatures, you’ve come to the right place! In this step-by-step guide, I will walk you through the process of how to draw a gharial. So grab your drawing supplies and let’s dive in!
Materials Required:
Before we begin, gather the following materials:
- Pencil (preferably a set of graphite pencils with different hardness)
- Sketchbook or drawing paper
- Eraser
- Fine-tipped pen or marker (optional)
- Colored pencils or markers (optional)
Step 1: Reference Gathering
Firstly, it’s essential to have a clear reference image of a gharial to work from. This will help you understand the intricate details and proportions of the creature. You can find reference images online, in books, or even visit a local zoo to observe them in person. Make sure to choose an image that showcases the gharial from a desirable angle and captures its characteristic features.
Step 2: Basic Shapes
Start by lightly sketching the basic shapes that make up the gharial’s body. Begin with an oval for the head and a long, curved line for the body. Remember to keep your pencil strokes loose and faint, as these initial shapes will act as your guide.
Step 3: Snout and Jawline
Next, focus on refining the head shape by adding the snout and jawline. Gharials have a distinct long and slender snout. Sketch the snout by extending the shape of the head. Pay attention to the curvature of the snout and the pointy tip, which is one of their defining features.
Step 4: Eyes and Nostrils
In this step, add the eyes and nostrils to bring the gharial to life. Their eyes are small and positioned towards the top of the head. Draw two small ovals and shade the area around them to indicate the eye sockets. Place the nostrils at the end of the snout using small, circular shapes.
Step 5: Body and Tail
Now, it’s time to work on the body and tail of the gharial. Use the initial curved line as a guide to sketch the body’s outline with smooth, flowing strokes. Pay attention to the muscular structure and scales along its back. Extend the body into a long, thin tail with triangular scales, tapering it towards the end.
Step 6: Legs and Feet
Gharials have four legs that are relatively short compared to their body. Sketch the front legs near the head, positioning them slightly below the body line. Gharials have five toes on each foot, with webbing in between, which is ideal for their aquatic lifestyle. Ensure you capture the webbed structure in your drawing.
Step 7: Sketching the Details
Now that you have the basic structure in place, it’s time to add details that will make your gharial look realistic. Start by refining the head by adding the mouth, teeth, and tongue. Gharials have long, sharp teeth, so make sure to accurately represent them. Add scales along the body, tail, and legs, paying attention to the texture and patterns. Take your time during this step to ensure you capture the gharial’s intricate details.
Step 8: Shading and Texturing
To give your gharial drawing depth and dimension, focus on shading and texturing. First, determine the direction of the light source. Shade the areas that are away from the light, adding depth to the body, tail, and legs. Use a range of pencils with different hardness to achieve different shades. Add subtle details like wrinkles and textures to enhance the gharial’s appearance.
Step 9: Inking (Optional)
If you prefer a more defined look, you can outline your drawing with a fine-tipped pen or marker. This will create a more polished and finished appearance. Take your time and carefully trace over the pencil lines, ensuring smooth and confident strokes. Once the ink is dry, erase any remaining pencil marks.
Step 10: Adding Colors (Optional)
Finally, if you wish to add color to your gharial drawing, you can use colored pencils or markers. Gharials typically have a grayish or greenish-brown coloration. Observe your reference image to accurately select the appropriate colors. Layer the colors gradually, building up the tones and textures. Take your time and blend the colors smoothly for a realistic finish.
Congratulations! You’ve successfully drawn a gharial, capturing its unique features and characteristics.
Conclusion
Drawing a gharial may seem daunting at first, but by following these step-by-step instructions, you can create a stunning and realistic representation of this incredible creature. Remember to be patient with yourself and enjoy the process of bringing your drawing to life.
So, grab your pencil and reference image, and dive into the world of gharial drawing. With practice and persistence, you’ll develop your skills as an artist and create beautiful gharial drawings.