How to Draw a Flower Field in 10 Easy Steps
Learn how to draw with this step-by-step tutorial.
Materials You'll Need
- Drawing paper
- Pencil (HB or 2B)
- Eraser
- Colored pencils
- Markers
- Blending stump
- Watercolor paints
Are you ready to dive into a vibrant sea of blossoms and bring the beauty of nature to life on paper? In this step-by-step guide, we'll explore how to draw a flower field that bursts with color, energy, and charm. Whether you're a seasoned artist looking for a creative challenge or a beginner eager to try your hand at something new, this tutorial is designed to make the process simple and enjoyable.
With just a few basic materials and a touch of imagination, you'll learn how to create a lively, blooming flower field that stretches across the horizon. From layering tiny blossoms to adding depth and texture, you'll capture the essence of nature's splendor in no time. So, grab your pencils, markers, or paints, and let's journey into the artistic world of flower-filled meadows!

Learn How to Draw Flowers Step-by-Step
This simple and straightforward guide teaches you how to draw many different kinds of flowers with step-by-step instructions. It's perfect both for total beginners and experienced artists who want to expand their skills.
-
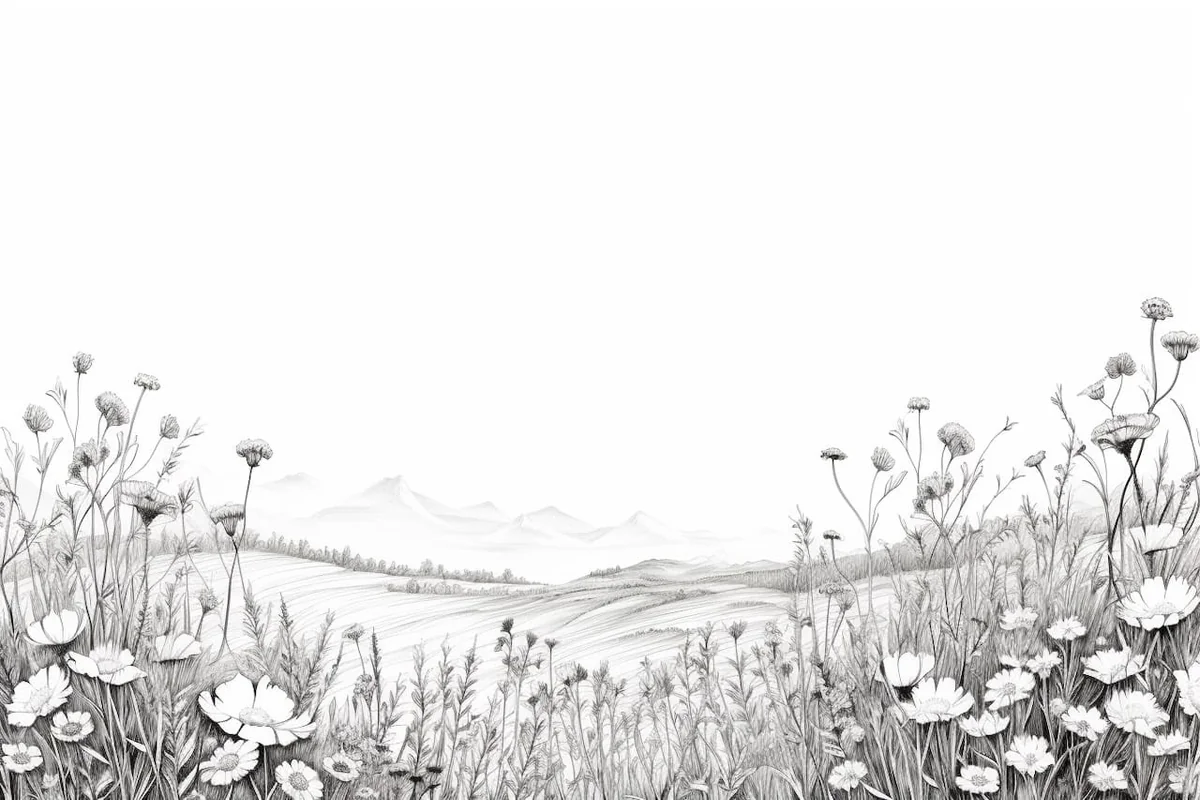
How to Draw a Flower Field: Step-by-Step GuideStep 1: Lay the Foundation with a Horizon Line
-
Seasonal Variations for Flower FieldsSpring Flower Fields: Fresh Beginnings


Materials Required
Before we begin, let's gather the materials you will need:
-
Drawing paper: Select a smooth and sturdy paper suitable for your preferred drawing medium.
-
Pencils: Have a range of pencils with different levels of hardness, such as 2B, 4B, and 6B. The 2B makes a great flower field drawing pencil.
-
Eraser: Choose a soft, non-abrasive eraser that won't damage the paper.
-
Colored pencils or markers (optional): If you wish to add color to your drawing, have some colored pencils or markers on hand.
Now that you have everything you need, let's get started on our flower field drawing!
How to Draw a Flower Field: Step-by-Step Guide
Step 1: Lay the Foundation with a Horizon Line
Step 2: Shape the Rolling Hills
Step 3: Add Distant Flowers for Depth
Step 4: Bring Focus to the Foreground Flowers
Step 5: Add Stems and Leaves for Structure
Step 6: Detail the Petals for Realism
Step 7: Enrich the Background with Trees and Bushes
Step 8: Highlight the Horizon Line
Step 9: Choose a Vibrant Color Palette (Optional)
Step 10: Add Color and Bring Your Scene to Life (Optional)
Blossoming Success: Your Flower Field is Complete!
Congratulations, artist! You've created a vibrant and lively flower field that captures the beauty of nature. From tiny, distant blooms to bold, detailed foreground flowers, your drawing is a testament to your creativity and attention to detail.
Keep practicing and experimenting with different flower types, layouts, and color schemes to develop your unique style. Whether your field is part of a larger composition or a standalone masterpiece, let it remind you of the endless possibilities in art. Let your creativity bloom, and happy drawing! ✨
Gallery of Flower Field Drawings


Seasonal Variations for Flower Fields
Drawing flower fields throughout the year offers exciting opportunities to capture nature's ever-changing palette and showcase different blooming cycles. Each season brings its own unique charm, colors, and flower varieties that can transform your artwork from a simple field into a dynamic representation of nature's rhythm.
Spring Flower Fields: Fresh Beginnings

Peak Drawing Season: March through May
Spring flower fields burst with soft pastels and delicate blooms as nature awakens from winter's slumber. This season offers some of the most enchanting drawing opportunities with its gentle color palette and sense of renewal.
Key Spring Flowers to Include:
-
Tulips - Perfect oval shapes in soft pinks, yellows, and whites
-
Daffodils - Bright yellow trumpets that add cheerful focal points
-
Crocuses - Small purple and white cups emerging from the grass
-
Wild violets - Tiny purple specks scattered throughout the field
-
Dandelions - Both yellow blooms and white seed heads for variety
Spring Color Palette: Use soft, muted tones like pale yellows, lavender, soft pinks, and fresh greens. Add touches of deeper purple and bright yellow for contrast. The overall feeling should be light and airy, with plenty of white space to suggest the crisp spring air.
Drawing Tips for Spring Fields:
-
Show flowers at different stages of blooming - some buds, some fully open
-
Include patches of bare earth where new growth is just emerging
-
Add morning dew drops on petals for extra sparkle
-
Draw some flowers slightly bent from spring rain
Summer Flower Fields: Bold and Vibrant

Peak Drawing Season: June through August
Summer brings the most dramatic and colorful flower fields, with blooms at their fullest and most vibrant. This is when your artwork can really pop with bold colors and abundant detail.
Key Summer Flowers to Include:
-
Sunflowers - Large, commanding presence with bright yellow petals
-
Poppies - Brilliant red blooms that create stunning focal points
-
Cornflowers - Bright blue additions that complement warm tones
-
Black-eyed Susans - Golden yellow with dark centers
-
Lavender - Purple spikes that add vertical interest
Summer Color Palette: Embrace bold, saturated colors - deep reds, bright yellows, rich purples, and vibrant oranges. Use warm greens for foliage and add touches of blue sky visible between the blooms.
Drawing Tips for Summer Fields:
-
Layer flowers densely to show abundance
-
Include flying bees and butterflies for movement
-
Show full, heavy blooms with some flowers drooping from their weight
-
Add visible pollen on flower centers
-
Create depth with overlapping petals and varied flower heights
Autumn Flower Fields: Warm and Rustic

Peak Drawing Season: September through November
Fall flower fields offer a completely different aesthetic with warm, earthy tones and the last blooms before winter. This season is perfect for creating cozy, rustic artwork.
Key Autumn Flowers to Include:
-
Chrysanthemums - Full, round blooms in oranges and deep yellows
-
Asters - Purple star-like flowers
-
Goldenrod - Tall yellow sprays
-
Marigolds - Bright orange and yellow ruffled blooms
-
Late sunflowers - Some fresh, others going to seed
Autumn Color Palette: Focus on warm earth tones - burnt oranges, deep yellows, rusty reds, and golden browns. Mix in some deep purples and add touches of brown for stems and dried elements.
Drawing Tips for Autumn Fields:
-
Include some flowers going to seed or slightly wilted
-
Add fallen petals scattered on the ground
-
Show varied stages of bloom - some vibrant, others fading
-
Include autumn leaves mixed among the flowers
-
Use warmer, more muted lighting to suggest shorter days
Winter Flower Fields: Subtle Beauty

Peak Drawing Season: December through February
While most flowers have finished blooming, winter flower fields offer their own quiet beauty with dried seed heads, evergreen elements, and the occasional hardy bloom.
Key Winter Elements to Include:
-
Dried seed heads - From sunflowers, poppies, and other summer blooms
-
Ornamental grasses - Tall, golden plumes swaying in winter wind
-
Rose hips - Bright red berries on thorny stems
-
Evergreen sprigs - Small pine or fir branches scattered throughout
-
Hardy pansies - Small colorful faces peeking through frost
Winter Color Palette: Use muted tones - soft grays, pale blues, subtle browns, and cream colors. Add small touches of red from rose hips or the occasional hardy bloom.
Drawing Tips for Winter Fields:
-
Show texture in dried stems and seed heads
-
Include frost or snow dusting on dried elements
-
Draw bare patches of earth between plant remnants
-
Add winter birds like cardinals for spots of color
-
Use lighter, more delicate line work to suggest the sparse landscape
Transitional Seasons: Capturing Change
Early Spring (February-March): Show the excitement of first buds breaking through snow or frost. Include both winter remnants and new growth in the same field.
Late Summer to Early Fall (August-September): Combine the abundance of summer with the first hints of autumn colors. Show some flowers at peak bloom while others begin to fade.
Seasonal Drawing Exercise
Try creating a series of four drawings of the same flower field composition, changing only the flowers and colors to represent each season. This exercise helps you understand how the same landscape can tell completely different stories throughout the year.
Pro Tip: Keep a seasonal reference journal with photos or sketches of flowers you observe throughout the year. This will help you accurately capture the unique characteristics of each season when drawing your flower fields.
By understanding and incorporating seasonal variations, your flower field drawings will become more dynamic, realistic, and emotionally resonant with viewers who recognize the natural rhythms you've captured on paper.
Fun Facts About Fields of Flowers
-
Fields of flowers occur naturally and through cultivation, from wild meadows full of native blooms to carefully planted tulip and lavender fields.
-
Wildflower meadows are biodiversity hotspots, supporting bees, butterflies, birds, and countless tiny critters that keep ecosystems healthy.
-
Flowering fields often follow seasonal cycles—spring brings tulips and poppies, while summer is peak time for daisies, sunflowers, and lavender.
-
Some flower fields, like the tulip fields of the Netherlands or the super blooms in California, are so vibrant they can be seen from space!
-
Flowers in a field compete for sunlight, pollinators, and nutrients—but many also cooperate, attracting bees that benefit them all.
-
The vibrant colors of a flower field are more than just pretty—they're survival strategies, designed to lure pollinators with visual flair.
-
A single field might contain dozens of flower species, from tall stalks like foxgloves to low creepers like clover or violets.
-
In folklore, flower-filled meadows are often seen as enchanted places, where fairies play, magical creatures hide, or secret doors appear.
-
Some flowers only bloom for a day or two, creating magical windows of time where the field is at its most breathtaking.
-
Artists, photographers, and nature lovers alike flock to flower fields because they offer soothing color palettes, dreamy light, and endless inspiration.
Tip: To truly capture the essence of a flower field, consider using a variety of brush strokes and techniques to add texture and depth to your drawing. Start by using a light hand to sketch the outlines of your flowers and foliage, then transition to thicker, bolder strokes for the petals and leaves to create dimension. Experiment with layering colors; for instance, apply a base color for each flower and then add highlights and shadows with slightly darker or lighter shades to make them pop.
Additionally, using a blending tool or your fingers can help to soften transitions between colors and create a more natural look. Don't forget to step back periodically to assess your composition and make adjustments as needed—this will help you maintain balance and harmony across your flower field!
Suggested Scenes and Settings for Field of Flowers Drawings
-
Sunrise Over the Blooms: Draw a field bathed in warm morning light, dew sparkling on petals, with tall grasses swaying gently in the breeze.
-
Butterfly Gathering: Create a scene filled with fluttering butterflies visiting wildflowers—poppies, daisies, and cornflowers scattered in the grass.
-
Picnic in the Meadow: Illustrate a cozy blanket, a basket of treats, and a pair of shoes kicked off in the middle of a flower-filled field.
-
Winding Path Through Color: Show a dirt path or narrow trail snaking through a field of vibrant blooms, inviting the viewer to take a stroll.
-
Flower Field at Dusk: Picture soft purples and oranges in the sky as evening sets in, with glowing fireflies dancing above the flowers.
-
Fantasy Meadow: Design a surreal flower field where blossoms glow, hum, or sway with magical energy—perfect for fairies, elves, or dreamy creatures.
-
Child Running Through Flowers: Capture the joy of a child or character dashing through waist-high blooms, arms wide and petals flying.
-
Bee's Eye View: Create a close-up scene from a bee's perspective, with towering stems and pollen-laden blooms surrounding the view.
-
Storm Rolling In: For a dramatic take, show a field under an approaching thunderstorm, petals ruffling in the wind and clouds brewing overhead.
-
Seasonal Shift: Illustrate a single field transitioning through the seasons—spring buds, summer full bloom, autumn petals falling, and winter frost on the stems.